
How to Get Rid of Thrips on Indoor Plants for Good: A Complete Guide
Silver streaks on your leaves. Stunted growth. Tiny, fast-moving insects taking over your grow tent. This isn't just a minor nuisance-it's a full-blown thrips infestation that can wipe out your entire harvest before you know it. You need a fast, effective solution that protects your investment, and you're right to be wary of harsh chemicals that could do more harm than good to your valuable plants. The damage is escalating, and you need a plan that works, right now.
This guide is that plan. Forget guesswork and ineffective home remedies. We provide a clear, step-by-step Integrated Pest Management (IPM) strategy used by professional growers to achieve total control. You will learn exactly how to identify these destructive pests, deploy a range of safe and powerful treatments to eradicate them completely, and fortify your indoor garden or grow tent to prevent them from ever returning. It's time to stop the damage, restore your plants to peak health, and secure your future harvests.
What Are Thrips? Know Your Enemy
If you've noticed silvery patches or tiny black specks on your plant leaves, you may have an infestation of thrips. These pests are one of the most common and frustrating problems for UK indoor and hydroponic growers, capable of causing significant damage if not dealt with swiftly. They are incredibly small, winged insects; for a detailed biological profile, Wikipedia provides a comprehensive overview of thrips, but what you really need to know is how they destroy your plants.
Thrips feed by piercing the surface of plant cells and sucking out the contents. This feeding method leaves behind characteristic silvery, stippled marks on leaves and can stunt growth, deform flowers, and reduce your final yield. Their most dangerous trait is their rapid reproduction rate. A few unnoticed adults can quickly escalate into a full-blown infestation that is much harder and more costly to control. Early detection isn't just a good idea-it's essential to protecting your investment.
Identifying Thrips: Adults vs. Larvae
Spotting thrips requires a sharp eye. Because they are so small, a jeweller's loupe or magnifying glass is a must-have tool for positive identification. You are looking for two distinct forms:
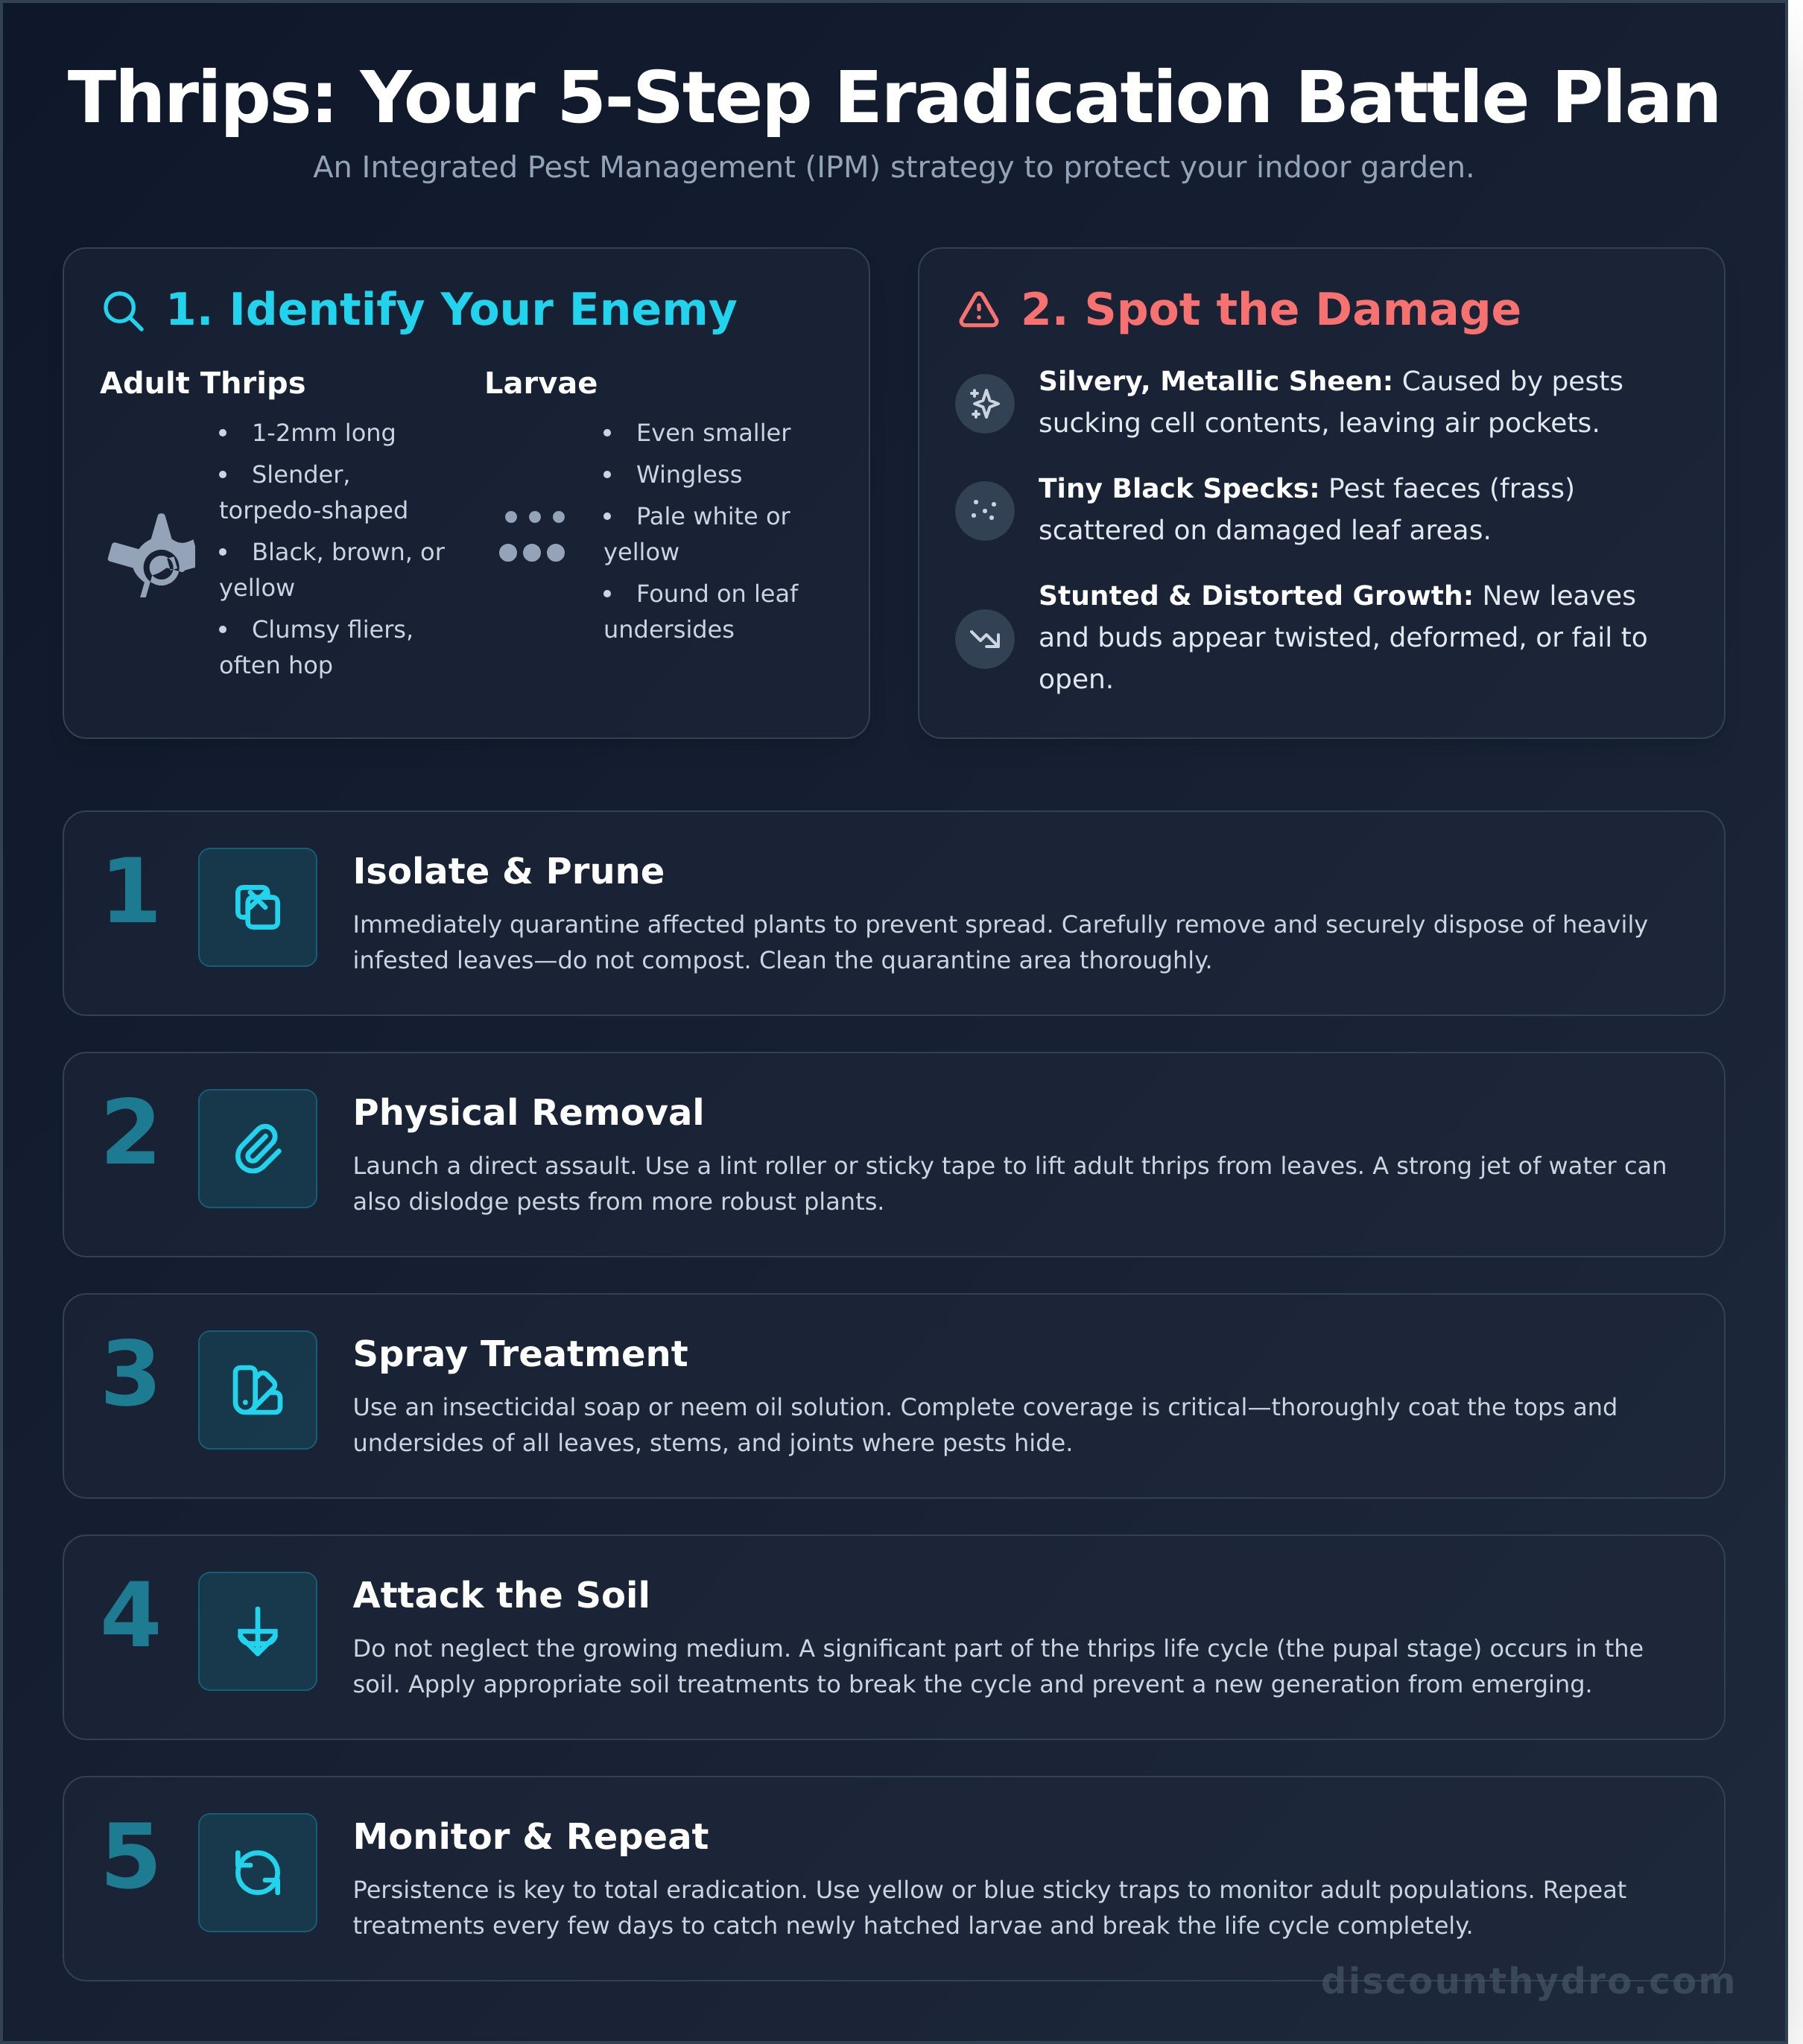
- Adults: These are slender, torpedo-shaped insects, typically only 1-2mm long. Depending on the species, they can be black, brown, or yellowish. They have distinctive fringed wings but are clumsy fliers, often seen hopping or making short jumps when disturbed.
- Larvae: The larvae are even smaller, wingless, and usually pale white or yellow. You will often find them in groups on the underside of leaves or within new growth, actively feeding.
The Thrips Life Cycle: Why It Matters
To effectively eliminate these pests, you must understand their life cycle. A single-application spray won't work because different stages are protected from treatment. The cycle has four key stages: egg, larva, pupa, and adult. The biggest challenge for growers is that the most vulnerable stages are often the hardest to reach. Eggs are laid directly inside plant tissue, and the pupal stage often occurs in your growing medium or soil. This means that even if you kill every adult and larva on your plants, a new generation is waiting to emerge. Breaking this cycle is the only path to total eradication.
Signs of Thrips Damage: Spotting an Infestation Early
By the time you see the damage, the pests are already established. For growers, spotting the signs of a thrips infestation early is critical to protecting your yield and investment. Don't wait for your crop to suffer. Regular plant inspections are non-negotiable. A quick and effective method is the 'white paper test': simply shake an affected leaf over a white sheet of paper. Any tiny, slender insects that fall are likely your culprits.
Be aware that the silvery stippling damage can sometimes be mistaken for a nutrient deficiency, leading to wasted time and incorrect treatments. Understanding these signs is the first step in effective pest control, a core principle in established Thrips Management Guidelines. Acting fast saves money and protects your harvest.
Classic Leaf Damage Symptoms
The most common sign of thrips is a distinctive silvery, metallic sheen on the leaf surface. This is caused by the insects piercing the plant cells and sucking out the contents, leaving behind empty, air-filled pockets. You will also notice tiny black specks scattered across the damaged areas - this is their faeces, known as frass. In a severe infestation, new growth will appear twisted, distorted, or stunted as the pests feed on developing tissues.
Damage to Flowers and Fruits
When these pests attack flowering and fruiting plants, the damage directly impacts your final product. Their feeding can cause developing buds to become deformed, discoloured, or fail to open at all. On open flowers, you'll see spotting and streaking on the petals. For fruit-bearing crops, this pest causes scarring or a rough, bronze-like texture on the skin of developing fruits. This damage is irreversible and severely reduces the market value and quality of your harvest.
Your 5-Step Battle Plan: How to Eliminate Thrips Effectively
Dealing with a thrips infestation requires more than a single spray-and-pray approach. To protect your investment, you need a systematic strategy known as Integrated Pest Management (IPM). This multi-pronged attack hits the pests at every stage of their life cycle. Relying on one method is a recipe for failure. Consistency and persistence are the keys to winning this fight. Follow this 5-step plan to get the job done.
Step 1: Isolate and Prune
The moment you confirm an infestation, act fast. Quarantine the affected plant immediately to stop the spread to other valuable crops.
- Prune Damage: Carefully remove any leaves or stems showing heavy infestation or damage. Look for the tell-tale silvery stippling.
- Secure Disposal: Place all pruned material directly into a sealed bag and dispose of it in your outside bin. Do not compost it-you will only reintroduce the pests later.
- Clean the Area: Wipe down the quarantine area, including pots, trays, and surfaces, with soap and water to eliminate any stray adults or eggs.
Steps 2 & 3: Physical Removal & Spraying
With the plant isolated, your next move is a direct assault. Start with physical removal: use a lint roller or sticky tape to lift adult thrips directly off the leaves. For tougher plants, a strong jet of water can dislodge many of them. Follow up immediately with a thorough spray. An insecticidal soap or a quality neem oil solution is your best first-line defence. When mixing, follow the product instructions precisely. It's crucial to get complete coverage-coat the tops and undersides of all leaves, stems, and leaf joints where pests hide. For more detailed guidance on application methods, the Missouri Botanical Garden offers an excellent resource on how to control thrips indoors, confirming the effectiveness of these treatments.
Steps 4 & 5: Attack the Soil and Monitor
Many growers fail because they only treat the foliage. The thrips life cycle includes a pupal stage in the growing medium, so you must treat the soil to break the cycle. A simple and effective method is to apply a top layer of food-grade diatomaceous earth, which will dehydrate and kill pupae near the surface. Finally, deploy your surveillance system. Place yellow or blue sticky traps just above the plant canopy and near the base. These traps are not just for catching flying adults; they are your early warning system, allowing you to monitor the population and gauge the effectiveness of your treatment plan.
Choosing Your Weapons: The Best Thrips Control Products
Once you’ve identified the enemy, it’s time to assemble your arsenal. A successful battle plan against a thrips infestation requires the right tools for the job. Below, we break down the most effective control products by function, focusing on solutions that are safe and proven for indoor growing environments. This is your guide to choosing the best weapons to reclaim your grow room.
Physical Traps and Barriers
Your first line of defence is monitoring and trapping. Adult thrips are instinctively attracted to specific colours, which you can use to your advantage. Blue and yellow sticky traps are essential for catching winged adults, helping you gauge the scale of the problem and reduce their numbers. For maximum effect, hang traps just above the plant canopy where adults are most active and place a few near any intake vents to catch invaders before they settle. As a preventative measure, fitting fine insect netting over your intake vents can stop them from getting in at all.
Shop our range of sticky traps and barriers here.
Effective Organic Sprays
For active infestations, you need direct knockdown power. Organic sprays offer a potent solution without resorting to harsh synthetic chemicals. Always follow the label instructions precisely and test any spray on a single leaf 24 hours before treating the entire plant.
- Neem Oil: A true multi-tasker, neem oil acts as a repellent, an anti-feedant (stops them from eating), and a growth regulator that disrupts the insect life cycle. It's a fantastic preventative and treatment for low-level issues.
- Insecticidal Soaps: These work on direct contact, dissolving the waxy outer shell of soft-bodied insects like thrips, causing dehydration and death. Thorough coverage, especially on the underside of leaves, is critical.
- Pyrethrum-Based Sprays: Derived from chrysanthemum flowers, pyrethrum is a powerful, fast-acting natural insecticide that attacks the pest's nervous system. It’s a stronger option for tackling more established infestations quickly.
Biological Controls: Using Nature's Predators
Fight pests with pests by introducing their natural enemies to your grow room. This is a clean, long-term strategy ideal for prevention or controlling minor outbreaks. Predatory mites like Amblyseius cucumeris are relentless hunters of thrips larvae on foliage. For the soil-dwelling pupae stage, beneficial nematodes such as Steinernema feltiae can be watered into your growing medium to attack them where they hide. Remember, biological controls need time to establish a population, so they are not a quick fix for a heavy infestation.
Prevention Is Key: How to Keep Thrips from Coming Back
You’ve fought the battle and won, but the war against pests is never over. The most effective long-term strategy for a pest-free grow room is prevention. Eradicating a full-blown infestation is costly, time-consuming, and can seriously impact your final yield. Setting up a strong defence is far easier and cheaper than mounting an attack. A clean, controlled, and closely monitored environment is your best weapon against a future invasion of thrips and other common pests.
Follow this checklist of best practices to keep your grow space secure and your plants protected.
Maintain Strict Grow Room Hygiene
Pests thrive in messy environments. By keeping your grow room spotless, you eliminate potential hiding spots and breeding grounds. A clean room is the foundation of any integrated pest management (IPM) strategy. Make these steps part of your daily and weekly routine:
- Remove Debris Daily: Clear away all fallen leaves, dead plant matter, and growing medium spills immediately.
- Clean Surfaces Regularly: Wipe down floors, walls, trays, and equipment with a suitable cleaning solution between cycles.
- Change Your Clothes: Avoid wearing the same clothes and shoes you wore outside into your grow room, as pests can easily hitch a ride.
Quarantine All New Plants
This is one of the most critical and overlooked steps. New plants or clones are the number one vector for introducing pests into a sterile environment. Sourcing from a reputable professional with high standards for plant health, like a dedicated local florist, can significantly reduce this risk. For example, businesses like Bliss Fleurs depend on providing pest-free plants and have robust prevention strategies. Regardless of the source, never bring a new plant directly into your main grow space. Isolate any new additions for at least two weeks in a separate area. Inspect them thoroughly every few days for any signs of pests. For complete peace of mind, treat them with a preventative pest control spray before introducing them to the rest of your crop.
Consistent Monitoring with Sticky Traps
You can’t fight what you can’t see. Blue or yellow sticky traps are a low-cost, highly effective early warning system. Keep them placed just above the plant canopy throughout your grow room at all times. Check them every 2-3 days. Catching the first one or two adult thrips is a game-changer, allowing you to take immediate, targeted action before they can lay eggs and establish a population. This proactive monitoring saves you money, time, and stress down the line.
By making these preventative measures a habit, you create a fortress that pests can't breach. Stock up on all your grow room essentials, from cleaning supplies to sticky traps, at the UK's best prices.
Win the War Against Thrips for Good
Dealing with a thrips infestation is tough, but victory is achievable. Remember the key takeaways from this guide: early detection is critical, a consistent multi-step treatment plan is non-negotiable, and proactive prevention is your ultimate long-term defence. By staying vigilant and interrupting their life cycle, you can eliminate these pests from your indoor garden for good.
You have the strategy; now it's time to arm yourself. We stock a wide selection of professional-grade pest control products from top brands, all at competitive prices. Get everything you need with fast, discreet UK-wide delivery so you can act immediately. Don't let pests compromise your yield.
Shop our full range of pest control solutions and get your grow room protected.
Stay one step ahead of pests and grow with confidence.
Frequently Asked Questions About Thrips
Can thrips fly into my house or grow tent?
Yes. Adult thrips have fringed wings and are weak fliers, but they are easily carried by wind through open windows, doors, and ventilation systems. They can also hitch a ride on clothing or new plants. For a grow tent, using a high-quality filter on your air intake is a critical first line of defence to prevent them from getting to your crop and causing damage before you even notice they are there.
Are thrips harmful to humans or pets?
No, thrips pose no direct harm to people or common household pets like cats and dogs. They do not bite, sting, or transmit diseases to mammals. Their entire life cycle is focused on feeding on and reproducing on plants. The only threat they present is to the health and yield of your crops, making them a serious nuisance for growers but not a physical danger to your family or animals.
How long does it take to completely get rid of a thrips infestation?
Eradicating a thrips infestation typically takes several weeks of consistent treatment. Because their life cycle includes egg, larval, pupal, and adult stages, you must break the cycle completely. Expect to apply treatments every 5-7 days for at least 3-4 weeks to ensure you have eliminated all generations. The exact timeline depends on the severity of the infestation and the effectiveness of your chosen control products.
Will thrips live in the soil of my potted plants?
Yes, the soil or growing medium is a critical part of the thrips life cycle. After feeding on the leaves, the larvae drop down to pupate in the top layer of the substrate. This is why foliar sprays alone are often not enough to solve the problem. To effectively control thrips, you must also treat the growing medium with solutions like beneficial nematodes or a soil drench to target them at this vulnerable pupal stage.
Do I need to throw away my plants if they have thrips?
In most cases, you do not need to discard your plants. A timely and persistent treatment plan using insecticidal soaps, neem oil, or beneficial insects can save a plant from a moderate infestation. You should only consider disposing of a plant if it is extremely heavily infested and the damage is irreversible, as it can act as a breeding ground that infects the rest of your grow room. Act fast to avoid this outcome.
Why are blue sticky traps sometimes recommended for thrips instead of yellow?
While standard yellow sticky traps will catch a wide variety of pests, including some thrips, blue traps are specifically more attractive to most species of adult thrips. Research has shown that their visual systems are highly drawn to the colour blue. Using blue traps provides a more accurate way to monitor for the presence of thrips and is more effective for mass trapping this specific pest, making your control efforts more targeted and efficient.