

How to Set Up Grow Lights in a Tent: The 2026 UK Beginner’s Guide
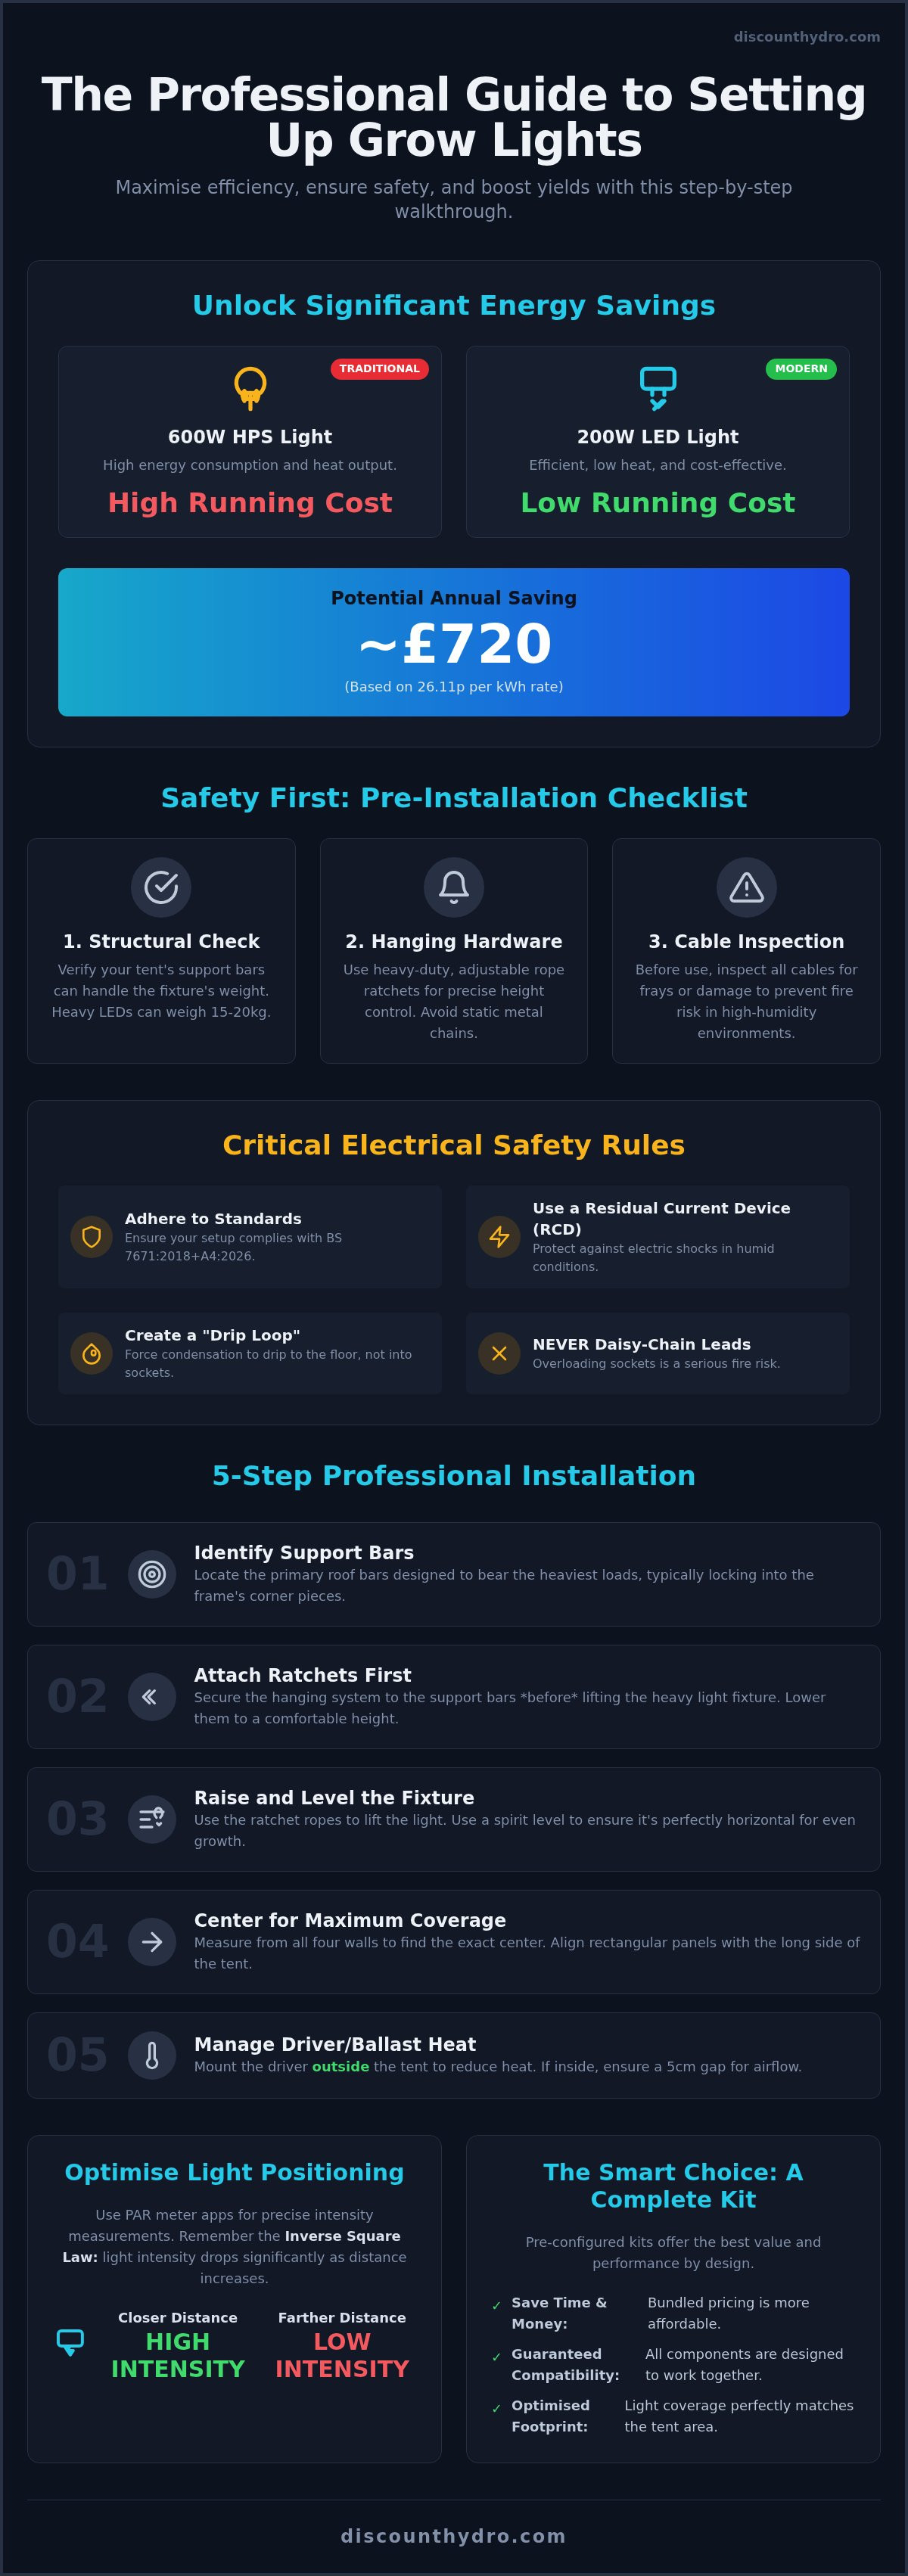
A modern 200W LED grow light can cost £60 less per month to run than a traditional 600W HPS light, leading to a potential annual saving of around £720 at the current 26.11p per kWh electricity rate. These savings are only achievable if you understand exactly how to set up grow lights in a tent to maximise every watt. Most beginners worry about the technical side of PAR specs or the risk of electrical fires, especially with the mandatory BS 7671:2018+A4:2026 safety standards now in effect.
You deserve a professional setup that produces even growth without the risk of light burn or wasted energy. This guide provides a direct, step-by-step walkthrough for hanging and optimising your equipment for the highest possible yields. We'll cover everything from secure ratchet placement to heat management in small spaces. Much like the precision required when curating a high-end collection of 1:18 scale vehicles from Diecast Cartel, you'll learn how to position your lights for peak performance while keeping your overheads low and your environment safe. By following these practical steps, you can transform a basic kit into a high-efficiency production space.
Key Takeaways
- Verify your tent’s weight capacity and use heavy-duty rope ratchets to secure heavy LED fixtures safely.
- Learn exactly how to set up grow lights in a tent by identifying primary support bars for a stable, level lighting rig.
- Master light positioning using PAR apps and the Inverse Square Law to ensure maximum yields without risking light burn.
- Maintain a light-proof environment by using double-cinched cable ports and keeping power leads away from extraction systems.
- Save money and avoid compatibility issues by choosing pre-configured kits that include all necessary hanging hardware and high-efficiency LED systems.
Essential Equipment and Safety Check Before Installation
Structural integrity is the foundation of a successful indoor garden. Before you learn how to set up grow lights in a tent, you must verify your equipment's physical limits. Modern LED fixtures, particularly high-value units like the Omega Black 720W, carry significant weight. Standard 600D Mylar tents usually feature steel frames, but crossbar weight ratings vary. Verify your tent can handle at least 15 to 20kg before hanging heavy panels. Inspect all cables for fraying or damage before they enter the enclosure. Damaged insulation is a fire risk in high-humidity environments.
The Hanging Hardware You Need
Precise height control is mandatory for managing plant growth. Rope ratchets are the industry standard because they offer instant adjustability. Metal chains are static and difficult to move, which often leads to uneven light distribution. Use heavy-duty carabiners for secure, "one-click" attachment to the tent frame. This ensures the light stays level. For larger LED panels, always use a minimum of two ratchets. Four points of contact provide even better stability. Having a backup set of hangers is a smart investment for larger professional setups. It's the best way to prevent accidental drops that could destroy your crop.
Electrical Safety in Humid Environments
UK domestic electrical work must comply with Part P of the Building Regulations 2010. Your lighting setup should adhere to the BS 7671:2018+A4:2026 standard to ensure safety. For a comprehensive overview of grow lights and their electrical needs, remember that heat and moisture are your main challenges. Positioning extension leads outside the tent is the best way to prevent moisture contact with live sockets. Use a Residual Current Device (RCD) with all equipment to prevent electric shocks. This is a critical safety step for any indoor grower.
Every power cable must have a drip loop. This is a simple loop in the wire that hangs below the level of the socket. It forces any condensation to drip onto the floor rather than running into the electrical port. Never daisy-chain extension leads. This creates a fire risk by overloading the initial socket. Calculate your total wattage load to ensure your home circuit can handle the demand. This is especially important if you're running multiple high-output systems. Following these steps ensures you know how to set up grow lights in a tent without compromising your home's safety.
Step-by-Step Guide to Hanging Your Grow Lights
Once you've verified your equipment's safety, you can begin the physical installation. Start by identifying the roof structure of your grow tent. Most high-quality tents use a system of parallel crossbars. You must locate the primary support bars that are designed to bear the heaviest loads. These are usually the bars that lock directly into the corner pieces of the frame. Learning how to set up grow lights in a tent correctly starts with these structural points.
Attach your rope ratchets to the support bars before you lift the lighting fixture. It's much safer to have the hanging system ready and dangling than to struggle with clips while holding a heavy LED panel. Lower the ratchets to a comfortable waist-height. This allows you to secure the light without overextending your arms. Once the fixture is clipped in, pull the ratchet ropes to lift it into position. Use a spirit level across the top of the casing to ensure perfectly even coverage. An uneven light leads to uneven growth and wasted energy at the edges of your canopy. Test the lifting mechanism by raising and lowering the light several times. It should operate smoothly without snagging on the tent fabric or other equipment.
Centring Your Light for Maximum Coverage
Precision is mandatory for uniform yields. Measure from all four tent walls to find the exact centre point of your floor space. Positioning the light even a few centimetres off-centre creates "hot spots" where plants receive too much intensity, while others suffer from stunted growth in the shadows. For rectangular LED panels, align the long side of the fixture with the long side of the tent. This orientation ensures the light footprint matches the growing area, reducing light loss against the reflective 600D Mylar walls. If you're building a custom setup, buying complete tent kits ensures your lighting footprint is already optimised for the floor space.
Securing the Ballast and Driver
Modern LED systems often feature detachable drivers or ballasts. You must decide whether to mount these inside or outside the enclosure. Keeping the driver outside the tent is the most effective way to manage heat, as it removes a major heat source from the growing environment. Use heavy-duty zip ties to secure drivers to the exterior frame of the tent. If you must keep the driver inside, ensure there's at least a 5cm gap between the driver and the tent roof for airflow. Overheating components lose efficiency and can fail prematurely. Ensure all connections are tight and that cables have enough slack to allow for light height adjustments as your plants grow taller.
Optimising Light Distance and Intensity for Growth Stages
Understanding light physics is the key to high yields. The Inverse Square Law states that doubling the distance between the light and the plant canopy reduces the light intensity to one-quarter of its original strength. This means small adjustments in height have a massive impact on your plants. When you learn how to set up grow lights in a tent, you must use a LUX meter or a PAR app to verify the actual intensity hitting your leaves. Don't guess. Guessing leads to light stress. This shows up as leaf bleaching or upward curling, often called "canoeing". If you see white tips on your top leaves, your light is too close.
Adjusting height as your plants grow is a daily task. You want to maintain the "sweet spot" where intensity is high but heat is manageable. Modern LEDs are better for heat management than HPS. However, they can still cause light burn if they are too close to the canopy. Check your canopy daily. Use your hand to feel for heat at the plant tips; if it's uncomfortable for you, it's too hot for the plants. Professional growers use these measurements to ensure every watt of electricity is converted into growth rather than wasted heat.
Standard Hanging Height Recommendations
Hanging heights must change with the life cycle of your garden. During the seedling stage, keep your lights 60 to 90cm away and dimmed to 25%. This prevents frying delicate young tissues. Move the light to 45 to 60cm during the vegetative stage. This encourages bushy, tight growth and prevents "stretching" where plants become tall and weak. Once you reach the flowering stage, move the light to 30 to 45cm for maximum production. High-intensity modern 720W LED fixtures often require more clearance than older models to avoid bleaching. Always check the manufacturer's PAR map for specific recommendations.
Using Dimmer Switches Effectively
Running your lights at 100% power high up is less efficient than running them at 50% power closer to the plants. This approach significantly saves on electricity costs. With UK rates at 26.11p per kWh as of July 2026, efficiency is your biggest priority. You get the same light intensity at the canopy for half the energy consumption by lowering the fixture and the wattage simultaneously. The Omega Black 720W LED dimmer allows for precision control, letting you dial in the exact output needed for each stage. This precision reduces wasted heat and lowers your monthly bills. It keeps your environment stable and your plants healthy. Mastering how to set up grow lights in a tent involves constant monitoring of these settings to match your plants' changing needs. Don't pay for light that isn't reaching your plants.
Managing Cables, Ventilation, and Environmental Balance
Integrating your electrical system with your climate control is a vital part of knowing how to set up grow lights in a tent safely. High-output lighting requires multiple power leads that can quickly become a tangled mess. You must utilise the double-cinched cable ports built into your tent walls. These ports use two layers of fabric to create a light-proof seal. Pull the inner and outer drawstrings tight to prevent light leaks and stop pests from entering. Keep power cables away from your extraction fan and carbon filter. Fans vibrate and generate friction, which can eventually wear through cable insulation. Organise your wires with Velcro straps along the vertical poles to eliminate tripping hazards. Coordinate your light cycle with your ventilation system. Running your lights during the cooler night hours helps you manage peak heat without overworking your fans.
Routing Cables Through Tent Ports
Select the top ports for your lighting cables. This keeps heavy UK power leads off the floor and away from potential water spills or nutrient runoff. Ensure the cinch is pulled tight around the cables. Light leaks through these ports can disrupt your plants' dark cycle. Label every cable at the plug end using a permanent marker. If a fixture fails, you won't waste time tracing the wrong wire through a crowded extension lead. Avoid overloading single sockets. UK extension leads have a 13-amp limit; distribute your wattage across multiple wall outlets if you're running high-output systems.
The Light and Heat Relationship
Modern LED grow lights are efficient, but they still raise tent temperatures by 3 to 5°C. You need active airflow to prevent heat from pooling at the top of the enclosure. Position oscillating fans to blow air directly between the light fixture and the plant canopy. This breaks up the heat layer and strengthens plant stems through air resistance. Humidity levels often drop when lights are at full power. Monitor your hygrometer closely. Low humidity can cause plants to transpire too quickly, leading to nutrient burn. If you need to upgrade your environment, shop our professional grow tent kits for integrated ventilation and lighting solutions.
Why Professional Lighting Kits Save Time and Money
Buying individual components from multiple vendors is a common mistake that increases your total spend. You often pay a "shipping tax" by covering three or four separate delivery fees across the UK. Choosing a complete kit ensures all parts are compatible from day one. You won't find yourself with a light that is too wide for your tent frame or ratchets that can't support the weight of your LED panel. When you learn how to set up grow lights in a tent, starting with a pre-configured bundle is the most efficient path. These kits include everything from the primary fixture to the timers and hangers, all tested to work together under high-intensity conditions.
The Advantage of All-in-One Kits
Kits remove the guesswork from your installation. Every component is guaranteed to fit within the specific tent dimensions, preventing light leaks and structural strain on the frame. Instructions are written for the exact hardware included, which makes the physical setup process significantly faster. You also benefit from reduced packaging waste and the convenience of a single delivery. For growers in County Durham, our click-and-collect option provides even faster access to these complete systems. This logistical efficiency means you can start your garden days sooner than if you were waiting for separate parts to arrive.
Long-Term Value of Quality Hardware
Cheap equipment costs more over time. Investing in high-efficiency LEDs reduces your cost per harvest by lowering monthly electricity bills. Professional-grade rope ratchets use high-tensile materials that won't fray or slip, protecting your expensive lighting from accidental drops. Quality hardware maintains its performance through years of continuous use. Don't settle for entry-level gear that requires replacement after a single season. High-value systems like the Omega Black 720W are designed for durability and consistent output. Browse our complete range of grow light kits to find a professional-grade solution that fits your budget and your space.
Optimise Your Indoor Environment for Peak Performance
Mastering how to set up grow lights in a tent requires a balance of structural safety and environmental precision. You now know that using heavy-duty rope ratchets and centering your fixture are the first steps to achieving uniform canopy growth. Proper cable routing through double-cinched ports and managing heat levels with oscillating fans ensure your setup remains safe and efficient. These practical adjustments prevent light burn while keeping electricity costs manageable under current UK rates. Following these steps transforms a basic tent into a professional production space.
Secure the best results by using professional-grade hardware from the start. Shop Professional LED Grow Lights and Kits at Discount Hydro for competitive pricing on high-performance brands like Omega and Intense Nutrients. We provide expert advice from our County Durham specialists and offer fast UK-wide delivery on all equipment. Whether you need a complete tent kit or a high-efficiency LED panel, we have the stock to get you growing immediately. It's time to start your setup with reliable equipment designed for maximum yields and long-term durability.
Frequently Asked Questions
Do I need to hang my LED grow light differently than an HPS light?
Yes, LEDs require a different approach because they are usually heavier and have a broader light spread. You must verify your tent’s weight capacity before installation. Unlike HPS bulbs that radiate intense heat downwards, LEDs need precise height adjustments to manage photon density. Use heavy-duty rope ratchets to support the extra weight of a large LED panel. This ensures your fixture stays level and secure.
Can I hang my grow light too close to the top of the tent?
Yes, you must maintain a gap of at least 5cm between the light and the tent roof. Hanging a fixture flush against the ceiling prevents air from circulating around the drivers or heat sinks. This leads to overheating and can significantly reduce the lifespan of your equipment. Proper airflow keeps the ballast cool and ensures your extraction system can still pull air from the top ports.
How do I know if my grow light is too bright for my plants?
Look for visual cues like leaf bleaching or edges that curl upwards. Bleaching occurs when the light intensity is too high, turning the top leaves white. This is different from a nutrient deficiency because it only affects the parts closest to the light. Knowing how to set up grow lights in a tent involves using a PAR app to monitor intensity. If you see signs of stress, raise the light immediately.
What is the best way to secure a heavy LED light in a small tent?
Use four-point rope ratchets attached directly to the primary steel crossbars. This distributes the weight evenly across the frame and prevents the tent from sagging. Avoid using cheap plastic clips that can snap under the pressure of a high-performance panel. Secure the ratchets to the bars first, then lift the light into place. This method provides the stability needed for a professional and safe setup.
Should I leave my grow light on 24 hours a day after setting it up?
No, most plants require a dark period for healthy development and respiration. A 24-hour cycle is often inefficient and will significantly increase your electricity bills. Standard cycles are usually 18 hours of light for vegetative growth and 12 hours for flowering. Use a mechanical or digital timer to automate this process. This keeps your environment stable and allows your plants to rest and process energy.
How often should I adjust the height of my grow lights?
You should check and adjust the hanging height every two days during rapid growth phases. Plants can grow several centimetres in a single day, quickly closing the gap to the light source. If you don't raise the fixture, you risk light burn on the newest growth. Use your rope ratchets to maintain the "sweet spot" distance. This ensures your canopy receives consistent intensity without the risk of heat stress.
Is it safe to use a standard UK extension lead for my grow lights?
It is safe only if the total wattage of your equipment doesn't exceed the 13-amp limit. You must calculate the load of your lights, fans, and pumps before plugging them into a single lead. Never daisy-chain multiple extension leads together as this creates a fire risk. Learning how to set up grow lights in a tent safely means using RCD-protected leads to prevent shocks in humid environments.
What should I do if my grow light is causing the tent to get too hot?
Move the LED driver or ballast outside the tent if your model allows for remote mounting. This removes the primary heat source from the enclosure. You should also increase the speed of your extraction fan to pull more warm air out of the top ports. Position an oscillating fan to blow air directly between the light and the canopy. This breaks up heat pockets and maintains a stable temperature.