

How to Set Up Grow Tent Ventilation: A Complete Guide for 2026
Your expensive grow lights and nutrients are effectively wasted if your plants are trapped in stagnant, 32°C air. Data from 2025 indicates that UK growers lose up to 40% of their potential yield simply because they haven't mastered how to set up a grow tent ventilation system correctly. It isn't just about moving air. It's about creating a pressurized environment that scrubs every scent and regulates humidity to within a 5% margin of your specific target.
You've likely felt the frustration of confusing CFM calculations or the anxiety of a heat spike during a humid British summer. We know that keeping your indoor garden private and your energy bills under £1.50 per day is a top priority for any serious setup. This guide provides the exact technical blueprint to balance your airflow, eliminate 100% of unwanted odours, and slash your running costs. We'll walk through selecting the right extractor fans, calculating ducting resistance for 150mm setups, and positioning carbon filters to ensure your environment stays optimised for heavy yields all year round.
Key Takeaways
- Understand why consistent airflow is vital for delivering CO2 and managing heat from high-intensity LEDs to maintain a healthy growing environment.
- Learn how to set up a grow tent ventilation kit by correctly pairing extractor fans with activated carbon filters to eliminate all organic odours.
- Master the "Base Formula" to calculate the exact CFM required for your specific tent dimensions, ensuring you never overspend on overpowered equipment.
- Follow a step-by-step installation guide to position your filter at the highest point for optimal heat extraction and system longevity.
- Discover expert tips for managing the UK’s high humidity and using automated controllers to keep your environment stable regardless of external weather.
Why Ventilation is Essential for Healthy Indoor Plants
Successful indoor gardening relies on more than just high-quality nutrients and powerful lights. You must understand how to set up a grow tent ventilation system to mimic the natural environment. Without constant airflow, your tent becomes a stagnant box where heat builds up and life-sustaining gases disappear. Plants are living organisms that breathe, and their metabolic processes depend entirely on the atmospheric conditions you provide. A poor setup leads to stunted growth, weak stems, and eventually, total crop failure. Professional growers treat ventilation as a primary life-support system, not an optional extra.
It's a principle that applies to any controlled environment where life thrives, from a sealed grow tent to the underwater ecosystems explored by divers. In both cases, managing air and pressure is critical, a skill perfected by hubs like Cozumeldivehub for those exploring the ocean.
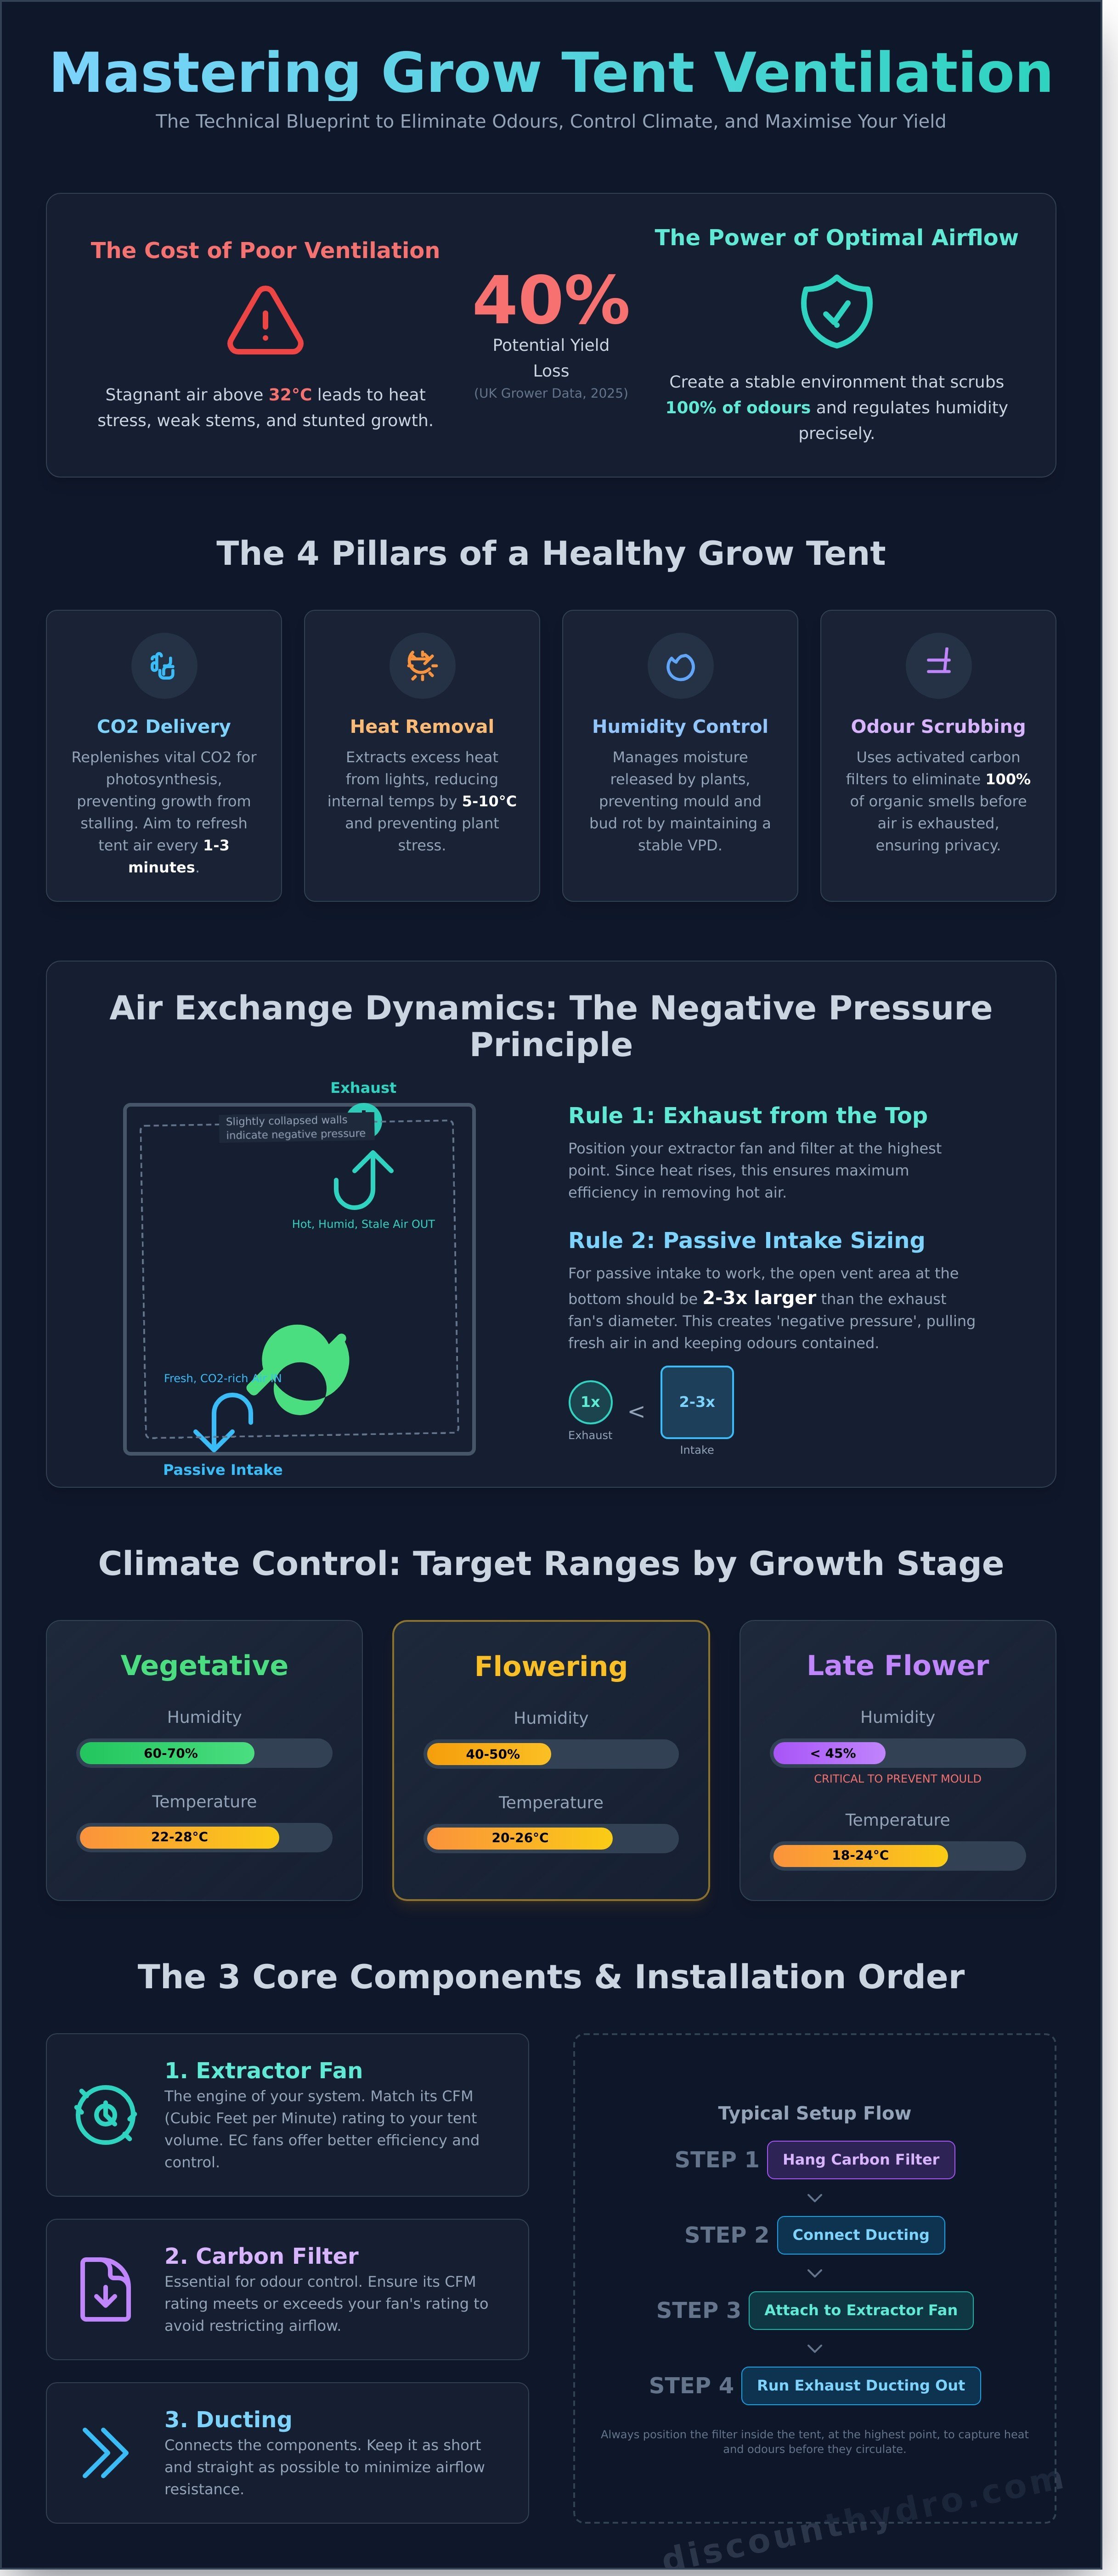
Ventilation serves four critical roles in a controlled environment. It delivers fresh Carbon Dioxide (CO2) for photosynthesis, removes excess heat from lighting equipment, manages humidity levels to prevent disease, and scrubs odours from the air before it exits the tent. In a confined space like a 1.2m x 1.2m grow tent, these variables can shift from optimal to dangerous in less than 30 minutes. Investing in a high-quality extractor fan and carbon filter is the most effective way to protect your investment and ensure a heavy harvest.
This level of dedication to creating the perfect environment is common among serious hobbyists, whether they're cultivating rare plants or building a collection of memorabilia. Fans of pop culture often find that same satisfaction in curating unique items from specialists like Koolthings.
The Role of CO2 and Fresh Air Exchange
Plants consume CO2 to produce energy through photosynthesis. In an enclosed tent, they can deplete the available CO2 levels from a healthy 400 parts per million (ppm) down to under 200ppm in roughly 20 minutes. Growth effectively stops when CO2 levels fall too low. To prevent this, your goal is to refresh the entire volume of air inside the tent every 1 to 3 minutes. This constant exchange ensures your plants always have access to the raw materials they need for rapid development.
For many UK hobbyists using small 60cm or 80cm tents, a "passive intake" is often sufficient. This involves using the screened flaps at the bottom of the tent to let fresh air in naturally as the extractor fan pulls old air out. To work correctly, your intake hole should be roughly 2 to 3 times larger than the diameter of your exhaust fan. This prevents the fan from working too hard and maintains the necessary negative pressure to keep smells contained. Knowing how to set up a grow tent ventilation with the right pressure balance is the difference between a discreet grow and an obvious one.
Controlling Heat and Humidity Spikes
Managing the climate is a constant battle against the heat generated by your equipment. Even modern LED grow lights produce significant thermal energy. These are essential grow room components that require active cooling to prevent leaf burn and heat stress. If your tent temperature exceeds 30°C for prolonged periods, plant metabolism slows down and terpene profiles degrade. An extractor fan sized correctly for your tent volume can reduce internal temperatures by 5°C to 10°C compared to ambient room temperature.
While extractor fans manage the microclimate, the ambient temperature of the room itself is crucial. For controlling the climate of larger spaces efficiently, advanced systems like heat pumps are often used; to see examples of this technology, you can check out Vesinimas.LT.
Humidity is the other silent killer in a grow room. Through a process called transpiration, plants release about 95% of the water they absorb back into the air as vapour. In a sealed environment, this causes humidity to spike above 70%, which is the danger zone for Botrytis, commonly known as bud rot. Consistent airflow helps you maintain a stable Vapour Pressure Deficit (VPD). Aim for these specific targets to ensure health:
- Vegetative Stage: 0.8 to 1.2 kPa (60% to 70% humidity).
- Flowering Stage: 1.2 to 1.5 kPa (40% to 50% humidity).
- Late Flower: Below 45% humidity to prevent mould.
Using a digital hygrometer and a variable speed controller on your fan allows you to make precise adjustments. If your humidity climbs too high, increasing the extraction speed pulls that moist air out and replaces it with drier air from the surrounding room. This keeps the stomata on the leaves open and functioning, allowing for maximum nutrient uptake and faster growth cycles.
The 3 Core Components of a Ventilation Kit
Building an efficient indoor environment depends on three mechanical pillars. These parts function as the respiratory system of your garden, ensuring fresh air arrives while stale air exits. If you're learning how to set up a grow tent ventilation system, you must prioritise durability over flashy branding. Most UK growers find that investing in mid-range hardware from specialist outlets like Discount Hydro offers the best price-to-performance ratio. Focusing on the price-to-performance ratio means looking for components with a high Mean Time Between Failure (MTBF). A cheap £30 fan might fail within 6 months, whereas a £90 EC model can run for 50,000 hours continuously. Mastering how to set up a grow tent ventilation kit requires more than just buying the most expensive parts; it's about matching the components to your specific environment.
Choosing an Extractor Fan: AC vs. EC Motors
The extractor fan is the engine of your setup. While AC fans are cheaper upfront, EC (Electronically Commutated) motors are the superior choice for 2026 indoor gardens. EC fans provide 40% better energy efficiency and allow for precise speed control without the annoying hum associated with AC motors. A 150mm fan running at 50% speed on an EC motor is often quieter and more efficient than a 100mm AC fan running at full tilt. In the UK, standard sizes range from 4-inch (100mm) for small closets to 8-inch (200mm) for large rooms. You'll need a fan capable of refreshing the air every 60 seconds. Use a scientific approach when calculating your fan needs to ensure your motor isn't underpowered for the heat load of your lights.
Carbon Filters and Odour Neutralisation
Carbon filters use a thick bed of activated charcoal to trap volatile organic compounds (VOCs) before they exit the tent. A professional-grade filter typically maintains 100% effectiveness for 12 to 18 months, depending on humidity levels. Humidity above 70% can cause the carbon to clump, reducing its lifespan by nearly 30%.
- Pre-filters: The white fabric sleeve acts as the first line of defence. Failing to wash or replace this sleeve every 3 months can restrict airflow by 25%, forcing your fan to work harder and increasing your £ electricity bill.
- Matching: Ensure your filter's CFM or m3/h rating is slightly higher than your fan's output to prevent air "whistling."
- Installation: Mount the filter at the highest point of the tent where heat and odours accumulate.
Ducting Types: Combi, Acoustic, and Aluminium
Ducting acts as the exhaust pipe for your system. In UK residential settings, acoustic (insulated) ducting is the most popular choice because it reduces noise levels by 10 to 15 decibels. This is vital for maintaining a discreet profile in terraced houses or flats. Standard aluminium ducting is prone to tearing and light leaks, while Combi ducting offers a reinforced outer layer for better lightproofing and physical protection. Every 90-degree bend in your ducting increases air resistance and cuts fan efficiency by roughly 20%. Standard 5-metre lengths are common in the UK, but you should trim them to the exact size needed to avoid unnecessary loops. Secure every connection with 100mm or 150mm duct clamps and silver foil tape to ensure the system doesn't leak odours back into the room.
Calculating Fan Capacity: Matching CFM to Your Tent Size
Selecting the right extraction fan is the most critical step when learning how to set up a grow tent ventilation system. If your fan is too weak, heat and humidity will spike, leading to crop failure. If it is too powerful without a controller, you will waste electricity and struggle to maintain consistent temperatures. You need to understand two primary units of measurement: CFM (Cubic Feet per Minute) and m3/h (Cubic Metres per Hour). CFM is the measurement of air volume moved per minute. Most UK suppliers list fans in m3/h, but many global guides use CFM, so knowing how to convert between them is vital for precision.
The foundation of your calculation is the "Base Formula" for volume. You simply multiply the Length x Width x Height of your tent. For a standard UK hobby tent measuring 1.2m x 1.2m x 2.0m, the total volume is 2.88 cubic metres. To keep your environment stable, you must replace this entire volume of air once every minute. This means your base requirement is 2.88 m3/min, or 172.8 m3/h. However, this base figure only works in a vacuum. Real-world setups involve resistance factors that significantly reduce fan performance.
Carbon filters are the biggest source of resistance, often cutting fan efficiency by 25%. Long ducting runs and 90-degree bends add further strain. Every sharp turn in your ducting can reduce airflow by 20%. Because of these losses, smart growers always oversize their fans. Buying a larger fan, such as a 6-inch model for a space that technically only requires a 4-inch model, allows you to run the unit at 50% or 60% speed using a controller. This reduces noise levels by roughly 15 decibels and extends the motor's lifespan by 2 or 3 years because it isn't constantly working at its limit.
Simplified Calculation Formula for Growers
To find your ideal fan size, follow this three-step math process. First, calculate your tent volume (L x W x H). Second, multiply that volume by 60 to establish the hourly exchange rate. Third, add 25% to account for the carbon filter and another 20% for ducting friction. For example, a 1.2m x 1.2m tent needs 172.8 m3/h base, plus 43.2 (filter) and 34.5 (ducting), totaling roughly 250 m3/h. Use this table for quick reference:
- 1.2m x 1.2m x 2.0m Tent: Minimum 250 m3/h (Recommended: 350 m3/h fan with controller).
- 2.4m x 1.2m x 2.0m Tent: Minimum 500 m3/h (Recommended: 600-750 m3/h fan with controller).
The Importance of Negative Pressure
Negative pressure occurs when you extract more air from the tent than you let in. It's a non-negotiable part of how to set up a grow tent ventilation kit correctly. When negative pressure is achieved, the tent walls will slightly "suck in" or bow inward. This visual cue confirms that no untreated air is leaking out of the zips or seams. Instead, all air is forced through your carbon filter, which is the only way to guarantee 100% odour control. If your walls are bulging outward, you have positive pressure, which means smells are escaping into your home. Always ensure your intake fan is smaller or running at a lower speed than your extraction fan to maintain this vacuum effect.
Step-by-Step Installation: Setting Up Your Fan and Filter
Success in indoor gardening depends on your ability to control the environment. Learning how to set up a grow tent ventilation system properly prevents heat stress and keeps humidity levels below the 60% threshold required during the flowering stage. Start by identifying the highest point in your tent. Since heat naturally rises, your carbon filter must sit at the very top to pull out the warmest air. You'll typically find mounting bars designed to hold the weight of a 150mm or 200mm extraction kit at the roof of the frame.
Connect your extractor fan directly to the filter using a short length of ducting or a fast clamp. It's vital to check the airflow direction arrow on the fan casing. The arrow must point away from the filter and toward your exit point. Use heavy-duty rope ratchets to suspend both the fan and the filter. These ratchets often support up to 68kg per pair, which is more than enough for professional-grade carbon filters. Hanging the equipment rather than bolting it to a frame prevents kinetic energy from turning your tent poles into a sounding board for motor vibrations.
Route your exhaust ducting to an external vent or an unused chimney. This ensures the hot, stale air leaves the building entirely rather than recirculating in the room outside the tent. If you vent back into the same room, your intake fan will eventually pull that same hot air back in, causing temperatures to spike above the 30°C danger zone. For a 1.2m x 1.2m tent, a 6-inch (150mm) fan is the standard choice to move enough air volume to refresh the space every 60 seconds.
Internal vs. External Filter Mounting
Internal mounting is the preferred choice for most UK growers. It keeps the entire system contained and ensures the fan pulls air through the carbon bed. This "pull" method is roughly 15% more efficient at scrubbing odours than "pushing" air into a filter. If you're using a micro-tent smaller than 1.2m in height, you might have to mount the fan outside to save space and reduce heat. Only do this if you have no other choice, as it increases the risk of untreated air leaking from the ducting joints.
Minimising Noise and Vibration
Noise management is essential for a discreet setup. Avoid using metal chains to hang your gear; they transmit every hum from the fan motor directly to the tent frame. Rubberised hangers or thick nylon rope ratchets act as shock absorbers. You should also follow the "Straight Line" rule. Every sharp 90-degree bend in your ducting reduces airflow by 20% and creates turbulent air noise. If your fan is still too loud, consider acoustic ducting. This triple-layered piping can reduce decibel levels by 5dB, making a significant difference in a quiet spare room.
The final step is the most important for odour control. Use jubilee clips to create a tight mechanical seal between the ducting, fan, and filter. Once the clips are tight, wrap every joint with heavy-duty silver foil tape. A 50m roll of foil tape costs less than £10 and creates an airtight bond that prevents any smells from escaping before they reach the carbon. Check your seals every 4 weeks to ensure the tape hasn't peeled due to high humidity. A single air leak can compromise your entire odour control strategy.
Ready to build your kit? Grab the best deals on high-performance extraction fans and carbon filters at the UK's lowest prices.
Optimising for the UK Climate and Odour Management
Setting up in the UK means battling 85% average outdoor humidity during the damp winter months. When you're learning how to set up a grow tent ventilation system in a cold spare room or an uninsulated garage, you must prioritise air exchange rates that prevent stagnant, damp pockets. High humidity leads to botrytis and powdery mildew, which can ruin a crop in under 48 hours. Use a digital fan controller with a thermal probe to automate your environment. These units adjust fan speeds based on 1 degree temperature shifts. This prevents the "yo-yo" effect where temperatures swing wildly, which stresses your plants and increases your electricity bill by up to 15%.
Maintenance is the difference between a successful harvest and a mechanical failure. Check your ducting for pinhole leaks every 4 weeks. A single 5mm hole in your exhaust ducting allows untreated air to bypass the carbon filter, resulting in unwanted smells escaping your grow space. Clean your white fabric pre-filter every 8 weeks using a vacuum or a cool wash. A clogged pre-filter forces the fan motor to work 20% harder to move the same volume of air. This leads to early motor burnout and 30% higher running costs over a single season.
Discount Hydro provides the UK's best prices on full ventilation kits. We offer 24-hour delivery across the mainland, ensuring you get the gear you need without the premium price tags found elsewhere. Our kits are curated for maximum compatibility, saving you the hassle of matching flange sizes and airflow ratings yourself.
Managing Seasonal Temperature Swings
UK nights are notoriously cold. When your lights turn off, temperatures in a shed can plummet to 5°C. This causes "lights-off" humidity spikes because cold air holds less moisture. Use a 2kW greenhouse heater near your intake fan to keep incoming air at a steady 18°C. If you're based in the North East, take advantage of our Click and Collect service in County Durham. It's the fastest way to secure heavy 8-inch or 10-inch fans without waiting for a courier or paying for pallet shipping on bulkier orders.
Long-Term System Maintenance
Carbon filters have a finite lifespan. Most high-quality RC412 Australian carbon beds last 12 to 18 months under normal conditions. However, if your humidity stays above 75%, that lifespan drops by 40% as the carbon pores clog with water vapour. You'll know it's time for a change when you detect a faint earthy scent near the exhaust point. Don't wait for total failure. Clean your centrifugal fan blades every 6 months using a soft brush. Dust buildup causes balance issues and vibrations that wear down bearings 50% faster. If your fan sounds louder than it did on day one, it's likely a maintenance issue. Browse our range of high-performance extraction fans to find a replacement or an upgrade that fits your budget. Following these steps ensures you know exactly how to set up a grow tent ventilation system that lasts for years rather than months.
Our stock includes everything from budget-friendly axial fans to professional-grade EC silent extractors. We focus on value and performance, providing the UK's best prices on brands that growers trust. Check out our latest deals on ventilation kits to save up to £40 on your next setup.
Get Your Ventilation Running for Peak 2026 Results
Indoor success starts with total environmental control. You've mastered the math for calculating CFM and the physical steps for extraction. Knowing how to set up a grow tent ventilation kit correctly prevents 90% of common health issues like mould or heat stress. Match your fan capacity to your tent volume to ensure fresh air cycles every 60 seconds. This is vital for managing the UK's high humidity levels throughout the year.
Top-tier hardware makes the difference. We stock Omega and Rhino hardware at the UK's best prices, ensuring your 2026 grow stays efficient and discreet. We offer fast UK-wide delivery on all orders; you can also use Click and Collect at our County Durham warehouse for immediate pickup. Don't let poor airflow ruin your hard work. Grab a professional kit at a discount today.
Shop the UK’s Best Prices on Ventilation Kits at Discount Hydro
Your plants are ready for better air.
Frequently Asked Questions
How much CFM do I need for a 1.2m x 1.2m grow tent?
You need an extractor fan with a minimum rating of 350 m3/h for a 1.2m x 1.2m x 2m tent. This figure accounts for a total air exchange every sixty seconds while factoring in 25% efficiency loss from your carbon filter and ducting bends. If you're using high-intensity 600W HID lights, increase this to 450 m3/h to manage the extra heat. Always check the manufacturer's pressure maps to ensure the fan maintains this flow under load.
Should the carbon filter be before or after the fan?
Place your carbon filter before the fan so air is pulled through the carbon bed. This "pull" configuration is 15% more efficient than pushing air through the filter and ensures all odours are scrubbed before reaching the fan blades. Mounting the filter at the highest point in your tent helps remove the hottest air first. It's the standard method for how to set up a grow tent ventilation system effectively.
Can I use a bathroom extractor fan for my grow tent?
No, bathroom extractor fans aren't suitable because they lack the static pressure required to move air through carbon filters or long ducting runs. A standard 100mm bathroom fan moves about 85 m3/h, whereas a dedicated 100mm inline centrifugal fan provides 250 m3/h or more. Using the wrong fan leads to 30% higher temperatures and premature motor failure. Invest in a dedicated hydroponic fan to avoid these equipment risks and protect your crop.
How often should I replace my carbon filter?
Replace your carbon filter every 12 to 18 months to maintain total odour control. High humidity levels above 70% can reduce this lifespan to just 6 months as moisture clogs the carbon pores and stops them from working. You'll know it's time for a new one when you detect faint smells outside the tent. We stock replacement filters starting from £35 for 100mm units to keep your setup running efficiently and discreetly.
Why is my grow tent walls sucking in?
Your tent walls suck in because of negative air pressure created when the exhaust fan removes air faster than it enters. This is actually a sign of a well-sealed system that prevents smells from escaping. If the bowing is excessive and reduces your growing space by more than 15%, open another passive intake vent or install a small intake fan to balance the pressure. Proper negative pressure ensures all air passes through the filter.
How do I reduce the noise of my grow tent fan?
Use acoustic "sonic" ducting and a digital fan speed controller to reduce noise levels by up to 15 decibels. Insulated ducting features a glass wool layer that absorbs sound vibrations before they exit the tent. Hanging your fan from bungee cords instead of bolting it to the frame also stops 90% of vibration noise from echoing through the poles and floor. These simple adjustments make your indoor garden much more discreet.
Do I need an intake fan as well as an exhaust fan?
You don't always need an active intake fan if your tent is smaller than 1.2m x 1.2m, as passive vents are usually sufficient. For larger setups or rooms with temperatures exceeding 28°C, an intake fan helps maintain a fresh CO2 supply. Ensure your intake fan is 20% less powerful than your exhaust fan to maintain the negative pressure required for how to set up a grow tent ventilation properly without leaking odours.
Can I vent my grow tent into the same room?
You can vent into the same room, but it's not recommended because it leads to rapid heat and humidity buildup. Re-circulating the same air can raise room temperatures by 5°C within two hours, which stresses plants and encourages mould growth. For the best results, vent your exhaust air directly outside through a window kit or into a separate chimney breast. This ensures a constant supply of fresh, cool air for your plants.