

Optimal Light Distance from Plants: The 2026 Indoor Grower’s Guide
Are your seedlings stretching for the sky, or are your top leaves showing the tell-tale signs of bleaching and light burn? These common grow room problems are more than just frustrating-they directly hit your final yield and waste your investment. Guessing your hanging height is a recipe for weak, leggy plants or fried canopies. The key to unlocking your crop's full potential lies in mastering the optimal light distance from plants, turning a common point of anxiety into a powerful tool for growth.
This is your definitive 2026 guide to getting it right, every single time. Forget the confusing jargon about PPFD and Lux. We've simplified the science into data-driven distance charts for the most popular LED and HPS kits on the UK market. With this guide, you will confidently set up any new light, prevent costly crop damage, and even lower your electricity bill by ensuring not a single watt is wasted. Get ready to maximise your light spread for dense, healthy, and heavy yields.
Key Takeaways
- Instantly diagnose problems like light burn and "leaf canoeing" by learning to spot the visual cues of incorrect light distance.
- Master the optimal light distance from plants by adjusting heights for each growth stage, from delicate seedlings to robust vegetative growth.
- Get specific hanging height charts for your exact light technology, whether you're running cool LEDs or high-heat HPS systems.
- Learn why moving your light just a few inches can cut its power by up to 75% and how to use this science to your advantage.
The Science of Photons: Why Light Distance Dictates Plant Health
Getting the most from your grow lights isn't just about wattage-it's about positioning. Light distance, the vertical gap between your light source and the plant canopy, is one of the most critical factors for a successful harvest. Get it wrong, and you're either wasting electricity or damaging your plants. Nailing the optimal light distance from plants ensures every pound you spend on power is converted into vigorous growth and maximum yield.
The Role of the Inverse Square Law in Grow Rooms
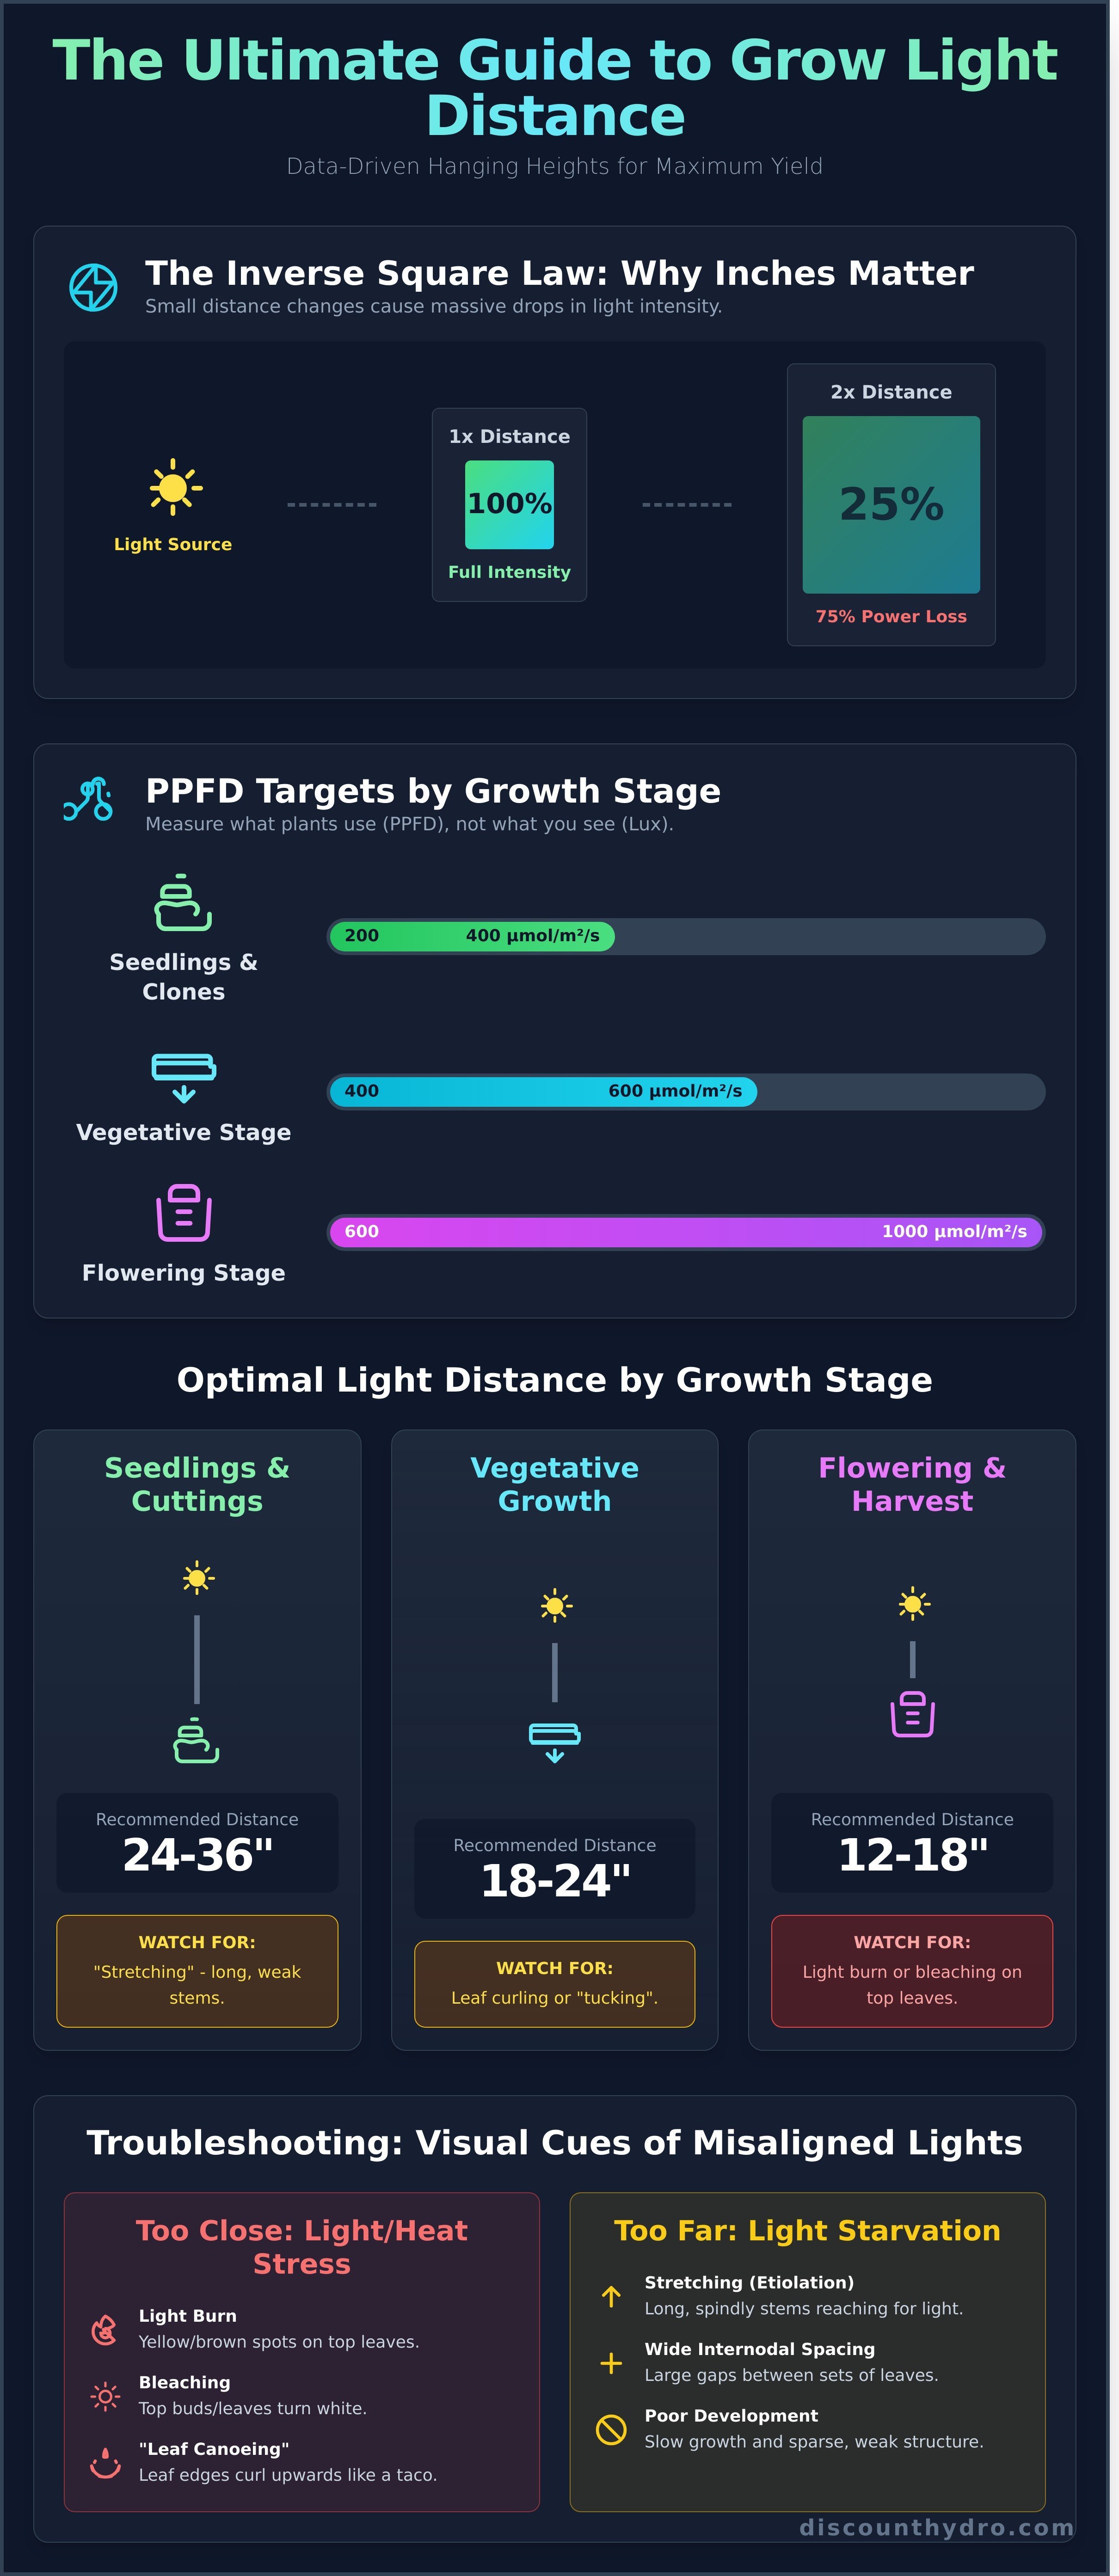
The intensity of your grow light drops off dramatically with distance. This isn't a gradual decline; it follows the Inverse Square Law. In simple terms, if you double the distance from your light to your plants, the light energy spreads over four times the area. The result? Your plants receive only 25% of the original light intensity-a massive 75% drop. This is why a small adjustment of a few inches can be the difference between a thriving crop and a struggling one. Your goal is to find the "sweet spot" where the light footprint covers your canopy with maximum, uniform intensity.
This directly impacts your plant's structure. Too much distance causes plants to "stretch" for light, resulting in long, weak stems and wide internodal spacing. Too little distance, and you risk light burn, bleaching, and heat stress. The correct distance promotes a stocky, robust structure with tight nodes capable of supporting heavy fruits and flowers.
PPFD vs. Lux: Measuring What Plants Actually Use
The human eye is a poor judge of a grow light's effectiveness. What looks "bright" to us is often useless to a plant. This is where we must stop thinking in Lux and start measuring in PPFD (Photosynthetic Photon Flux Density). PPFD measures the number of usable light photons hitting a specific area per second-the actual fuel for the science of photosynthesis. A cheap Lux meter is only useful for identifying major inconsistencies or "dead zones" in your grow tent.
To truly establish the optimal light distance from plants, you need to hit the right PPFD targets for each growth stage. While every plant is different, these are solid benchmarks for most high-value indoor crops:
- Seedlings & Clones: 200 - 400 µmol/m²/s
- Vegetative Stage: 400 - 600 µmol/m²/s
- Flowering Stage: 600 - 1000 µmol/m²/s
Optimal Light Distance Chart by Growth Stage
Getting the optimal light distance from plants is not a one-time setting. As your plants mature, their lighting needs change dramatically. Each stage requires a specific distance to maximise growth and prevent stress. Following these guidelines ensures you provide the right intensity at the right time for a heavy, high-quality harvest.
Forget the outdated "Hand Test." This method, where you check for heat on the back of your hand, is useless for modern, cool-running LED grow lights. High-intensity LEDs can cause light burn and stress without generating significant heat. Rely on measurements and plant observation, not feel.
Seedlings and Cuttings (Early Stage)
Delicate seedlings and new clones can be easily overwhelmed. Start with your lights hung high to provide gentle, consistent illumination without causing damage. This prevents burning and stress on fragile new leaves.
- Recommended Distance (High-Intensity LEDs): 24-36 inches
- Watch For: Stretching (etiolation). If your seedlings grow long and spindly, it means they are reaching for the light. Simply lower your fixture by a few inches each day until the stretching stops.
- Light Choice: While low-wattage T5 fluorescent lights are a classic choice for propagation, many modern full-spectrum LEDs with dimmers offer superior efficiency and can be used from seed to harvest.
Vegetative Growth (Mid Stage)
During the vegetative stage, your goal is to build a strong, bushy plant structure. Lowering the light increases intensity, driving photosynthesis and encouraging the development of thick stems and dense lateral branching. This is where you build the foundation for a big yield.
- Recommended Distance: 18-24 inches
- Monitor Closely: Look for signs of light stress, such as leaves "tucking" or curling at the edges. This indicates the light is too intense or too close. For more expert advice on troubleshooting light distance, university extension resources provide excellent, science-backed guidance.
Flowering and Harvest (Late Stage)
This is where maximum light intensity pays off. Bringing lights closer ensures deep canopy penetration, fuelling the development of dense flowers, fruits, and potent essential oils. Fine-tuning the optimal light distance from plants in this phase is critical for final quality.
- Recommended Distance: 12-18 inches
- Risk of Bleaching: In the final weeks, keep a sharp eye out for light bleaching, where the tops of your plants turn white or yellow from excessive intensity. If you see this, raise your light immediately.
- Late-Season Fade: Some growers raise their lights slightly in the last 1-2 weeks to reduce intensity, simulating the end of the season and encouraging plants to finish.
LED vs. HPS vs. CDM: Technology-Specific Hanging Heights
Not all grow lights are created equal. The technology inside your fixture-whether it's LED, HPS, or CDM-is the single biggest factor determining its ideal hanging height. Heat output, light intensity, and beam angle all vary dramatically, and getting it wrong can cost you a harvest. Understanding these differences is the key to finding the optimal light distance from plants for maximum yield.
The LED Revolution: Why Closer Isn’t Always Better
Modern LEDs are incredibly efficient, converting more electricity into usable light (PAR) and less into wasted heat. However, their focused intensity can be deceptive. Many fixtures use optical lenses that create powerful "hot spots" directly beneath the diodes. This concentrated energy can cause light burn (bleaching) on your canopy, even without the high temperatures of an HPS. A large bar-style fixture like a 720W Omega Black distributes light more evenly than a single COB unit, allowing for closer placement without creating damaging hot spots.
Traditional HID Lighting (HPS/MH)
High-Pressure Sodium (HPS) and Metal Halide (MH) lights are workhorses known for their raw power and low initial cost. Their main drawback is massive heat output. In a standard 1.2m x 1.2m grow tent, managing this heat is critical. An air-cooled hood is a must-have upgrade, allowing you to vent heat directly out of the tent and hang the light much closer to your plants. Without one, you'll be fighting high temperatures constantly.
- 600W HPS Kit: Start at 40-60cm (16-24 inches) from the canopy.
- 1000W HPS Kit: Requires more space; start at 60-90cm (24-36 inches).
Ceramic Discharge Metal Halide (CDM/CMH) lights offer a middle ground, providing a superior light spectrum to HPS with less heat, but more than an equivalent LED. Finally, always check your light's beam angle. A narrow 90° angle focuses intense light, requiring more height, while a wide 120° angle spreads it out, allowing for closer placement to achieve an even footprint. Adjusting for these factors is essential for dialling in the optimal light distance from plants and getting the most from your equipment.
Troubleshooting: Signs Your Lights are Misaligned
Even the best grow light setup can damage your crop if positioned incorrectly. Your plants provide clear visual cues when their lighting isn't right. Learning to read these signs allows you to make fast adjustments, protecting your yield and ensuring you achieve the optimal light distance from plants for vigorous growth.
Watch for these common symptoms of misalignment:
- Light Burn: The leaves closest to your light turn yellow or white, while the veins often remain green. This "bleaching" is a sign that the light intensity is too high for the leaves to process.
- Heat Stress: Leaf edges curl upwards, sometimes resembling a taco or canoe. This is a physical response from the plant trying to reduce its surface area and cool itself down from excessive heat.
- Stretching (Etiolation): If plants develop long, spindly stems with wide gaps between leaf sets, your light is too far away. The plant is wasting energy reaching for a more powerful light source.
- Mimicked Nutrient Deficiencies: Overly intense light can accelerate a plant's metabolism, causing it to use up mobile nutrients like Calcium and Magnesium faster than they can be supplied. This can look like a deficiency, but the real issue is light distance.
Identifying Light Burn vs. Nitrogen Deficiency
Distinguishing between light burn and a nutrient issue is simple if you know where to look. The key difference is location. Light burn will always appear on the foliage at the top of the canopy, closest to the lamp. In contrast, a nitrogen deficiency typically starts with the yellowing of lower, older leaves. To fix light burn, immediately raise your light fixture or reduce its power using a dimmable ballast. This quick action is vital for recovery.
Environmental Synergy: Temperature and CO2
The perfect light distance is tied directly to your grow room's environment. A higher ambient temperature reduces a plant's tolerance for heat, meaning lights must be positioned further away. For precise readings, use an infrared thermometer to check the leaf surface temperature, not just the air. Conversely, growers enriching their rooms with CO2 can run lights much closer and at a higher intensity, as the plants can utilise the extra energy for supercharged photosynthesis. Fine-tuning these elements together is the secret to finding the true optimal light distance from plants and maximising your results. Get total control with our range of digital timers, thermometers, and environmental controllers.
Optimising Your Grow Room for Peak Efficiency
Finding the correct hanging height is crucial, but it’s only one part of the equation. To truly maximise your yield and energy use, your entire grow room setup must work together. A well-optimised environment ensures every watt of power is delivered directly to your canopy, preventing waste and boosting plant health. Getting the environment right makes maintaining the optimal light distance from plants far more effective.
The principle of using a scientific, supported approach to achieve peak health and efficiency is a powerful one, extending beyond just horticulture. For those interested in applying similar expert-led strategies to their own well-being, you can visit foundry and explore their medical programs.
Start with your surroundings. High-quality reflective tent walls, like those found in our grow tent kits, can increase light intensity at the edges of your canopy by over 20%. This simple factor ensures more even growth and prevents weaker plants on the perimeter. Also, don't underestimate basic maintenance. A dusty bulb or a dirty LED lens can block up to 10% of the light output. A quick wipe-down before each cycle is a free performance boost. Finally, match your light's wattage to your space. A 600W HPS or equivalent LED is ideal for a 1.2m x 1.2m area, ensuring you have enough power without excessive heat or energy costs.
Essential Tools for Light Management
Daily adjustments are simple with the right gear. Heavy-duty rope ratchets are non-negotiable for safely handling the weight of modern LED fixtures, allowing for precise, one-person adjustments. For true accuracy, a PAR meter is the professional's choice, but affordable smartphone apps like Photone can provide excellent PAR and DLI estimates. To get the most from these tools, you need a high-performance fixture. Check out our LED Grow Lights for top-tier efficiency and output.
Final Checklist for a Perfect Setup
Before you finalise your setup, run through this quick checklist to guarantee you are achieving the best optimal light distance from plants and delivering uniform energy to your canopy:
- Level Your Fixture: Use a spirit level to ensure your light is perfectly flat. An angled light creates hotspots and weak zones.
- Calculate Your DLI: Research the Daily Light Integral (DLI) requirement for your specific crop. This tells you the total amount of light your plants need over 24 hours.
- Observe and Adjust: Remember, every plant and environment is unique. A manufacturer's chart is a starting point, not a rule. Watch your plants for signs of stress or stretching and adjust accordingly.
By combining precise measurements with careful observation, you'll ensure your plants get exactly what they need for vigorous growth. Find all the tools you need, from hangers to tents, right here at discounthydro.com.
Master Your Light Distance for Maximum Yields
Mastering your grow room environment comes down to precision. The distance of your light from the canopy is a critical, dynamic variable that directly impacts plant health and harvest weight. By adjusting for each growth stage and understanding the unique heat output of your LED, HPS, or CDM system, you prevent stress and unlock your plants' full potential.
Ultimately, achieving the optimal light distance from plants is the key to converting every watt of energy into impressive growth. If your current lighting isn't delivering the professional results you demand, it’s time for an upgrade.
Get the right equipment for the job. Browse our range of high-performance LED Grow Lights at the UK’s best prices. We stock leading brands like Omega and Intense Nutrients, all backed by fast UK-wide delivery and expert technical support from our team based in Durham.
Your best harvest yet is just one click away.
Frequently Asked Questions
How far should a 600W HPS light be from plants?
A 600W HPS light produces significant heat, so distance is crucial to avoid burning your plants. For the vegetative stage, a safe distance is typically 60-75 cm (24-30 inches) from the canopy. During the flowering stage, you can lower it to 45-60 cm (18-24 inches) to maximise light intensity. Always use the back-of-the-hand test: if it feels too hot for your hand after 30 seconds, it's too hot for your plants.
Can LED grow lights be too close to plants if they don’t feel hot?
Absolutely. While modern LEDs run cooler than HPS lamps, they produce highly intense light. Placing them too close can cause light bleaching, where leaves turn yellow or white, and stunted growth. This is due to excessive light intensity (PPFD), not heat. Always refer to the manufacturer's recommendations for your specific model, as different diodes and lenses have different optimal heights. Getting the distance right is crucial for plant health and yield.
What are the signs of light stress in indoor gardening?
Look for several key indicators of light stress. The most common signs are leaves turning yellow or white at the top of the plant (light bleaching), and leaf edges appearing burnt, brown, and crispy. You might also see leaves curling upwards at the edges, resembling a taco shape. In some cases, plants may appear stunted with abnormally short spacing between nodes. If you see these signs, raise your lights immediately to a safer distance.
How do I know if my plants are stretching for light?
Plant stretching is easy to spot. Your plants will develop unusually long, thin stems and have large gaps between sets of leaves (nodes). This "leggy" growth is a clear sign they are not receiving enough light intensity and are expending energy to grow closer to the source. The stems will often be weak and may struggle to support the plant's weight. To fix this, simply lower your grow light closer to the plant canopy to increase intensity.
Does light distance change if I use a dimmable LED?
Yes, using a dimmable LED gives you precise control over both light intensity and distance. When the light is dimmed, its output is lower, allowing you to position it closer to your plants without causing light stress. This is ideal for seedlings and young plants. At full power, you will need to raise the light to the standard recommended height. This flexibility helps you dial in the perfect conditions for every growth stage, maximising efficiency and results.
What is the best height for grow lights during the seedling stage?
The seedling stage requires careful management to avoid damage. For most full-spectrum LED lights, a height of 60-75 cm (24-30 inches) is a safe starting point. If using a powerful HPS light, you may need to increase this to 75-90 cm (30-36 inches) due to the heat output. Monitor your seedlings closely for stretching or stress. Finding the optimal light distance from plants at this early stage is critical for strong development.
Should I move my lights every day as the plants grow?
You don't need to move your lights daily, but regular adjustments are essential for consistent growth. Check the distance between your light and the top of the plant canopy every 2-3 days. As plants grow taller, you will need to raise the light to maintain the correct distance and prevent stress. Using adjustable light hangers makes this process quick and easy, ensuring your plants always receive the perfect amount of light without interruption.
Is a 1000W LED the same distance as a 1000W HPS?
No, the distance will be different. A 1000W HPS light generates far more heat and must be kept further from the canopy, typically 60-90 cm (24-36 inches), to prevent heat burn. A high-efficiency 1000W LED runs much cooler, allowing it to be placed closer, often around 45-60 cm (18-24 inches). The optimal light distance from plants for an LED also depends heavily on its specific diodes and lens angle, so always check the manufacturer's guidelines.