

Troubleshooting LED Grow Light Issues: The Complete 2026 Diagnostic Guide
Your LED grow lights represent a significant financial investment, but when a panel flickers or foliage begins to yellow, the fear of losing a high-value harvest becomes very real. It is incredibly frustrating to see expensive equipment underperform, especially when you are unsure if the problem is a technical failure or a simple environmental imbalance. Mastering troubleshooting led grow light issues is essential for any serious UK grower looking to protect their equipment investment and ensure their indoor garden remains productive and efficient.
Achieving peak performance from your equipment requires more than just plugging it in. When troubleshooting led grow light issues, the solution often lies in the "sweet spot"-the perfect balance between hanging height and power output. Because of the Inverse Square Law, light intensity diminishes significantly as distance increases; even a 10cm adjustment can drastically change the energy reaching your canopy. If your lights are too close, you risk photon burn; too far, and your plants will stretch and lose density. For those interested in the technology behind next-generation fixtures designed to solve these challenges, you can learn more about advanced systems.
This 2026 diagnostic guide provides a direct, practical approach to identifying light burn, driver malfunctions, and heat-related stress. We cut through the confusion between light intensity issues and nutrient deficiencies, giving you the exact steps needed to restore your fixture to full working order. By following these expert protocols, you will safeguard your equipment, maintain healthy green foliage, and gain the technical knowledge required to prevent future failures. Don't let a technical glitch compromise your yield-get your setup back to peak performance today.
Key Takeaways
- Master a systematic diagnostic approach to isolate failures within the power, driver, or diode hierarchy before considering a costly replacement.
- Save time and money by troubleshooting led grow light issues such as flickering or dimming caused by driver fatigue and unstable voltage.
- Learn to distinguish between light-induced chlorosis and nutrient deficiencies to ensure your plants can handle high-intensity LED photon pressure.
- Calculate the "sweet spot" for your hanging height using the Inverse Square Law to maximise intensity and manage heat effectively in any tent size.
- Determine when to perform a DIY repair and when to contact your UK grow shop for a warranty replacement based on actual component lifespans.
Is Your LED Grow Light Failing? A Systematic Diagnostic Approach
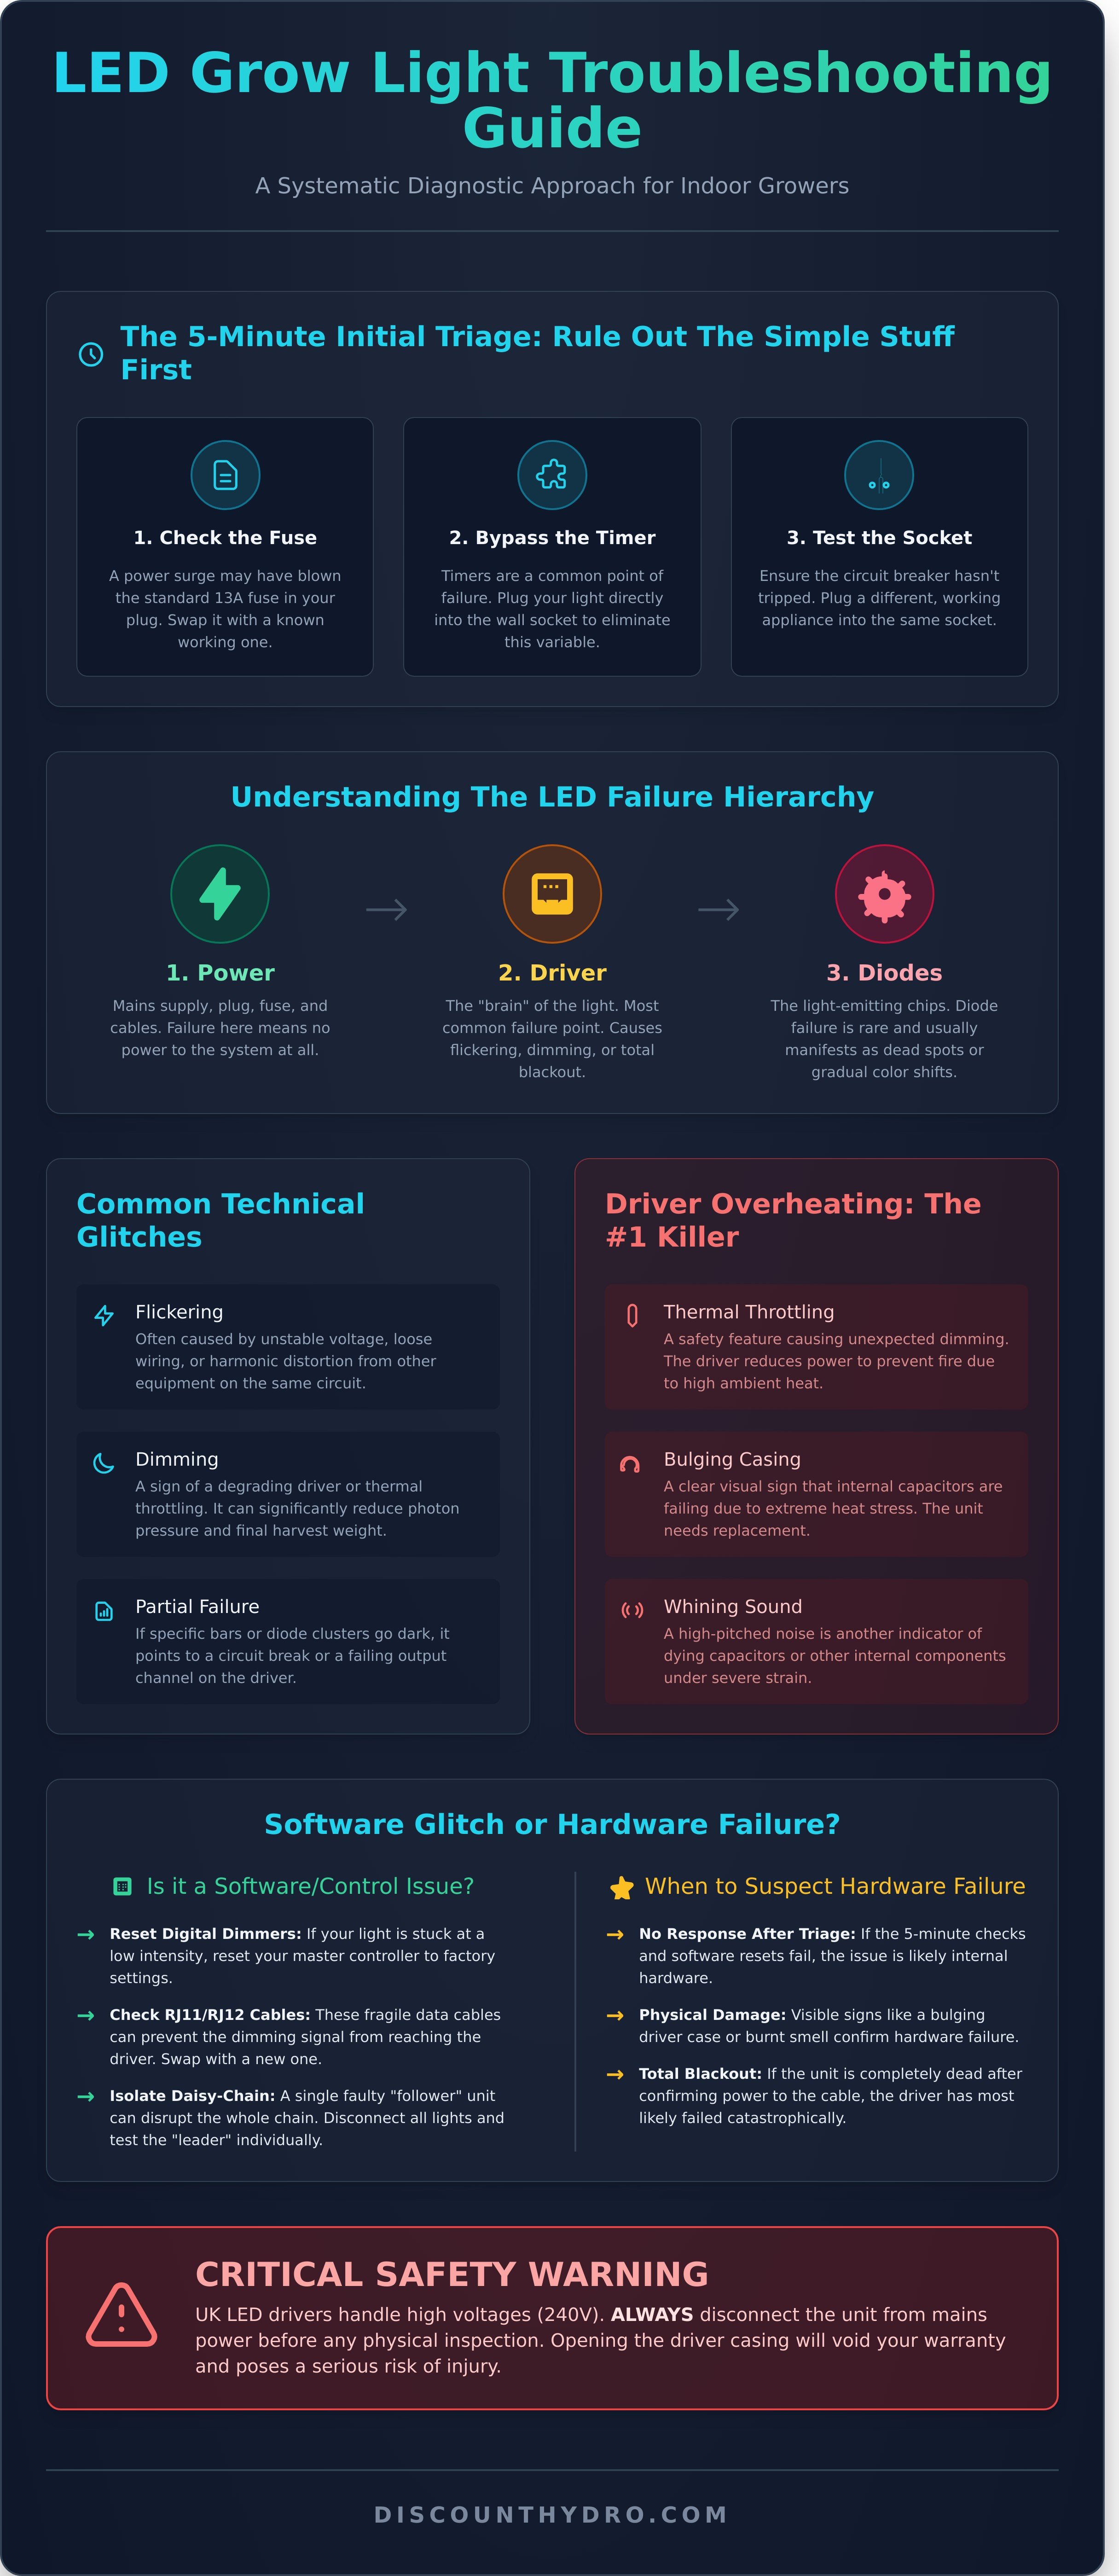
When your grow room goes dark, the problem isn't always as simple as a "blown bulb." Unlike traditional HPS kits that rely on a basic ballast and lamp setup, modern LED systems are complex electronic arrays. Understanding the different types of grow lights is essential because LEDs fail differently; they follow a strict Power-Driver-Diode hierarchy. A failure at the driver level usually results in a total blackout, whereas diode failure might manifest as individual "dead" chips or gradual spectral shift. Effective troubleshooting led grow light issues starts by identifying if you have a catastrophic hardware failure or a simple configuration error.
Safety Warning: UK LED drivers handle high voltages. Never open a driver casing or touch exposed wiring while the unit is connected to the 240V mains. If the unit is under warranty, opening it will void your protection and potentially lead to injury. Always disconnect the power before inspecting physical connections.
The 5-Minute Initial Triage
Before dismantling your rig or arranging a return, rule out the simplest external factors. This rapid troubleshooting led grow light issues checklist saves time and prevents unnecessary downtime for your plants:
- Check the Fuse: Most UK grow light leads use a standard 13A fuse. Replace it with a known working fuse to rule out a simple surge issue.
- Bypass the Timer: Mechanical and digital timers are frequent fail points. Plug the light directly into the wall socket to see if it fires up.
- The Appliance Test: Plug a different working appliance into the same socket to ensure the circuit breaker at your consumer unit hasn't tripped.
Software vs. Hardware: Identifying the Culprit
Many modern LEDs use external smart controllers, which can mimic hardware failure symptoms through software glitches. A "failed" light is often just a lost signal or a bad connection in the control line.
- Reset Digital Dimmers: If your light is stuck at a low intensity or won't turn on, reset your master controller to factory settings.
- RJ11/RJ12 Cables: These data cables are fragile. Swap them out to see if the dimming signal is reaching the driver correctly. Since quality matters for a stable signal, you can find reliable options at Netwerkkabels en Netwerkproducten – Netwerkkabelshop.
- Daisy-Chain Loops: In a multi-light setup, one faulty "follower" unit can sometimes disrupt the control signal for the entire chain. Disconnect all units and test the "leader" light individually to isolate the problem.
Common Technical Glitches: Flickering, Dimming, and Driver Failure
The LED driver is the most sensitive component in any indoor grow room. It acts as the "brain," converting AC power from your UK mains into the precise DC current required by the diodes. Most troubleshooting led grow light issues stem from driver instability rather than the LEDs themselves. Because drivers are packed with capacitors and complex circuitry, they are the first to fail when environmental conditions or power quality fluctuate.
Flickering is a primary symptom of technical failure. This is often caused by unstable voltage, harmonic distortion from other high-draw appliances, or simple loose wiring at the connection points. If you notice partial light failure-where specific bars or diode clusters go dark while others remain lit-this typically indicates a circuit break or a failing output channel on a multi-channel driver. When optimizing light intensity for maximum crop yield, even slight dimming caused by a degrading driver can significantly reduce your final harvest weight.
Understanding LED Driver Overheating
Heat is the leading killer of LED drivers. In the confined space of a grow tent, high ambient temperatures can lead to thermal throttling. This is a safety feature where the driver automatically reduces power output to prevent a fire, resulting in unexpected dimming.
- Passive vs. Active Cooling: High-wattage bar LEDs rely on large aluminium heatsinks (passive), while some older styles use internal fans (active). If fans fail or fins are clogged with dust, heat builds up rapidly.
- Dying Capacitors: Look for a bulging driver housing or listen for a high-pitched whining sound. These are clear signs that the internal capacitors are failing due to heat stress.
Power Surges and Electrical Interference
UK growers must account for local electrical standards. Using cheap extension leads over long distances causes "voltage drop," which starves the driver of power and leads to strobing.
- Surge Protection: Always use high-quality, fused surge protectors. A minor spike in the 230V grid can fry sensitive driver circuits instantly.
- RF Interference: Large extractor fans or older HID ballasts can emit Radio Frequency (RF) interference. This "noise" disrupts the driver's signal, causing erratic flickering. Ensure your LED cables are kept away from heavy-duty power cables to maintain signal stability.
Light Burn vs. Nutrient Deficiency: Identifying Plant Stress Symptoms
Distinguishing between light-induced chlorosis and a genuine hunger for minerals is a critical step when troubleshooting led grow light issues. High-intensity LEDs provide incredible efficiency, but they also create "photon pressure." When PPFD levels are pushed to the limit without a corresponding increase in CO2, the plant’s metabolic rate outpaces its ability to process nutrients, leading to a visible "burn" that many growers mistake for a simple pH or feed problem.
Understanding the threshold of your crop is vital. In a standard UK grow room environment without CO2 supplementation, plants generally max out their light tolerance around 800-1000 µmol/m²/s. Exceeding this without environmental adjustments leads to stunted growth and bleached foliage.
Spotting Light Bleaching and Leaf Curl
The primary indicator of light stress is its location. Unlike mobile nutrient deficiencies that typically begin at the base of the plant, light bleaching is strictly apical. You will see the top canopy-the parts closest to the diodes-turning white or pale yellow while the lower leaves remain a healthy green. This happens because the chlorophyll is literally being destroyed by the intensity.
- Tacoing: Watch for leaves folding upward at the edges. This is a defensive mechanism to reduce surface area and moisture loss.
- PAR Measurement: Do not rely solely on manufacturer height charts. Every environment is different. Use a dedicated PAR meter to get an accurate reading at the canopy level.
- Thermal Management: Beyond photons, the physical heat a lighting system generates can exacerbate these symptoms, drying out the leaf margins and causing crisping.
The Relationship Between Light and Cal-Mag
High-performance LEDs are notorious for increasing a plant's demand for Calcium and Magnesium. Because these lights drive such high rates of photosynthesis, the plant transpires faster and exhausts its mineral reserves rapidly. This often manifests as small brown spots or interveinal yellowing on the middle-to-upper leaves.
Before assuming you have a pest infestation, check your light height. If the spots are concentrated directly under the "hot spot" of the LED array, it is likely a light-induced deficiency. To rectify this, you must balance your hydroponic nutrients to match the aggressive growth rates these lights provide. Increasing your Cal-Mag dosage or slightly lowering the light intensity can often resolve these troubleshooting led grow light issues within a few days, ensuring your plants stay healthy through to harvest.
Optimising Your Setup: Height, Intensity, and Heat Management
Achieving peak performance from your equipment requires more than just plugging it in. When troubleshooting led grow light issues, the solution often lies in the "sweet spot"-the perfect balance between hanging height and power output. Because of the Inverse Square Law, light intensity diminishes significantly as distance increases; even a 10cm adjustment can drastically change the energy reaching your canopy. If your lights are too close, you risk photon burn; too far, and your plants will stretch and lose density.
Effective dimming strategies are essential for crop success and energy efficiency. Align your power settings with the growth stage to avoid unnecessary stress:
- Seedlings: 20-40% intensity at 60-90cm height.
- Vegetative Stage: 40-60% intensity at 45-60cm height.
- Bloom Stage: 80-100% intensity at 30-45cm height.
Hanging Height and Light Spread
Modern bar-style fixtures, such as the Omega Black 720W, distribute light much more evenly than traditional HPS lamps. While HPS creates a concentrated "hot spot" directly in the centre of the grow tent, bar LEDs allow for a lower hanging height and more uniform coverage across the entire footprint. To ensure your distribution is correct, use a LUX meter app as a baseline for uniform light levels. If you notice uneven growth at the edges, adjusting the height is the first step in troubleshooting led grow light issues related to footprint coverage.
Heat Dissipation in Enclosed Spaces
LEDs are far more efficient than HID lighting, but they still generate heat that must be managed to prevent diode degradation. For the best results in small tents, consider moving the drivers outside the enclosure to lower internal temperatures by 2-3°C. Ensure you have constant airflow across the heat sinks using clip-on fans to prevent heat build-up. Note that high humidity levels can reduce the efficiency of passive cooling; maintaining a balanced environment with high-quality extraction fans from discounthydro.com is vital for long-term fixture health and maximum yield.
When to Repair vs. Replace Your LED Fixture
The "50,000-hour lifespan" is a common industry claim, but in the practical environment of a UK grow room, heat and humidity often cut this short. When you are deep into troubleshooting led grow light issues, the most important question is whether the unit is worth saving. If your fixture is still under warranty, stop immediately and contact your UK grow shop; attempting a DIY repair will void your coverage and leave you out of pocket.
For out-of-warranty units, perform a cost-benefit analysis. If a replacement driver or high-quality COB chip costs more than 30% of a new, more efficient system, an upgrade is usually the smarter financial move. Modern fixtures now offer "driverless" technology or remote-power options, which remove the main heat source from the grow area, significantly increasing commercial reliability and reducing failure rates. The principles of expert diagnostics are universal across high-tech fields, from hydroponics to warrantied vehicle repairs at specialist garages like Diego's Shop. For those interested, you can learn more about Drone Doctor LLC to see how specialists approach similar challenges with drone technology.
Evaluating Diode Degradation
LEDs rarely fail all at once; they suffer from "lumen depreciation." If your plants are showing slower growth despite the light being on, your diodes may have lost their spectral "punch." This is often caused by heat stress or a buildup of dust and salt spray from humidifiers. To restore efficiency, clean your LEDs regularly using a dry, lint-free microfiber cloth. For stubborn grime, use a very slightly damp cloth with distilled water while the unit is unplugged and cool.
Choosing Your Next System
When troubleshooting led grow light issues leads to a dead end, look for 2026-standard features in your replacement. High efficacy (at least 2.7 umol/j) and full-spectrum control are now essential for maximizing yields. For UK hobbyists looking for professional results at a warehouse price, the Omega Black 720W LED remains a top-tier choice due to its proven reliability and intense output.
Final Purchase Checklist:
- Warranty: Ensure the manufacturer offers a UK-based repair or replacement service.
- Diodes: Look for brand-name chips like Samsung or Osram for long-term spectral stability.
- Thermal Management: Opt for fixtures with large passive heat sinks to avoid fan failures.
Ready to upgrade? Find the UK's best prices on professional lighting systems at discounthydro.com.
Get Your Grow Back on Track
Mastering troubleshooting led grow light issues is essential for maintaining a high-performance indoor garden. By identifying technical glitches like driver failure early and distinguishing between light burn and nutrient stress, you can prevent crop loss and optimise your yields. Whether you need to recalibrate your hanging heights or decide it is finally time to upgrade a failing fixture, having a systematic approach ensures your plants always receive the intensity they require for peak health.
If your current setup is beyond repair, do not let your harvest suffer. Discount Hydro offers the UK’s best prices on high-quality replacements and upgrades. As an authorised UK stockist of Omega and Intense Nutrients, we provide expert technical support for all lighting kits to ensure you get the most out of your equipment. Take advantage of our UK-wide fast delivery and secure the latest technology for less. Browse the Best Deals on LED Grow Lights at Discount Hydro today and keep your indoor garden thriving with professional-grade gear at warehouse prices.
Frequently Asked Questions
Why are my LED grow lights flickering when dimmed?
Flickering usually indicates an incompatibility between your LED driver and the dimmer switch. Most high-quality LED grow lights require specific 0-10V or PWM dimmers to function correctly. If you use a standard household trailing-edge dimmer, the voltage drop causes the diodes to strobe or flicker. Ensure your controller matches the manufacturer’s technical specifications. If the issue persists, it may be a sign of a failing driver nearing the end of its life.
Can LED grow lights actually burn my plants if they are too close?
Yes, they can. While LEDs run much cooler than traditional HPS kits, "light burn" occurs from excessive photon intensity rather than just heat. If placed too close, leaves will turn white or yellow as the plant cannot process the energy. Always maintain the recommended hanging height. For most 600W equivalent bars, keep at least 30-45cm distance during the flowering stage to avoid damaging your crop and reducing yields.
What is the most common cause of a total LED light failure?
The most common cause of total failure is a faulty LED driver rather than the diodes themselves. The driver converts AC power from your UK mains (230V) to DC. Overheating, cheap components, or power surges often fry the internal capacitors. When troubleshooting led grow light issues, always start by checking the driver. If the unit is completely dead, replacing the driver is often the most cost-effective fix to get your setup running again.
How do I know if my LED driver is faulty or just overheating?
An overheating driver will often shut down the light temporarily and restart once it has cooled, or it might cause the light to dim automatically to protect the circuits. Ensure there is adequate airflow around the unit. If the light won't turn on at all or makes a high-pitched buzzing sound, the driver is likely faulty. Check for visible signs of damage like bulging capacitors or a burnt smell before ordering a replacement part.
Is it worth repairing an LED grow light out of warranty?
It depends on the component. Replacing a £40-£80 driver on a high-end £500 light bar is a smart investment. However, if multiple individual diodes have burnt out, the labour and precision soldering required often make it cheaper to buy a new, more efficient model. We recommend weighing the repair cost against the improved PAR output and energy savings of modern LED technology before committing to a fix.
Why do some of my LED diodes look like they are glowing dimly when turned off?
This "afterglow" is usually caused by a small amount of residual current in the circuit. It often happens if your timer or switch breaks the neutral wire instead of the live wire, allowing a tiny voltage to reach the diodes. While it rarely damages the light, it can disrupt the dark cycle for sensitive plants. Using a high-quality double-pole timer or ensuring your plug is oriented correctly can usually stop the glow.
How often should I clean my LED grow light bars?
You should wipe down your light bars every 3-6 months, or between every grow cycle. Dust and dried nutrient spray on the diodes can reduce light output by up to 10%, wasting electricity and lowering your final harvest weight. Use a dry, soft microfibre cloth or a slightly damp cloth with isopropyl alcohol. Never use abrasive cleaners or spray liquids directly onto the diodes to avoid short-circuiting the board.
Do I need a special surge protector for my hydroponic LED setup?
Yes, a dedicated surge protector is highly recommended for any UK hydroponic setup. LED drivers are sensitive to voltage spikes from the grid or from heavy equipment like extractor fans and water pumps kicking in. A high-quality surge-protected power strip protects your investment from being fried. When troubleshooting led grow light issues, many failures can be traced back to preventable electrical surges that a £15 protector would have stopped.