
What is a Hygrometer and Why Every Grower Needs One
Are your plants looking less than perfect, despite getting the best lights and nutrients? The problem might not be what you're adding, but what's already in the air. Uncontrolled humidity can stall growth, invite pests, and even lead to crop-destroying mould. But mastering this crucial element is simpler and cheaper than you might think, and it all starts with a simple, effective tool: the hygrometer.
This no-nonsense guide will show you why this device is essential for any serious grower. We'll cut through the technical talk and explain exactly what Relative Humidity (RH) is and how it impacts your plants at every stage. You will learn how to choose the right tool for your budget, where to place it for accurate readings, and the simple steps to take to dial in the perfect environment. Get ready to stop guessing and start controlling the key to the bigger, healthier yields you've been working for.
Key Takeaways
- Learn why Relative Humidity (RH) is a critical factor for preventing mould and maximising the weight of your harvest.
- Discover the key features to look for when choosing the right hygrometer, ensuring you get reliable data for your specific grow setup.
- Avoid common mistakes by learning exactly where to place your device to get the most accurate canopy-level readings.
- Turn your readings into results with simple, low-cost methods for raising or lowering humidity to match your plant's growth stage.
What is a Hygrometer and Why is it Essential for Your Grow Room?
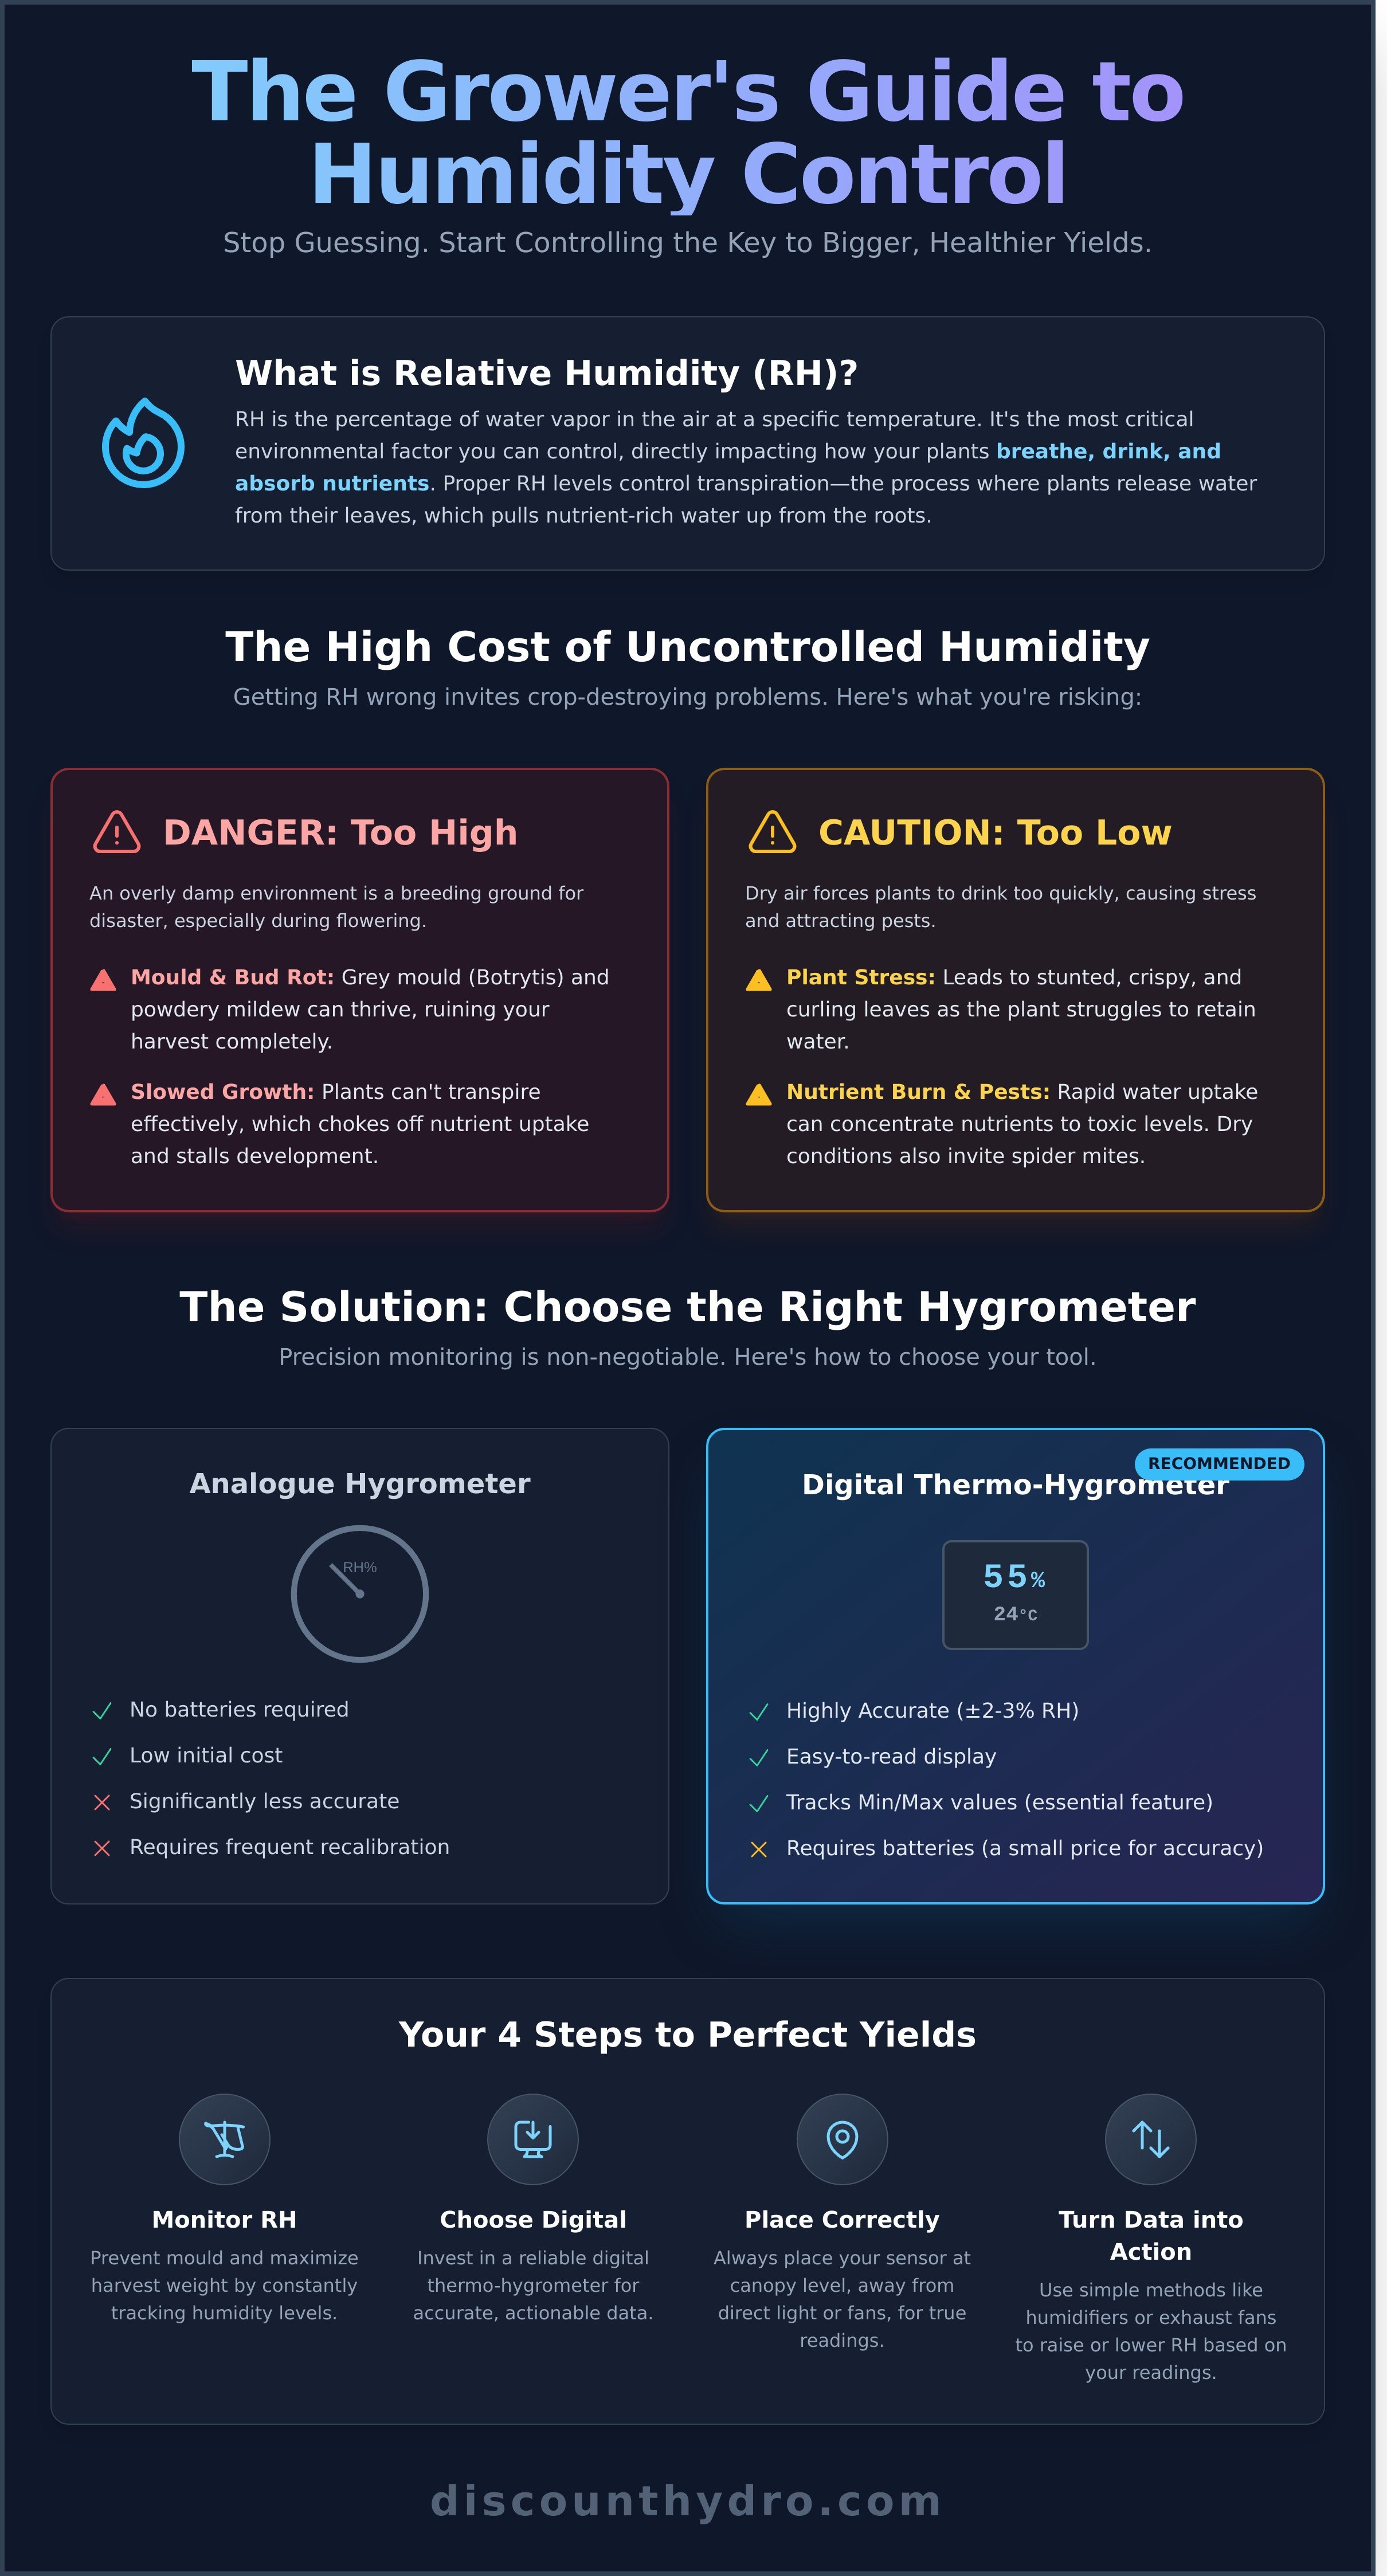
A hygrometer is a straightforward, essential tool that measures the amount of water vapour-or humidity-in the air. For any serious indoor grower, it's not an optional extra; it's a critical piece of equipment for maximising yield and preventing crop failure. While the technical details behind what is a hygrometer can be complex, its function is simple: it gives you a precise reading of the moisture level in your grow room environment. This measurement is crucial because humidity directly controls how your plants 'breathe', drink, and absorb nutrients.
The key reading you'll get from your hygrometer is Relative Humidity (RH). RH is expressed as a percentage, indicating how saturated the air is with water vapour at its current temperature. Think of it as a dial for your plant's most vital functions. The RH level in your grow room dictates the rate of transpiration-the process where plants release water vapour from their leaves. This process is directly linked to nutrient uptake; as water evaporates from the leaves, it creates a pull that draws nutrient-rich water up through the roots. Get the RH wrong, and your entire feeding schedule can be thrown off balance.
The Critical Role of Humidity in Plant Growth
Plants breathe through tiny pores on their leaves called stomata. When humidity is optimal, these stomata open to take in CO2 and release water vapour at a healthy, controlled rate. This transpiration acts like a biological pump, pulling water and essential nutrients from the root zone up to the rest of the plant. Correct transpiration means efficient feeding and robust growth. If the RH is too high or low, this entire system breaks down, directly impacting plant health and final yield.
Common Problems Caused by Incorrect Humidity
Failing to control your grow room's humidity is a direct invitation for disaster. The wrong RH level creates a perfect breeding ground for a host of expensive problems that can ruin your entire crop:
- High Humidity Issues: An overly damp environment is a magnet for fungal diseases. You risk outbreaks of grey mould (Botrytis), powdery mildew, and devastating bud rot, especially during the critical flowering stage.
- Low Humidity Issues: When the air is too dry, your plants transpire too quickly. This leads to stress, stunted leaf growth, and crispy, curling leaves. It can also cause nutrient burn, as the plant draws up too many nutrients with the excess water.
- Pest Infestations: Dry conditions are ideal for pests like spider mites. An infestation can quickly overwhelm your plants, and is far more difficult and costly to fix than simply managing your humidity from the start.
Types of Hygrometers: Analogue vs. Digital
When choosing a hygrometer for your grow room, the main choice is between traditional analogue models and modern digital units. Both measure humidity, but their accuracy, features, and cost differ significantly. For a controlled environment where precision is non-negotiable, understanding these differences is key to making the right investment.
Analogue Hygrometers: The Traditional Choice
Analogue hygrometers are the classic, dial-faced instruments. They operate mechanically, typically using a synthetic hair or a metal coil that expands and contracts with changes in air moisture, moving the needle on the display. While simple, they come with notable trade-offs for a serious grower.
- Pros: No batteries needed, which means no power failures. They also have a lower initial purchase price.
- Cons: They are significantly less accurate than digital models and can be difficult to read precisely from a distance. More importantly, they can lose their accuracy over time and require recalibration. While professional Hygrometer calibration services are available for scientific instruments, for a grow room, this is an unnecessary hassle.
Digital Hygrometers: Accuracy and Modern Features
Digital hygrometers use electronic sensors to provide a precise humidity reading on a clear LCD screen. They are the standard for modern indoor cultivation due to their reliability and extra features that give growers more control over their environment.
- Pros: Highly accurate readings (often within ±2-3% RH). The digital display is easy to read at a glance. Many models include a memory function to track minimum and maximum humidity levels, which is essential for diagnosing environmental swings.
- Cons: They require batteries, which will need replacing periodically. The initial cost can be slightly higher than a basic analogue model, but the value they provide in accuracy is well worth the small difference.
Thermo-Hygrometers: The All-in-One Grow Room Tool
For maximum efficiency, nearly all growers opt for a thermo-hygrometer. This device combines a hygrometer and a thermometer into a single, compact unit, displaying both relative humidity and temperature on the same screen. Since temperature and humidity are closely linked and both affect your plants' health, monitoring them with one tool is a no-brainer.
This is the most practical and cost-effective solution for any grow room. You get two critical environmental meters for the price of one, saving space and simplifying your setup. It's the undisputed best choice for controlling your grow environment.
Ready to get the best tool for the job? Browse our range of digital thermo-hygrometers.
How to Choose the Right Hygrometer for Your Grow Setup
You know you need to monitor humidity, but which tool is right for the job? Choosing a hygrometer isn't complicated. The best choice comes down to the size of your grow space and the features you need to maintain total control. Let's cut through the noise and find the right unit for your setup at the best price.
Key Features to Look For
Don't get bogged down in technical specs. Focus on these four essential features that deliver real-world results in your grow room:
- Accuracy: Look for a unit with an accuracy of at least +/- 5% RH. Anything less is just guesswork. You need reliable data to make the right adjustments to your fans and dehumidifiers.
- Readability: A large, clear digital screen is non-negotiable. A backlight is a huge bonus for checking your environment during lights-off periods without disturbing your plants.
- Min/Max Memory: This is crucial. This function records the highest and lowest humidity and temperature readings, so you can see exactly what happens in your tent when you’re not there.
- External Probe: A basic hygrometer measures the air around its casing. A model with a wired external probe lets you place the sensor right at your plant's canopy level-where it really matters-while keeping the display outside the tent for easy viewing.
Matching the Hygrometer to Your Grow Tent Size
The size of your operation dictates how many sensors you need. A single reading might not tell the whole story, as different areas of your tent can have surprisingly different conditions. Managing these microclimates is key, and as experts on reducing humidity in the greenhouse will tell you, accurate data is the first step to effective environmental control.
- Small Tents (up to 1.2m x 1.2m): One reliable unit placed at canopy level is usually enough to give you a solid overview of your conditions.
- Larger Tents & Grow Rooms: For bigger spaces, use at least two. Place one near your air intake to measure the incoming air and another at the canopy level, away from direct airflow. This gives you a complete picture of how humidity behaves in your environment.
Budget vs. Premium: What Do You Get For Your Money?
You can get started for less than a tenner, but is it worth spending more? It all depends on your needs.
Budget models (under £15) are perfect for beginners. They cover the essentials: accurate RH and temperature readings, and often a min/max function. They do the core job effectively without any fuss.
Premium models (£30+) offer advanced features for serious growers. Expect superior accuracy, data logging to track trends over time, and even Wi-Fi connectivity to check your grow room stats on your phone from anywhere. While these features are powerful, remember this: any accurate hygrometer is infinitely better than none at all. Start with what you can afford and get your environment dialled in.
Using Your Hygrometer: Placement, Reading, and Calibration
Buying a quality hygrometer is the first step. Using it correctly is what protects your investment and maximises your yield. This device isn't just for watching numbers change; it's a tool that tells you exactly when to take action. Getting bad data from incorrect placement is a common beginner mistake that leads directly to poor results.
Optimal Hygrometer Placement in a Grow Tent
Where you place your sensor is critical. Put it in the wrong spot, and the reading is useless. Follow these simple rules to get data that reflects your plant's real-world environment:
- At Canopy Level: The most important reading is the humidity right where the leaves are. Always place your sensor level with the top of your plant canopy. As your plants grow, move the sensor up.
- Avoid Direct Exposure: Keep the sensor out of the direct beam of your grow light and away from the direct airflow of fans, humidifiers, or dehumidifiers. Direct exposure will give you skewed, inaccurate readings.
- Stay Off the Floor and Ceiling: The floor is often the coolest, most humid spot, while the area near the ceiling is the hottest and driest. Neither of these locations represents what your plants are actually experiencing.
Understanding Ideal Humidity Levels for Plant Stages
Your plant's humidity needs change dramatically as it grows. Young plants with undeveloped root systems absorb moisture through their leaves in high humidity. Flowering plants, however, need drier air to transpire properly and prevent mould. Stick to these proven targets for best results.
| Growth Stage | Ideal Relative Humidity (RH) |
|---|---|
| Clones / Seedlings | 70% - 80% |
| Vegetative | 50% - 70% |
| Flowering | 40% - 50% |
Dropping the relative humidity (RH) during the late flowering stage is non-negotiable. High humidity at this point is the number one cause of bud rot (Botrytis), which can wipe out an entire harvest in days.
How to Calibrate Your Hygrometer for Accurate Readings
Even a good quality hygrometer can drift over time, giving you false data. To ensure your readings are reliable, you should test its calibration once or twice a year. The 'salt test' is a simple and effective method:
- Place a teaspoon of table salt in a bottle cap and add a few drops of water to make a damp slurry (it should not be dissolved).
- Put the salt cap and your hygrometer inside a sealed zip-lock bag or an airtight container.
- Leave it for at least 8-12 hours in a stable temperature.
- The hygrometer should read exactly 75% RH. If it's off, note the difference and adjust your readings accordingly, or replace it. Trusting a faulty tool is worse than having no tool at all.
How to Control Humidity Based on Your Hygrometer Data
A hygrometer gives you the critical data; now it's time to use it to your advantage. Actively managing your grow room's relative humidity (RH) based on these readings is the key to preventing problems like mould and pushing your plants to their full potential. Here are the straightforward, actionable steps you can take to dial in your environment.
How to Lower Humidity in Your Grow Room
High humidity, especially during flowering, is a recipe for bud rot and poor growth. If your readings are consistently too high, take these steps:
- Increase Air Exchange: The most effective way to drop humidity is to move the damp air out and pull fresh, drier air in. Turn up your extractor fans to increase the rate of air exchange in your tent or room.
- Use a Dehumidifier: For precise, powerful control, nothing beats a dedicated dehumidifier. It actively pulls moisture from the air, allowing you to hit exact RH targets, which is vital for a quality finish.
- Avoid Overwatering: Excess water sitting in your pots or system trays will evaporate and directly increase the RH. Ensure your plants are using the water you give them and that there is no standing water.
Your ventilation system is your primary tool for humidity control. Get the best equipment for the job and shop for extractor fans and filters here.
How to Increase Humidity When It's Too Dry
Low humidity can stress your plants, especially seedlings and clones, causing them to transpire too quickly. If your grow room is too dry, here’s how to fix it:
- Add a Humidifier: This is the most reliable and controllable method. A cool mist humidifier is often best as it won't add unwanted heat to your grow space.
- Try Simple DIY Tricks: For small adjustments, you can hang a wet towel or place a few open containers of water in the grow room. The passive evaporation will gently raise the RH.
- Reduce Fan Speed: If your extraction is too aggressive, it might be pulling humid air out too quickly. Try slightly reducing the speed of your extractor fan with a controller to help maintain a higher RH.
From Humidity to VPD: The Next Step in Environment Control
Once you're comfortable managing RH, the next step is to master Vapour Pressure Deficit (VPD). In short, VPD is the relationship between temperature and relative humidity. It provides a much more accurate measure of the "drying power" of the air on your plants, which directly impacts their transpiration rate and nutrient uptake.
Optimising for the correct VPD-not just RH-is the ultimate way to steer your plants towards explosive growth. For growers ready to unlock the next level of environmental control, we highly recommend reading our dedicated 'VPD Chart' article to learn more.
Take Control and Maximise Your Yields
To put it simply, a grow room without a hygrometer is a grow room left to chance. This essential tool is your front line of defence, providing the critical data needed to manage humidity levels effectively. As we've covered, proper humidity control is non-negotiable for preventing issues like mould, mildew, and pests, while also ensuring optimal nutrient uptake for vigorous growth. From choosing between analogue and digital to knowing exactly where to place it, using a quality hygrometer correctly is the key to unlocking your plants' full potential and securing a heavy, healthy harvest.
Don't guess when you can know for sure. Get the precision your plants deserve and eliminate the risk of a failed crop. Shop our full range of accurate hygrometers and meters today. We guarantee the UK's best prices on all your grow room essentials. Plus, with fast, nationwide delivery on all orders and Click and Collect available from our Durham store, you can have your environment dialled in without delay. Start growing smarter.
Frequently Asked Questions
What is the best place to put a hygrometer in a grow tent?
For the most accurate reading, place your hygrometer at the plant canopy level. This measures the environment your plants are actually experiencing. Avoid placing it directly in the path of a fan, humidifier, or under intense grow lights, as this will give you false readings. Keep it in a shaded, central location amongst your plants to get a true average of the grow tent's conditions. This ensures you're making adjustments based on real data, not skewed measurements.
What is the ideal humidity for the flowering stage of plant growth?
During the flowering stage, you must lower the relative humidity (RH) to between 40-50%. This is crucial for preventing common issues like bud rot and powdery mildew, which thrive in damp conditions and can ruin a harvest. Maintaining this lower humidity range also encourages better resin production and helps ensure a dense, high-quality final yield. Consistent monitoring during this critical phase is key to success, so check your readings daily to stay within this target range.
How accurate are cheap digital hygrometers?
Most budget-friendly digital hygrometers, like those available for under £10, are perfectly adequate for home grow rooms. They typically have an accuracy of +/- 5% RH, which is a sufficient margin for making effective environmental adjustments. While professional-grade units offer greater precision, a basic digital model provides the essential data you need to manage humidity without overspending. For the price, they offer excellent value and reliability for the vast majority of indoor growers.
Do I need a hygrometer with an external probe?
A model with an external probe offers a major advantage: you can place the sensor directly at the plant canopy while keeping the display unit outside the tent for easy viewing. This means you get the most accurate, relevant readings without disturbing your grow environment by opening the tent flap. For growers who want precise data and maximum convenience, a hygrometer with an external probe is a smart investment that simplifies monitoring and gives you better control over your setup.
How often should I check my hygrometer readings?
You should check your readings at least once or twice daily to stay on top of environmental changes. The most important times to check are just after the lights turn on and again after they turn off, as temperature shifts will significantly impact humidity. Also, check your levels after watering or feeding your plants. This regular monitoring allows you to react quickly with your fans or dehumidifier before any humidity issues become a serious problem for your crop.
Can I use one hygrometer to monitor multiple grow tents?
This is not recommended. Each grow tent is a unique, sealed environment, and humidity levels can vary drastically between them based on plant density, ventilation, and lighting. Moving a single device back and forth won't give you accurate, real-time data for either space. Given their low cost, it is a much safer and more effective strategy to invest in a dedicated unit for each individual grow tent. This small investment helps protect your entire crop from potential failure.
How do I know if my hygrometer is broken?
Signs of a faulty unit include a frozen display, readings that never change, or numbers that are clearly inaccurate (e.g., showing 10% RH right after you've misted your plants). If you suspect an issue, you can perform a simple "salt test" at home to check its calibration. If the readings are significantly off or the device is completely unresponsive, it's time for a replacement. A new, reliable unit is a small price to pay for accurate environmental control.