
How to Hang LED Grow Lights Safely: The Complete 2026 Guide
You’ve invested in a powerful, high-performance LED grow light. Now comes the critical step that makes or breaks your setup: installation. The thought of a heavy, expensive unit falling onto your prized plants is a real fear for any serious grower. Add the confusion over UK electrical circuit limits or the challenge of mounting to high ceilings with no visible joists, and a simple task becomes a major source of stress. Getting this wrong doesn’t just put your crop and equipment at risk-it’s a genuine safety hazard for your home.
This guide cuts through the noise. We are going to show you exactly how to hang led grow lights safely and securely. Forget the guesswork and uncertainty. You will master the structural requirements for a rock-solid mounting, learn how to create a fire-safe cable management system, and perfectly position your lighting for maximum yield. It's time to protect your investment and build a grow space with the professional-grade safety and performance you need.
Key Takeaways
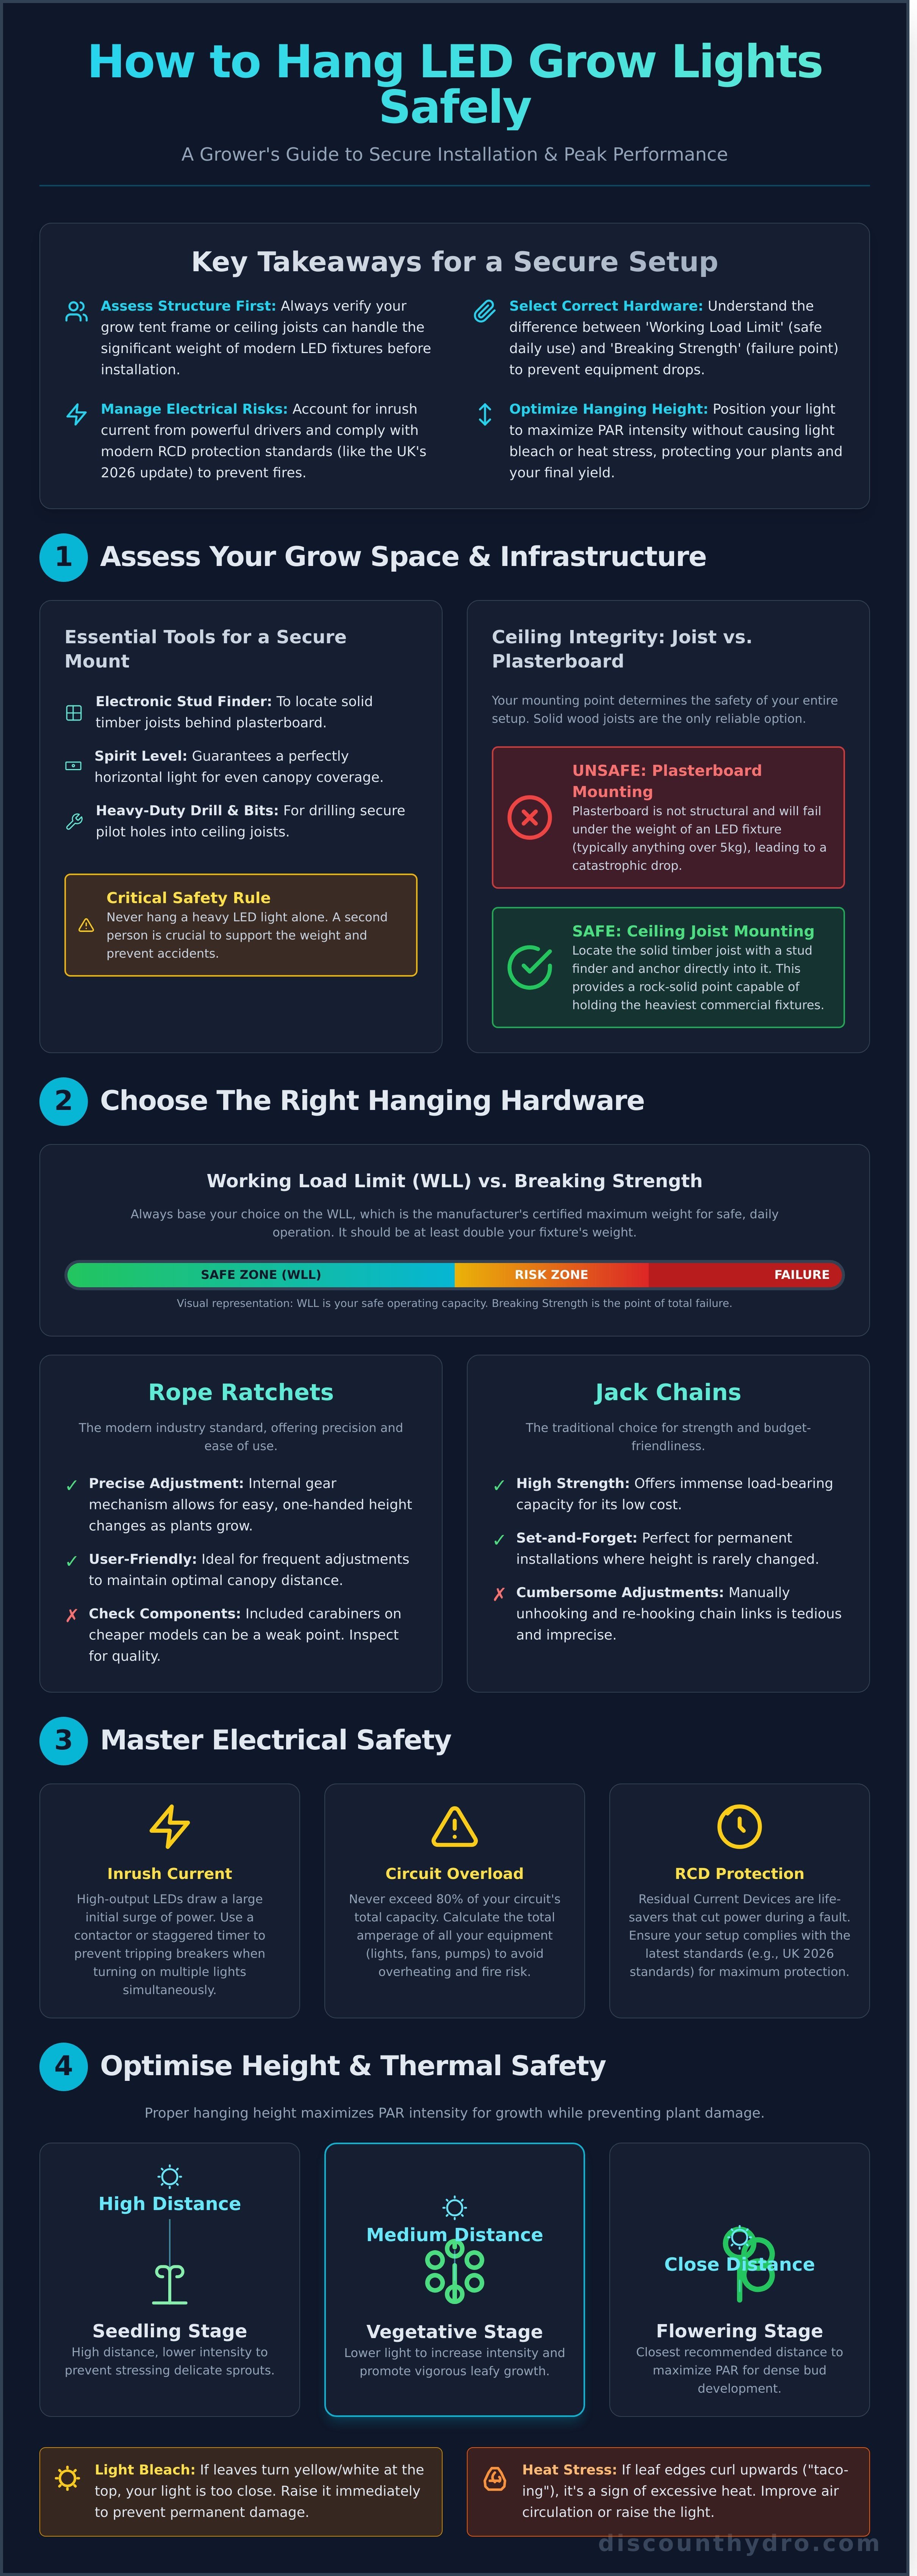
- Assess your grow space's structural limits before buying. Discover if your tent frame or ceiling joists can support the significant weight of modern, high-output LED fixtures.
- Select the correct hanging hardware by understanding the critical difference between 'Working Load Limit' and 'Breaking Strength' to prevent costly equipment drops.
- Master how to hang led grow lights safely by managing electrical risks like inrush current and complying with the latest 2026 UK standards for RCD protection.
- Optimise your hanging height to maximise PAR intensity for your crops without causing light bleach or heat stress, protecting your final yield.
Assessing Your Grow Space Infrastructure for Heavy LEDs
The first step in learning how to hang led grow lights safely is to evaluate your structure. Unlike older, lighter HPS systems, modern LED fixtures pack advanced drivers, diodes, and substantial heatsinks into single, heavy units. For a complete overview of grow light technology and its evolution, this resource is invaluable. While a grow tent comes with a frame rated for a specific weight, a permanent room requires you to verify its structural integrity. Don't risk your investment or your safety by making assumptions.
Before you begin, gather the essential tools for the job. Using the right equipment from a reliable DIY supplier like Klevaro prevents damage and ensures a secure installation.
- Electronic Stud Finder: To locate solid timber joists behind plasterboard.
- Spirit Level: Guarantees your light hangs perfectly horizontal for even canopy coverage.
- Heavy-Duty Drill & Bits: For drilling pilot holes into joists for secure anchor points.
A critical safety rule: never hang a heavy light alone for the first time. These units can be awkward and heavy. A second person can help support the weight, pass tools, and prevent accidents.
Identifying Ceiling Joists and Weight Limits
Slide your stud finder across the ceiling until it beeps, indicating the edge of a timber joist. Mark both edges to find the centre. This solid wood is your only safe mounting point. To calculate the dead load, simply use the fixture's specified weight. As a rule, never rely on plasterboard alone for any fixture over 5kg-it is not designed to bear weight and will fail.
Hanging Solutions for High or Slanted Ceilings
For irregular spaces, you may need to install a cross-beam or 'bridge' mount between two joists to create a central hanging point. Freestanding light racks offer a non-permanent alternative but take up valuable floor space. For the most secure ceiling mount, drill a pilot hole into the centre of a joist and screw in a heavy-duty eye-bolt. This provides a rock-solid anchor capable of holding the heaviest commercial LED fixtures on the market.
Choosing the Right Hanging Hardware: A Comparative Analysis
Your high-performance LED grow light is a significant investment. Securing it properly isn't just about protecting that investment-it's about the safety of your entire grow space. Hanging gear has evolved from basic chains to precision-engineered systems, and choosing the right one is the first step in learning how to hang led grow lights safely. Before you buy, you must understand the difference between 'Working Load Limit' (WLL) and 'Breaking Strength'. WLL is the maximum mass the hardware is certified to support in daily use, while Breaking Strength is the point of catastrophic failure. Always base your choice on the WLL, ensuring it's at least double the weight of your fixture.
In the high-humidity environment of a grow tent or room, rust is your enemy. Components made from stainless steel or with a corrosion-resistant coating are essential to prevent weakening over time. Regularly inspect your hardware for signs of wear and tear, such as fraying ropes, bent metal, or rust, before it leads to failure.
Rope Ratchets vs. Jack Chains
The two most common hanging solutions offer different advantages. Rope Ratchets are now the industry standard, providing unmatched ease of use. Their internal gear mechanism allows for precise, one-handed height adjustment, which is crucial for maintaining the optimal distance from your canopy as your plants grow. For heavier 720W+ fixtures, check the quality of the included carabiners. Low-quality clips can bend under load; look for strong, reliable connections.
Jack Chains are the traditional, high-strength, and budget-friendly alternative. Best suited for permanent or "set-and-forget" installations, they offer immense strength for their cost. However, adjusting their height is a manual process that can be cumbersome, requiring you to unhook and re-hook links on both sides of the light.
Specialised Mounting Brackets and Rails
For larger operations or growers seeking maximum efficiency, specialised hardware is the best solution. Sliding rail systems allow you to move a single light fixture to cover a larger footprint, perfect for multi-plant setups. For large, multi-bar LED fixtures that can be difficult to balance, 'Y-hangers' provide an additional central hanging point for superior stability. Finally, look for systems that use spring-loaded clips on their carabiners; they allow for quick release, making maintenance and cleaning of your light fixture far simpler and safer.
Electrical Safety: Preventing Fires and Circuit Overloads
Physical mounting is only half the battle. True safety comes from understanding the electrical load you're placing on your home's circuits. High-wattage LEDs have a significant "inrush current"-a momentary spike when they turn on that can trip breakers or degrade components over time. This is a critical aspect of how to hang led grow lights safely and prevent the number one risk: electrical fires.
Recognising these risks, upcoming 2026 UK electrical standards will mandate specific RCD protection for circuits powering indoor gardens. Getting your setup right today is not just smart; it's future-proofing your investment. For those interested in the broader landscape of renewable energy and advanced electrical systems, you can check out EEHD Erneuerbare Energien Handel und Distribution GmbH to see how professionals are evaluating key components for 2026 and beyond.
Calculating Amperage and UK Circuit Loads
Your equipment's power draw is the most important calculation. Look at the label on your LED driver for the "Input Power" in watts (W). To find the amperage (A), use this simple formula: Watts / 240V = Amps. For example, a 600W light draws 2.5A.
Now, apply the '80% Rule'. A standard UK 13A socket can theoretically handle 3120W, but for continuous loads, you should never exceed 80% of its capacity (around 2496W or 10.4A). Add up the wattage of everything on that circuit:
- LED Lights
- Extractor Fans
- Circulation Fans
- Water Pumps
If your total wattage exceeds 2496W, you must call a licensed electrician to install a dedicated 16A circuit. Do not risk overloading a standard ring main.
Professional Cable Management and Drip Loops
Water and electricity are a lethal combination. Always use the 'Drip Loop' technique: allow the power cord to dip down below the socket before rising back up to it. This simple loop ensures any condensation or drips will fall to the floor instead of running into the electrical outlet.
Keep all wiring tidy and away from heat sources using cable ties or trunking. The hottest and most dangerous part of your LED is the driver-it can get extremely hot. Ensure cables are not resting on it. Finally, never use cheap, multi-socket household extension leads. They are not rated for the continuous high power draw of grow equipment and are the leading cause of fires. If you must use a power strip, invest in a heavy-duty, surge-protected unit designed for workshop use. Proper cable management is essential for learning how to hang led grow lights safely and effectively.
Optimising Light Height and Thermal Safety for Your Crops
Once your LED is securely mounted, the job isn't finished. The height of your light directly impacts its intensity (PAR/PPFD) and the temperature at the canopy level. Hanging a powerful LED too low is a common mistake that causes 'light bleach' and heat stress, creating 'hot spots' that scorch your most promising growth. Getting this balance right is a critical part of how to hang led grow lights safely and effectively for maximum yield.
The goal is to deliver the maximum usable light without damaging the plant. Constant monitoring is key. For precise control, an infrared thermometer is an essential, low-cost tool. It allows you to take instant readings of your canopy's surface temperature, ensuring your plants are thriving, not just surviving.
The Inverse Square Law and Hanging Distance
Light intensity decreases exponentially with distance. The inverse square law means if you double the distance from the light to the canopy, the light intensity falls to just one-quarter of its original strength. This is why small adjustments in height have a huge impact. Always start high and lower the light gradually.
- Seedlings & Clones: 60-75 cm. Young plants are sensitive and require low intensity.
- Vegetative Stage: 45-60 cm. As plants grow stronger, you can lower the light to increase intensity.
- Flowering Stage: 30-45 cm. This is where high PAR is needed, but be vigilant for signs of stress.
Note that LED lens angles matter. A 90-degree lens creates a more focused, intense beam, requiring a greater hanging height than a 120-degree lens which spreads the light wider.
Heat Dissipation and Airflow Requirements
Even efficient LEDs produce heat. To prevent heat buildup, maintain a 'Thermal Gap' of at least 15 cm between the top of the light fixture and the ceiling or roof of your tent. This allows air to circulate and heat to dissipate naturally. If you're using active cooling, such as extractor fans, ensure they are positioned to pull hot air up and away from the light, not against it. When planning how to hang led grow lights safely, also consider your carbon filter placement. Ensure its weight and position don't interfere with or place strain on your light's hanging chains or ratchets.
Step-by-Step Installation and Long-Term Maintenance
You've selected the right light for your space; now for the most critical part. Following a professional process is central to learning how to hang led grow lights safely and getting maximum performance from your investment. This is not a 'set and forget' task. A dynamic grow room requires attention to detail from installation to harvest.
The 5-Step Hanging Process for Professional Results
For larger fixtures, a two-person installation is recommended. Before you begin, always double-check that your chosen mounting point can handle at least three times the weight of your LED fixture. This simple workflow ensures a secure and level setup every time.
- Structural Marking & Pilot Holes: Measure and mark the locations for your mounting points on the ceiling or grow tent frame. Use a stud finder for ceilings to locate joists. Drill pilot holes that are slightly smaller than your screw-in hardware.
- Anchor & Eye-Bolt Installation: Securely screw your eye-bolts or other anchors into the pilot holes. For plasterboard, ensure you are using appropriate heavy-duty anchors rated for the light's weight. Tug firmly on each anchor to confirm it is secure.
- Hardware Attachment & Levelling: Attach your rope ratchets or chain hangers to the anchors. Use a spirit level across the hangers to ensure they are perfectly even before attaching the light. An unlevel fixture creates uneven light distribution and stress on the hardware.
- Fixture Mounting & Initial Height: With a helper, carefully lift and connect the fixture to the hangers. Adjust to the manufacturer's recommended starting height for your specific plants.
- Cable Routing & Final Inspection: Route the power cord to your outlet, ensuring it has enough slack for future height adjustments and is not a trip hazard. Before plugging in, perform a final 'Double-Check' of every connection point, from the ceiling anchor to the fixture itself.
Routine Safety Inspections and Hardware Checks
A safe grow room is an efficient grow room. Regular maintenance prevents equipment failure and protects your investment. Neglecting your setup can void your warranty and create serious hazards.
- The Monthly Audit: Once a month, inspect all hardware. Check rope ratchets for any sign of fraying or slippage. Ensure carabiners and clips are fully closed and under proper tension.
- Cleaning Your LEDs: Dust and grime buildup can trap heat, reducing efficiency and creating a fire hazard. Always unplug the unit before cleaning. Use a dry microfibre cloth to gently wipe the diodes and housing. Never use liquid cleaners.
- Adjusting for Plant Growth: As your canopy grows, you will need to raise the light. Adjust the height smoothly using your rope ratchets, avoiding any sudden drops that could shock the components or mounting points.
Always follow the manufacturer's specific hanging instructions to maintain your warranty. For a full range of heavy-duty rope ratchets, hangers, and other essential accessories at the UK's best prices, visit us at discounthydro.com.
Secure Your Setup for a Successful Harvest
Getting your lighting installation right is the foundation of a high-yield indoor garden. Remember the core principles: always assess your ceiling or tent's load capacity, choose hanging hardware that far exceeds the weight of your light, and never compromise on electrical safety. Mastering how to hang led grow lights safely isn't just about protecting your equipment; it's about safeguarding your entire investment and ensuring optimal conditions for your plants to thrive.
Don't cut corners on essential gear. Shop our range of high-strength LED hanging hardware and professional grow lights today. We guarantee the UK's best prices on leading brands like Omega and Gavita, all backed by fast, UK-wide delivery. For growers in the North East, we also offer specialist advice for our County Durham customers to ensure you get the perfect setup.
With the right equipment and a focus on safety, you're perfectly positioned for a bountiful and rewarding growing cycle.
Frequently Asked Questions
Can I hang my LED grow lights from a plasterboard ceiling without a joist?
No, you should never hang an LED grow light directly from plasterboard. It is not designed to bear significant weight and can easily fail, causing your light to fall. Always use a stud finder to locate a wooden ceiling joist and fix your hanging points directly into it. If a joist is not in the right position, you must use heavy-duty plasterboard fixings, such as toggle bolts, that are rated to hold well above the weight of your fixture.
How much weight can standard grow tent poles support for lighting?
Most standard grow tent frames can support a total weight of between 25kg and 50kg, but this varies significantly between brands and models. It is essential to check the manufacturer's specifications for your exact tent. Remember to add up the total weight of your lights, carbon filter, and extractor fan. Never exceed the recommended weight limit, as this can cause the poles to bend or the entire frame to collapse, destroying your equipment.
What is the best way to hide and secure grow light cables?
The safest way to manage cables is to keep them neat and away from heat sources and water. Use velcro straps or heavy-duty cable ties to run cords along the tent poles or hanging chains. Outside of a tent, plastic cable trunking fixed to a wall provides a clean and secure solution. Always leave a 'drip loop'-a dip in the cable before it reaches the socket-to prevent any water from running into the electrical outlet.
Do LED grow lights get hot enough to start a fire if they touch the ceiling?
While modern LEDs run much cooler than old HPS lights, their heat sinks and drivers still generate significant heat. Direct contact with a flammable surface like a grow tent wall or ceiling is highly unlikely to cause a fire, but it is an unnecessary risk. More importantly, blocking airflow by touching a surface will cause the unit to overheat, reducing its efficiency, shortening its lifespan, and potentially voiding your warranty. Always maintain proper clearance.
How do I know if I’m overloading my household circuit with too many lights?
To check your load, use this simple formula: Amps = Watts / Volts. In the UK, the voltage is 230V and a standard wall socket is on a 13-amp circuit, giving a maximum of 2990W. For safety, you should not exceed 80% of this, which is about 2392W. Add up the total wattage of all lights, fans, and pumps connected to the same circuit. If the total is approaching 2392W, you must use a separate circuit to avoid tripping breakers.
Can I use zip ties to hang my LED grow lights permanently?
No, you should not use plastic zip ties for the primary suspension of your grow lights. While they are excellent for managing cables, they are not designed to bear weight long-term. The plastic can become brittle over time due to heat and light exposure, eventually snapping without warning. For a secure setup, always use the metal chains or adjustable rope ratchets that are supplied with your light or sold specifically for this purpose.
What should I do if my ceiling is too high for the included hanging kit?
If the supplied kit is too short, the best option is to purchase longer hardware. You can buy heavy-duty galvanised chain from a hardware store and cut it to the exact length you need. Alternatively, specialist hydroponics retailers sell extra-long adjustable rope ratchets. Knowing how to hang led grow lights safely in rooms with high ceilings is simple with the right equipment. Avoid linking multiple short kits together, as this creates more potential points of failure.
How often should I replace my rope ratchets or hanging chains?
Always inspect your hanging hardware before starting a new grow cycle. For rope ratchets, check the rope for any signs of fraying and test the locking mechanism to ensure it still holds firm. It's good practice to replace rope ratchets every 1-2 years, as the internal components can wear out. Metal chains should last for many years, but you must replace them immediately if you see any signs of rust, corrosion, or stretched links.