
Spider Mites: The Ultimate Guide to Identification, Elimination, and Prevention
You’ve seen the signs. The tiny yellow spots on the leaves, the faint, silky webbing that appears overnight. Your valuable plants are under attack, and the culprit is one of the most destructive pests for any indoor grower: spider mites. You’ve probably tried sprays that didn't work, and now you’re watching your investment wither away. This isn't just frustrating-it's a direct threat to your entire crop, and every day you wait, the damage gets worse.
Stop wasting time and money on failed treatments. This is your complete, no-nonsense guide to taking back control of your grow room. We'll give you a step-by-step battle plan to correctly identify the infestation, completely eliminate every last mite and egg, and-most importantly-prevent them from ever coming back. We’ll show you the best products that get the job done safely and effectively, protecting your harvest from total loss. Your grow is too valuable to leave to chance. Let's get to work.
Key Takeaways
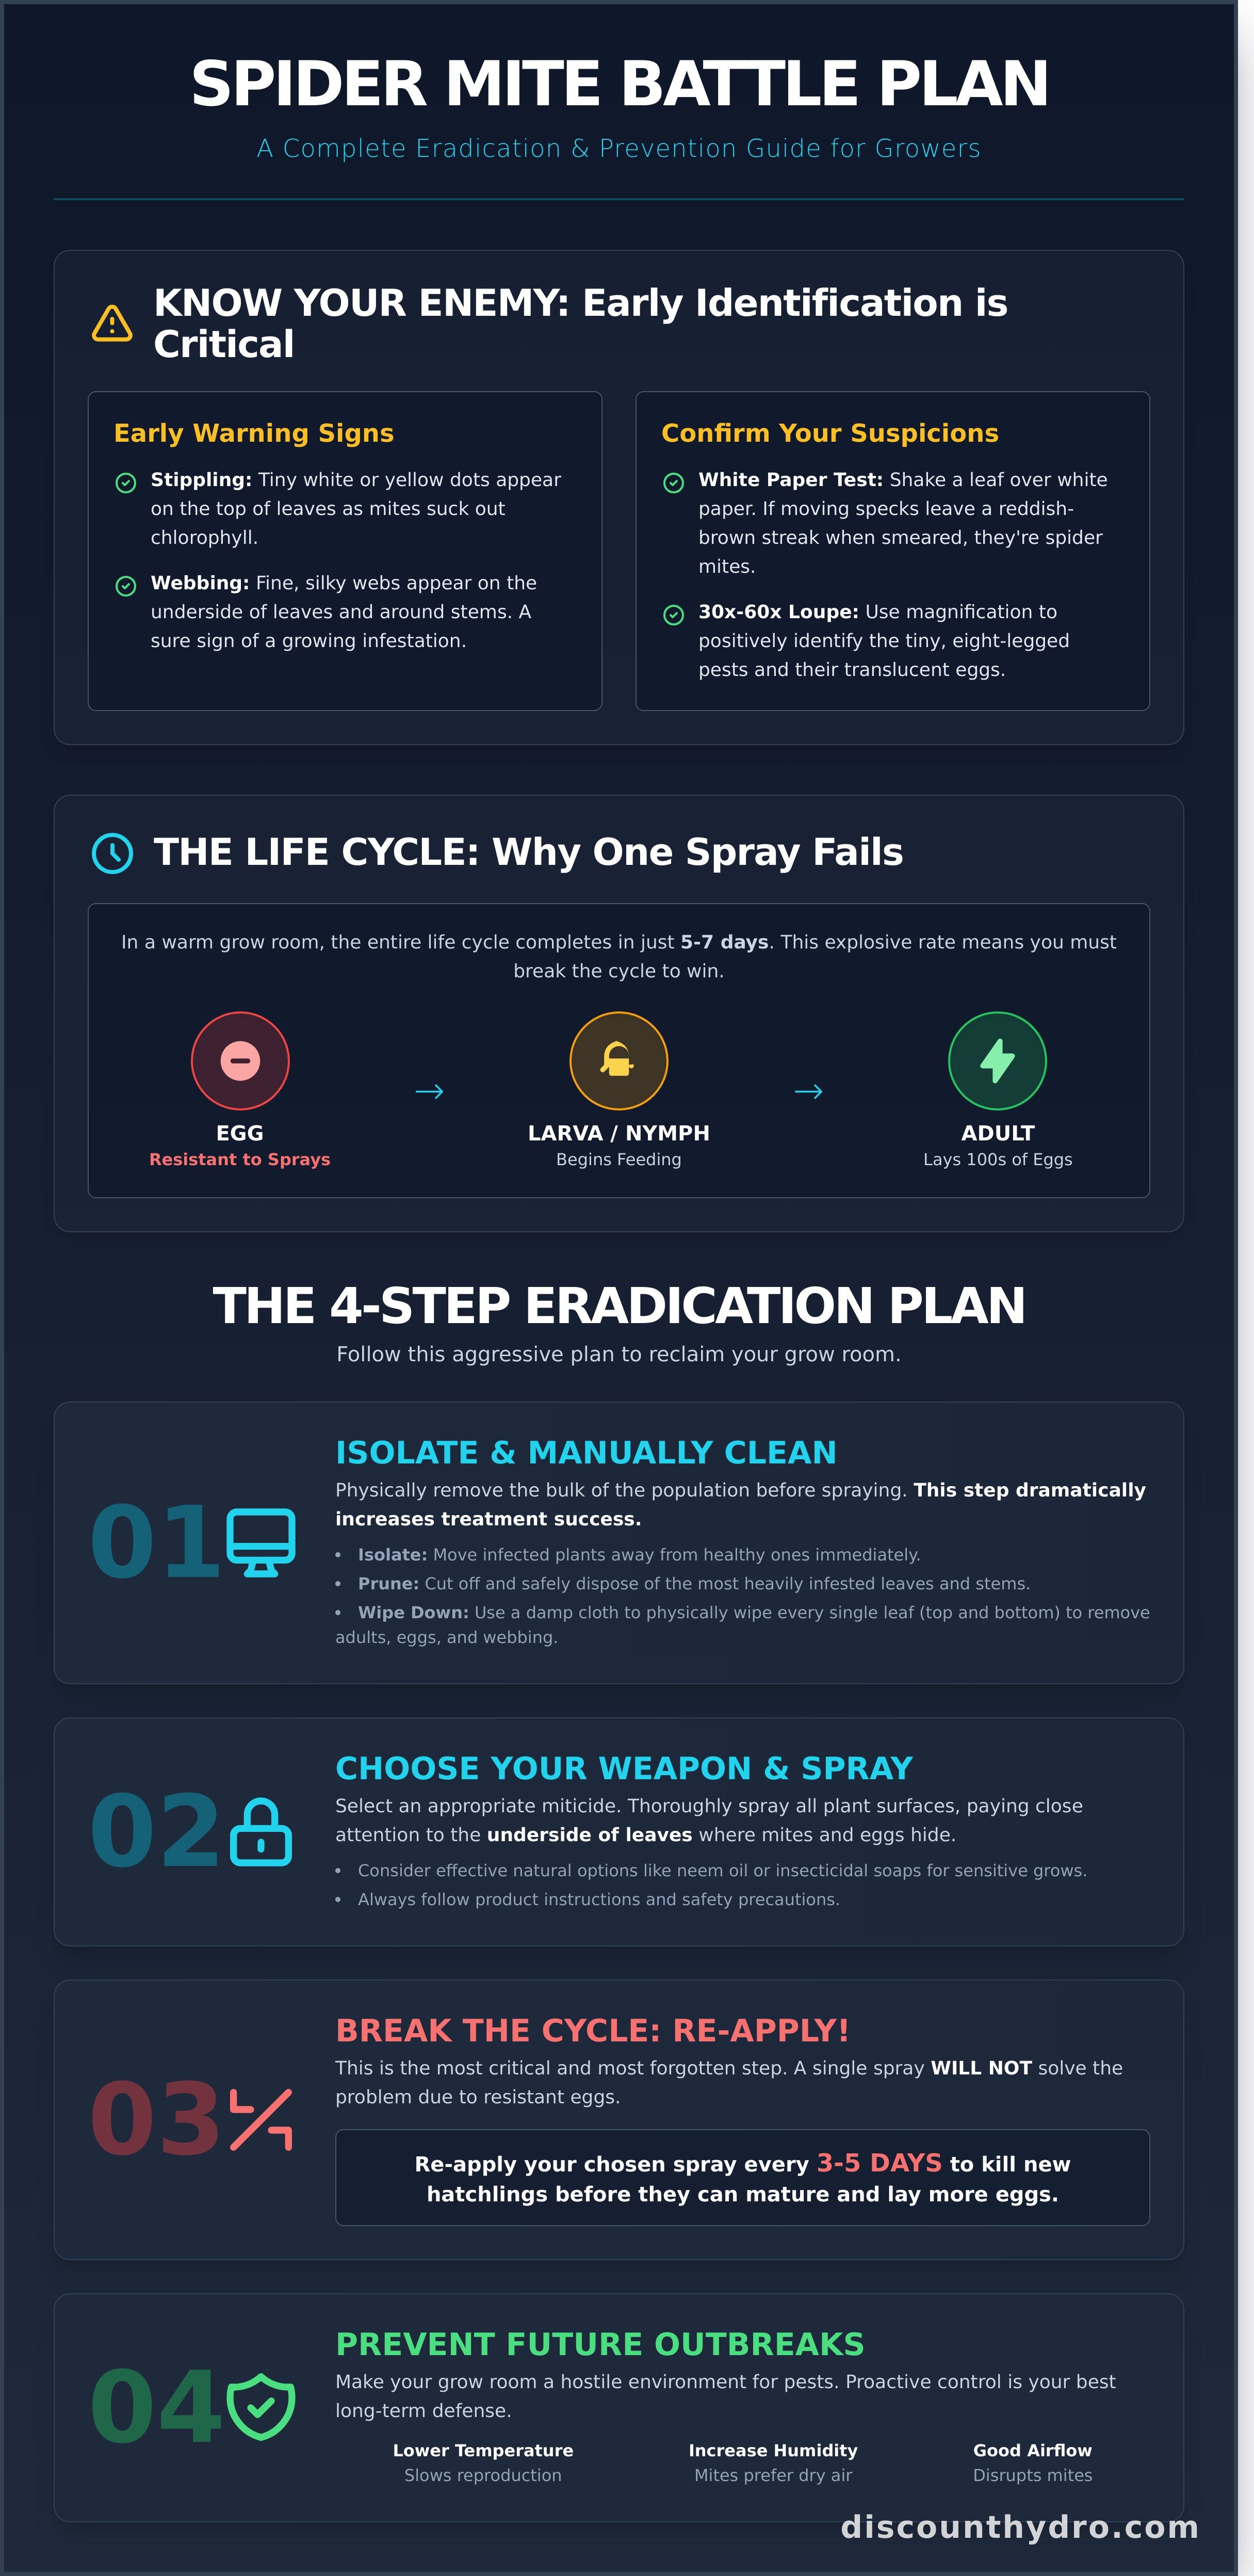
- Learn to spot the early signs of an infestation, allowing you to act fast and protect your harvest from costly damage.
- Discover why a single treatment is never enough and get the correct re-application schedule to break the pest life cycle for good.
- Get a proven, 4-step eradication plan to eliminate spider mites, starting with a critical manual removal phase that boosts treatment success.
- Master a few simple environmental controls to make your grow room a hostile environment for pests and prevent future outbreaks.
What Are Spider Mites & How to Identify an Infestation
Before you can eliminate a pest, you must understand it. First, know your enemy: spider mites are not insects. They are arachnids, related to spiders and ticks. For indoor growers, they are one of the most common and destructive pests you will face. An infestation can devastate a crop in a matter of days if left unchecked.
These pests thrive in the exact conditions often found in a grow room: warm, dry environments with low airflow. This makes your setup a prime target. The most common culprit you'll encounter is the two-spotted spider mite (Tetranychus urticae). Because they reproduce at an incredible rate, early detection is the absolute key to successful eradication. Waiting until the problem is obvious is often too late.
Telltale Signs of Spider Mites on Your Plants
Initial damage appears as tiny white or yellow spots on the upper surface of leaves, a pattern known as "stippling." This is caused by the mites piercing individual plant cells and sucking out the chlorophyll. As the infestation grows, you will notice fine, silky webbing, particularly on the underside of leaves and around stems. In advanced stages, leaves may turn yellow or bronze, feel dry and crispy, and eventually die off.
Confirming an Infestation: The White Paper Test
This is the fastest, low-tech way to confirm your suspicions. It requires no special equipment, only a sheet of plain white paper.
- Hold the paper directly underneath a suspect leaf.
- Gently but firmly tap or shake the leaf and stem.
- Examine the paper for tiny, moving specks. They may look like dust or pepper flakes at first.
- To confirm they are the target pest, gently smear the specks with your finger. If they leave a reddish-brown streak, you have spider mites.
Using a Jeweller's Loupe for Positive ID
For 100% positive identification, nothing beats magnification. We recommend a 30x-60x jeweller's loupe or pocket microscope. This allows you to get a clear view of the pest and distinguish it from other potential issues. Look for tiny, oval-shaped bodies with eight legs and clusters of small, translucent eggs. This tool removes all guesswork, ensuring you apply the correct treatment for the correct pest.
The Spider Mite Life Cycle: Why One Treatment Is Never Enough
To beat an infestation, you have to think like the enemy. Understanding the rapid life cycle of spider mites is the single most important factor in wiping them out for good. A single spray might kill the adults you see, but it leaves behind a time bomb of unhatched eggs ready to restart the invasion. This is not a one-and-done battle.
In the optimal warm and dry conditions of a grow room, the entire cycle from egg to egg-laying adult can be completed in as little as 5 to 7 days. This explosive breeding rate is why a small problem can overwhelm your entire crop seemingly overnight. If your treatment plan doesn't account for every stage, you are guaranteed to fail.
Stage 1: The Egg (The Hidden Threat)
The starting point of your problem. A single female can lay hundreds of tiny, spherical eggs in her short life, usually clustered on the safety of leaf undersides. These eggs are incredibly resilient and protected by a tough outer shell, making them highly resistant to most miticides and pest sprays. They are the reason infestations always return after a single treatment.
Stage 2: Larva to Adult (The Destructive Phases)
Once hatched, the six-legged larva begins feeding immediately. It quickly moults into an eight-legged nymph and then a mature adult. These three stages are responsible for all the destructive feeding that saps the life from your plants, causing stippling, yellowing, and webbing. Because eggs are constantly hatching, you must re-apply your chosen treatment consistently.
- The Goal: Break the cycle before new eggs are laid.
- The Method: Repeated treatments are non-negotiable.
- The Schedule: Spray every 3-5 days to kill new hatchlings as they emerge from their protected egg stage, before they have a chance to mature and reproduce.
How to Get Rid of Spider Mites: A 4-Step Eradication Plan
A swift, aggressive approach is the only way to beat a spider mite infestation. Don't wait. Follow this 4-step plan to reclaim your grow room and protect your harvest. This process requires diligence, but it's the most effective way to eliminate these pests for good.
Step 1: Isolate and Manually Clean Infected Plants
Your first job: get infested plants away from the healthy ones. If you can't move them, create as much space as possible. Next, physically remove the enemy.
- Prune: Cut off the most damaged leaves and stems. Bag them securely and dispose of them outside, far away from your garden or grow space.
- Wipe Down: Use a damp cloth to wipe every single leaf, top and bottom. This simple action removes a huge number of adult mites, eggs, and their destructive webbing.
Step 2: Choose Your Weapon (Natural vs. Chemical)
With the bulk of the population gone, it's time to spray the survivors. You have two main options, depending on the severity of the problem and your growing philosophy.
- Natural Options: For minor issues or organic grows, horticultural oils (like neem oil) and insecticidal soaps are effective. They work on contact by suffocating the mites but require very thorough application.
- Chemical Options: For severe infestations that threaten your entire crop, a dedicated acaricide or miticide is your best bet. These are powerful, targeted chemicals designed for rapid knockdown.
We stock a full arsenal to deal with any pest problem. Browse our range of effective spider mite sprays.
Step 3: Application and Treatment Schedule
How you spray is as important as what you spray. To maximise effectiveness and minimise plant stress, spray just before your grow lights turn off. Mites love to hide, so be meticulous. Coat every part of the plant: stems, nodes, and especially the undersides of leaves where they lay their eggs. Your schedule is critical to break their life cycle.
- Spray every 3 days.
- Continue for at least two weeks (a minimum of 4-5 applications).
This relentless schedule ensures you kill new hatchlings before they mature and reproduce.
Step 4: Clean Your Environment and Prevent Return
Killing the mites on your plants is only half the job. Their eggs can survive in your grow space, waiting to restart the invasion.
- Sanitise Everything: Thoroughly clean and disinfect your entire grow tent or room. Wipe down walls, floors, trays, fans, and all equipment.
- Rotate Your Sprays: Do not use the same pesticide repeatedly. Spider mites can develop resistance quickly. Alternate between at least two different products with different active ingredients.
- Monitor Daily: Inspect your plants closely every day, especially leaf undersides. Catching a new outbreak early is key to preventing another full-blown crisis.
Preventing Spider Mite Outbreaks in Your Grow Room
After dealing with an infestation, the last thing you want is a repeat performance. Prevention is always cheaper and more effective than eradication. The goal is to create a grow room environment that is completely hostile to pests, making it difficult for them to ever establish a foothold. A clean, well-monitored grow room supported by a proactive routine is your best long-term defence against spider mites and other common pests.
Environmental Control: Your First Line of Defence
Your environmental controller is a powerful pest control tool. Spider mites thrive in hot, dry, and stagnant conditions. By controlling your climate, you make your grow room an undesirable home for them. Aim to keep temperatures below 27°C, as higher heat accelerates their breeding cycle. Crucially, maintain relative humidity between 55-60% during the vegetative stage. This level of moisture makes it very difficult for mites to reproduce. Finally, ensure powerful air circulation with fans to eliminate stagnant hot spots where infestations often begin.
Grow Room Hygiene and Best Practices
Treat your grow room like a clean room. Pests don't appear from nowhere; they are brought in from outside. Implementing a strict hygiene protocol is a zero-cost way to dramatically reduce your risk. A simple checklist is the most effective way to stay on top of it:
- Never go directly from outdoors into your grow room. Always change your clothes and shoes first to avoid carrying in pests or eggs.
- Quarantine all new plants. Any new clone or plant should be kept in a separate area for at least a week. Inspect it thoroughly for any signs of pests before introducing it to your main crop.
- Filter your air intake. A simple filter or screen over your intake fan can stop pests from being sucked into your room from outside.
Using Preventative Sprays
An active prevention strategy involves making your plants themselves inhospitable to new arrivals. A weekly or bi-weekly foliar spray during the vegetative stage with a gentle, plant-safe product can work wonders. Solutions like neem oil or insecticidal soaps coat the leaves, creating a surface that deters any opportunistic mites from settling in and laying eggs. This simple step is one of the most effective ways to guarantee a pest-free harvest. Stock up on preventative pest control essentials.
Win the War Against Spider Mites
You are now equipped with the knowledge to defend your grow room. The key to defeating spider mites lies in a three-pronged attack: vigilant identification of the first signs, a persistent eradication plan that accounts for their entire life cycle, and a robust prevention strategy built on cleanliness. By understanding your enemy and acting decisively, you can protect your plants from these destructive pests and ensure they reach their full potential.
Don't wait for a full-blown infestation to cripple your harvest. Having the right arsenal on hand is critical. We offer a wide selection of the most effective natural and chemical pest treatments, giving you the power to choose the right solution for your setup. With our competitive prices on all essential grow room supplies and fast, discreet UK-wide delivery, you can get the gear you need to protect your investment without delay. Take control of your environment today.
Shop our full range of pest control solutions and protect your grow.
Frequently Asked Questions
How did I get spider mites in my sealed indoor grow room?
Even in a sealed room, spider mites are expert hitchhikers. They can be carried in on your clothing, hair, or shoes after you've been outside. They also frequently arrive on new plants or clones that haven't been properly quarantined. Contaminated tools, soil, or even unfiltered air intake vents can also be entry points. Strict hygiene is the best prevention; always sterilise equipment and inspect new plants thoroughly before introducing them to your grow space.
Can spider mites live in the soil or hydroponic medium?
Spider mites live, feed, and breed almost exclusively on the plant itself, particularly the undersides of leaves. While they don't live in soil or inert media like coco coir and rockwool, they can temporarily fall into it, and their eggs can survive in the top layer of a substrate. In a serious infestation, treating the top of the medium and the pot itself is a crucial step to ensure you eliminate the entire population and prevent re-infestation.
Will spider mites go away on their own?
No, they will absolutely not go away on their own. A spider mite population will grow exponentially if left unchecked, quickly overwhelming and killing your plants. A single female can lay hundreds of eggs in her short lifespan, leading to a massive infestation in just a few weeks. Immediate and aggressive treatment is the only way to save your crop. You must intervene to break their rapid life cycle and eliminate them completely.
Are spider mites harmful to humans or pets?
Spider mites are a serious threat to your plants but are not directly harmful to people or pets—they don't bite or transmit diseases. The main risks to humans are indirect: handling pesticides and the physical strain from the intensive cleaning required to eliminate them, which can cause back or joint pain. If you experience this kind of discomfort, specialists such as GB Clinic can provide expert care. The pests' only direct danger is to the health of your crop.
Is it safe to use pesticides during the flowering stage?
You must be extremely careful. Many chemical pesticides are not safe for use during flower as they can leave harmful residues on your final harvest. Always choose a product specifically labelled as safe for use during the flowering or fruiting stage, and strictly adhere to the instructions. Organic or plant-safe options are strongly recommended. Pay close attention to the product's pre-harvest interval (PHI) to ensure it is no longer active when you crop.
What's the difference between an insecticide and an acaricide/miticide?
Using the right tool for the job is essential for success. Insecticides are formulated to kill insects. However, spider mites are not insects; they are arachnids, related to spiders. An acaricide, or miticide, is a pesticide specifically developed to target and kill mites. While a broad-spectrum insecticide might have some effect, a dedicated miticide will always be far more effective for controlling a spider mite infestation and will deliver better results.