

How to Assemble a Grow Tent: The Complete Step-by-Step Guide for UK Growers
A single pinprick of light or a backwards extractor fan can compromise a £500 investment before your first cycle even begins. Most UK growers spend hours wrestling with poles and canvas, only to find their environment isn't actually air-tight. It's frustrating to risk tearing an expensive tent skin or struggling with cable management in a confined 1.2m x 1.2m space. You want a professional setup that's secure, light-proof, and ready for action without the headache of trial and error.
Master how to assemble a grow tent with our professional, no-nonsense guide to building a high-performance indoor garden from the ground up. We'll show you exactly how to tension the frame, orient your ventilation for maximum airflow, and hang heavy equipment safely. This guide provides a clear roadmap to achieving a light-proof, air-tight environment with every cable and filter perfectly positioned for peak efficiency. You'll learn the correct order of operations to get your equipment securely hung and safely wired so your garden is ready to perform from day one.
Key Takeaways
- Prepare your workspace and build a rock-solid frame with professional techniques that ensure structural integrity from the base up.
- Optimise your ventilation by learning the correct way to mount carbon filters and inline fans for total odour control and efficient heat management.
- Master how to assemble a grow tent with precision lighting setups, ensuring your fixtures are at the perfect height for maximum growth.
- Secure your environment with essential final checks, including light leak tests and negative pressure calibration, to guarantee a high-performance indoor garden.
Pre-Assembly: Preparing Your Space and Gear
Learning how to assemble a grow tent starts long before you connect the first pole. You need a clear, unobstructed workspace to avoid damaging the fabric or losing small components. Clear a floor area at least 20% larger than the tent's actual footprint. This extra buffer gives you room to move around the structure without tripping over unboxed parts. As soon as your delivery arrives, perform a full inventory check against the manufacturer's manual. Missing a single corner piece or a roof bar stops your build instantly, so verify every item before you start.
Lay out all poles by their designated letter or number on the floor. Most modern kits use coded stickers or embossed marks to guide the build. Organizing these parts into groups prevents mid-assembly confusion and saves at least 15 minutes of searching during the frame construction. Ensure your chosen room has a grounded UK mains socket nearby. You'll need reliable power for high-intensity lights and extraction fans. Understanding what is a grow tent requires recognizing it as a controlled environment, which means adequate room ventilation is a non-negotiable requirement for temperature management.
Choosing the Optimal Location
Evaluate the floor's load-bearing capacity before positioning your gear. A standard 1.2m x 1.2m tent filled with wet growing media and heavy pots can easily exceed 150kg. Place the unit near a window or an external vent to simplify the extraction setup. Leave a 15-20cm gap between the tent walls and the room walls. This gap allows air to circulate freely around the exterior, preventing heat pockets and moisture buildup on your home's wallpaper or paint.
Essential Tools for a Smooth Build
Keep a pair of clean gloves handy during the process. Oils and dirt from your skin can smudge or degrade the high-reflectivity Mylar lining over time, reducing light efficiency. You'll also need high-quality grow room tape to create airtight seals around your ducting later. Use a spirit level on the base frame once it's assembled. A tilted tent puts uneven stress on the poles and can cause water to pool in one corner of the floor tray, leading to spills or uneven hydration for your plants.
Structural Assembly: Building the Frame and Skin
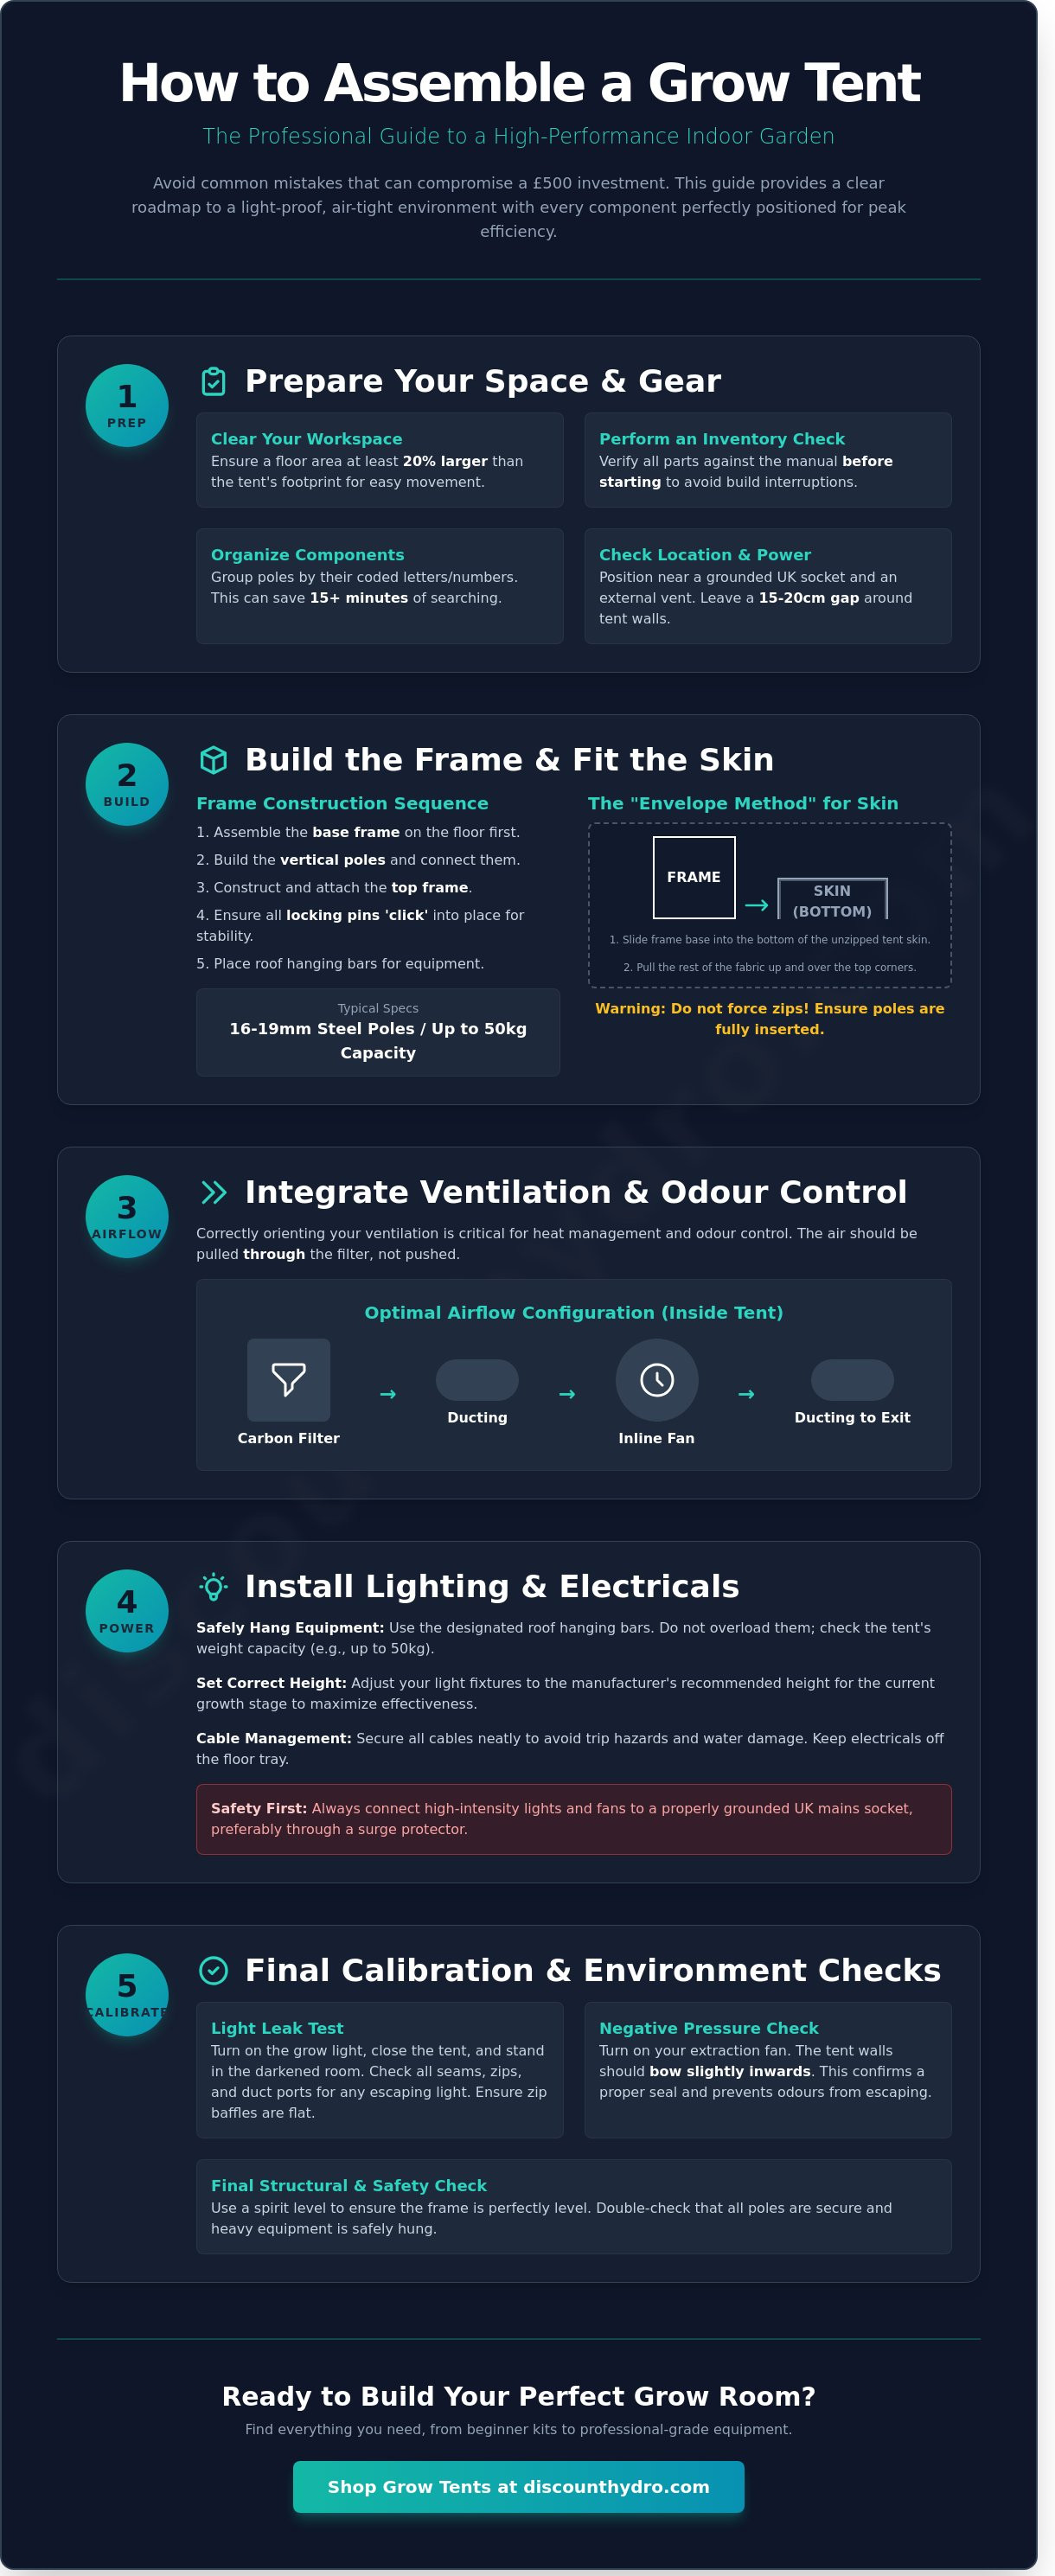
A stable environment begins with a perfectly squared frame. Start by assembling the base poles on the floor of your grow space. You must ensure every pole is fully inserted into the corner pieces until the locking pins engage. Learning how to assemble a grow tent correctly prevents structural failure once you add the weight of fans and filters. Once the base is secure, build the vertical structure and the top frame. You should always complete the entire metal skeleton before you touch the fabric skin. This sequence ensures the frame is rigid and aligned, which makes fitting the outer cover significantly easier.
Step-by-Step Frame Construction
Most modern tents use 16mm or 19mm powder-coated steel poles. You need to distinguish between the main structural poles and the roof hanging bars. Structural poles form the outer box, while hanging bars sit across the top to support your equipment. Always check that the click-lock buttons are fully popped out through the connector holes. This simple check confirms the frame can handle its rated weight capacity, which is often up to 50kg on larger models. Properly setting up your grow tent environment requires this level of structural integrity to safely hold heavy carbon filters and LED arrays. Before moving to the next stage, center the frame within the waterproof floor tray to ensure an even fit.
Fitting the Tent Fabric Without Damage
The "Envelope Method" is the most efficient way to skin a frame. Unzip all doors and windows completely and lay the fabric flat on the floor. Identify the bottom of the tent and slide the base of your frame into it. This provides a secure anchor point. Pull the fabric up and over the top corners one at a time. If the skin feels too tight, don't pull on the zips or the seams. Instead, go back to the frame and ensure every pole is pushed deep into its connector. Even a 5mm gap in a joint can make the fabric impossible to close. If you're looking for a new setup, you can find the UK's best deals on grow tents through our online store.
Managing tension is a balance of alignment and patience. If you force a zip over a tight corner, you risk tearing the light-proof lining or breaking the teeth. Once the skin is over the frame, zip it up slowly to check the fit. Ensuring the light-proofing baffles behind each zip are laid flat is vital to prevent light leaks that disrupt plant dark cycles. If the zips are sticking, check that the frame hasn't tilted during the process. A perfectly level frame results in a smooth, professional finish that lasts for years of use.
Ventilation and Odour Control Integration
Heat naturally rises, making the top of your environment the hottest zone. When learning how to assemble a grow tent, the ventilation setup is the most critical stage for climate control. You must mount the carbon filter at the highest possible point using the internal roof bars. This placement ensures the system extracts the warmest air first, preventing heat pockets that can damage your crop. Position the inline fan as close to the filter as possible. A short, straight connection minimizes resistance and keeps the motor running efficiently.
Airtight seals are mandatory for odour control. Don't rely on standard duct tape, as the adhesive often fails under high humidity or heat. Use metal jubilee clips or heavy-duty nylon cable ties to lock the ducting onto the fan and filter flanges. This prevents unfiltered air from escaping into the room. To complete the circuit, open the passive intake vents at the bottom of the tent. This configuration creates negative pressure; the tent walls should suck inward slightly when the fan is active. This pressure ensures all air exits through the carbon filter rather than leaking out of the zips.
Hanging the Carbon Filter and Fan
Professional carbon filters often weigh between 5kg and 15kg, so safety is a priority. Use nylon rope ratchets to suspend the equipment. These allow you to lift the heavy filter and fan into place incrementally without needing a second person. Ensure the airflow direction is correct: the air must pull through the filter, enter the fan, and travel through the ducting to the exhaust port. If noise is a concern in a domestic setting, swap standard foil ducting for acoustic-insulated ducting. This can reduce the sound of rushing air by up to 10 or 15 decibels, keeping the operation discreet.
Managing Ducting and Ports
Light leaks and airflow resistance are common mistakes during this stage. Every grow tent features double-sleeved ports; you must pull both drawstrings tight and cinch them against the ducting to block light. This step is vital for anyone mastering how to assemble a grow tent, as light pollution during dark cycles can stress plants. Keep your ducting runs as straight as possible. A single 90-degree bend can reduce your fan's extraction efficiency by 20% to 30%. Finally, always vent the exhaust air out of the room or through a window. If you vent back into the same room, the tent will eventually pull in the same hot, CO2-depleted air it just expelled.
Lighting and Electrical Setup
Once the frame is secure, you need to focus on the engine of your grow. Learning how to assemble a grow tent requires a focus on safety and light distribution. Hang your LED grow lights centrally to ensure PAR levels remain consistent across the entire canopy. You should calculate the hanging height based on the growth stage; seedlings typically require 60cm to 90cm, while flowering plants can often handle 30cm to 45cm depending on the specific wattage. Improper distance leads to light burn, which bleaches leaves and stunts development.
Keep ballasts and drivers off the floor to prevent damage from spills or nutrient runoff. Mount these components on a brick or a dedicated shelf outside the tent. UK grow rooms should use heavy-duty contactors for lighting timers. This prevents the high start-up current of large LED arrays from fusing standard 13A household timers. Organise all control gear on a mounting board outside the tent for easy access. This also helps manage heat, as external drivers can reduce internal temperatures by 2 to 3 degrees Celsius.
Hanging Your Light Fixture
Check your tent's roof bar weight rating before mounting any equipment. Heavy 600W or 1000W LED fixtures can weigh over 12kg. Ensure the bars are locked into the corner joints to prevent a collapse. Use adjustable rope ratchets instead of fixed chains. These allow you to raise the light as plants grow without removing the fixture. Keep the light perfectly level. An angled fixture creates hot spots where some plants receive 25% more intensity than others, leading to uneven growth across your tent.
Safe Cable Management
Electricity and water are a dangerous combination in a hydroponic environment. Route all cables through the highest rear ports of the tent. Use Velcro ties to secure power leads to the vertical frame poles, keeping them away from the heat of the light fixture. Always implement a drip loop on every cable. This involves letting the wire hang lower than the socket before it plugs in. This ensures any condensation or spills run to the floor rather than into the electrical contact. Following these steps is a vital part of how to assemble a grow tent safely.
Ready to upgrade your environment? Shop our range of lighting kits and accessories for the best prices in the UK.
Final Calibration and Environment Check
Once you've finished the physical build, the final stage of how to assemble a grow tent is the calibration phase. This ensures your investment doesn't fail during the first week of operation. Start by performing a light leak test. Enter the tent, zip it shut, and switch off all external room lights. Wait 5 minutes for your pupils to dilate fully. If you see tiny pinpricks of light through the stitching or zips, use silver duct tape or adjust the Velcro flaps. Even small leaks disrupt the dark cycle of your plants.
Next, verify your extraction system. Switch the fan to its standard operating speed. The tent walls should suck inwards by 2 to 3 centimetres. This negative pressure is vital because it proves that all air is being pulled through the carbon filter rather than escaping through the zips. If the walls bulge outwards, your intake fan is too powerful or your extraction is blocked. Once the pressure is correct, calibrate your digital hygrometers. Place sensors at the height where your future plant canopy will sit, as floor-level readings are often 3 or 4 degrees cooler than the actual growing zone.
Testing the Climate
Run your lights and extraction fans for a full 24-hour test period before you introduce any live plants. This trial run reveals how your room handles heat. You'll need to monitor the "lights on" and "lights off" fluctuations closely. In UK grow rooms, night-time temperatures shouldn't drop below 16°C. If they do, you'll need a tube heater. Adjust your fan controller settings to find the sweet spot for Vapour Pressure Deficit (VPD). When your environment stays within a 5% humidity range for 48 hours, it's safe to integrate your reservoirs and hydroponic nutrients.
Maintenance and Long-Term Care
Keeping your environment sterile is a core part of successful how to assemble a grow tent procedures. Every month, wipe the reflective Mylar walls with a weak solution of hydroponics safe cleaner. Dust buildup on the walls can reduce light efficiency by 10%. Don't ignore the zips; if they become stiff, apply a small amount of silicone lubricant to prevent them from snagging or tearing the fabric. Finally, inspect the white pre-filter sleeve on your carbon filter every 3 months. If it looks grey or dusty, wash it or replace it. A clogged pre-filter reduces your fan's lifespan and kills your airflow.
Start Your Indoor Grow with Confidence
Success starts with a stable environment. Focus on building a rigid frame and ensuring your ventilation system creates the necessary negative pressure to manage airflow. Industry data suggests that up to 15% of beginner equipment issues stem from poor initial assembly. Learning how to assemble a grow tent correctly is a foundational skill that saves time and protects your investment. Proper calibration of your lighting and extraction can boost yield potential by 25% compared to unoptimized setups.
Discount Hydro supplies everything you need to build a professional setup at a fraction of the cost. We offer fast UK-wide delivery to ensure your project stays on schedule. For those nearby, our click and collect service in County Durham provides a convenient way to get your gear immediately. We back our products with expert support for indoor growers who need reliable advice on equipment selection. Don't settle for overpriced gear when you can get professional quality for less.
Shop our range of high-quality Grow Tents at the UKs best prices
You're ready to transform your space into a productive garden. Grab your tools and start building today.
Frequently Asked Questions
Can I assemble a grow tent by myself?
Yes, you can assemble most small to medium setups alone. Learning how to assemble a grow tent by yourself is straightforward for 1.2m x 1.2m units. Larger 2.4m tents usually require 2 people to pull the heavy canvas over the metal frame without tearing the 600D fabric. It's best to build the frame from the floor up and then slide the skin over the top corners carefully.
How do I stop my grow tent from smelling?
Install a carbon filter matched to your extractor fan's m3/h rating to eliminate smells. A 100mm or 150mm carbon filter removes 99% of organic odours when air passes through the activated carbon bed. You'll need to replace the filter every 12 to 18 months for maximum efficiency. Don't let humidity rise above 70%, as damp air stops the carbon from working correctly and causes smells to escape.
What is the best way to hang a heavy LED light in a tent?
Use heavy-duty ratchet hangers rated for the specific weight of your fixture. Most LED grow lights weigh between 5kg and 15kg. Attach the carabiners directly to the roof bars and the light's hanging points. This allows for 100% height adjustability as your plants grow toward the ceiling. Ensure the clips are fully closed to prevent the light from falling and damaging your 22mm steel frame or floor.
How do I fix a light leak in my grow tent?
Use black adhesive duct tape or light-proof patches on the exterior of the canvas. Check for leaks by sitting inside the zipped tent for 5 minutes until your eyes adjust. Small pinholes often appear near seams or zips. Cover these with 50mm wide gaffer tape to ensure total darkness during the 12 hour dark cycle. This prevents light stress which ruins 100% of your indoor crop's yield.
Does a grow tent need to be vented outside?
Yes, venting outside is the most effective way to manage heat and humidity in your setup. Exhausting 25°C air into the same room causes heat buildup and stale air. Use flexible 100mm or 150mm ducting to send air out of a window or wall vent. This maintains the 40% to 60% humidity levels required for healthy indoor growth and prevents 100% of moisture-related mould issues.
How much weight can the roof bars of a grow tent hold?
When learning how to assemble a grow tent, you'll find most standard roof bars support between 30kg and 50kg. Check your specific model's manual, as heavy-duty 22mm steel poles hold more than 16mm versions. Distribute the weight of your fan, filter, and lights across multiple bars. If you're using a 10 inch (250mm) filter, use the reinforced corner connectors to ensure the structure remains 100% stable.
Why is my grow tent wall sucking inwards?
This is caused by negative air pressure when your extraction fan is stronger than your intake. While a slight inward bow proves your tent is sealed, excessive pressure stresses the zips. Open a passive mesh vent or increase your intake fan speed. This ensures a fresh supply of CO2 for your plants every 3 to 5 minutes, which is vital for maintaining a 100% healthy growing environment.
How do I keep the floor of my grow tent clean?
Use the removable waterproof floor tray that comes with your kit. This tray catches 100% of spillages and nutrient runoff. Remove it weekly to wipe down with a 10% bleach solution or organic cleaner. Keeping the floor dry prevents 90% of common pest infestations and mould issues in your indoor garden. It's the easiest way to maintain a sterile environment for your high-value plants.