

Hydroponic Seed Starting: The Complete Guide for UK Growers
Successful hydroponic seed starting is a logistical process of balancing moisture and oxygen, not a mystery of nature. Investing in professional LED lighting and nutrients is wasted if seeds fail or succumb to damping off during the initial phase. You likely recognise that the germination stage is the most volatile part of the grow cycle with the highest risk of loss. This guide provides a pragmatic roadmap to mastering soil-free germination for the UK market. We'll show you how to achieve high germination rates and fast-growing seedlings ready for transplant without wasting capital on failed attempts. You will learn the technical differences between media like Rockwool and Coco, the environmental controls required for success, and efficient propagation techniques. We cover everything from pH adjustment for alkaline UK tap water to selecting the right trays and domes. This focus is on building a cost-effective setup that delivers reliable results for every crop.
Key Takeaways
- Accelerate your grow cycle by switching to soil-free germination methods that improve oxygen access to the root zone.
- Select the most efficient propagation media, such as Rockwool or Coco, based on the requirements of your final growing system.
- Reduce seedling loss and damping off by implementing a sterile 5-step hydroponic seed starting process.
- Prevent weak, leggy growth by using specific LED lighting and humidity controls tailored for early-stage development.
- Build a cost-effective propagation setup using professional-grade trays and domes to ensure consistent, high germination rates.
The Fundamentals of Hydroponic Seed Starting
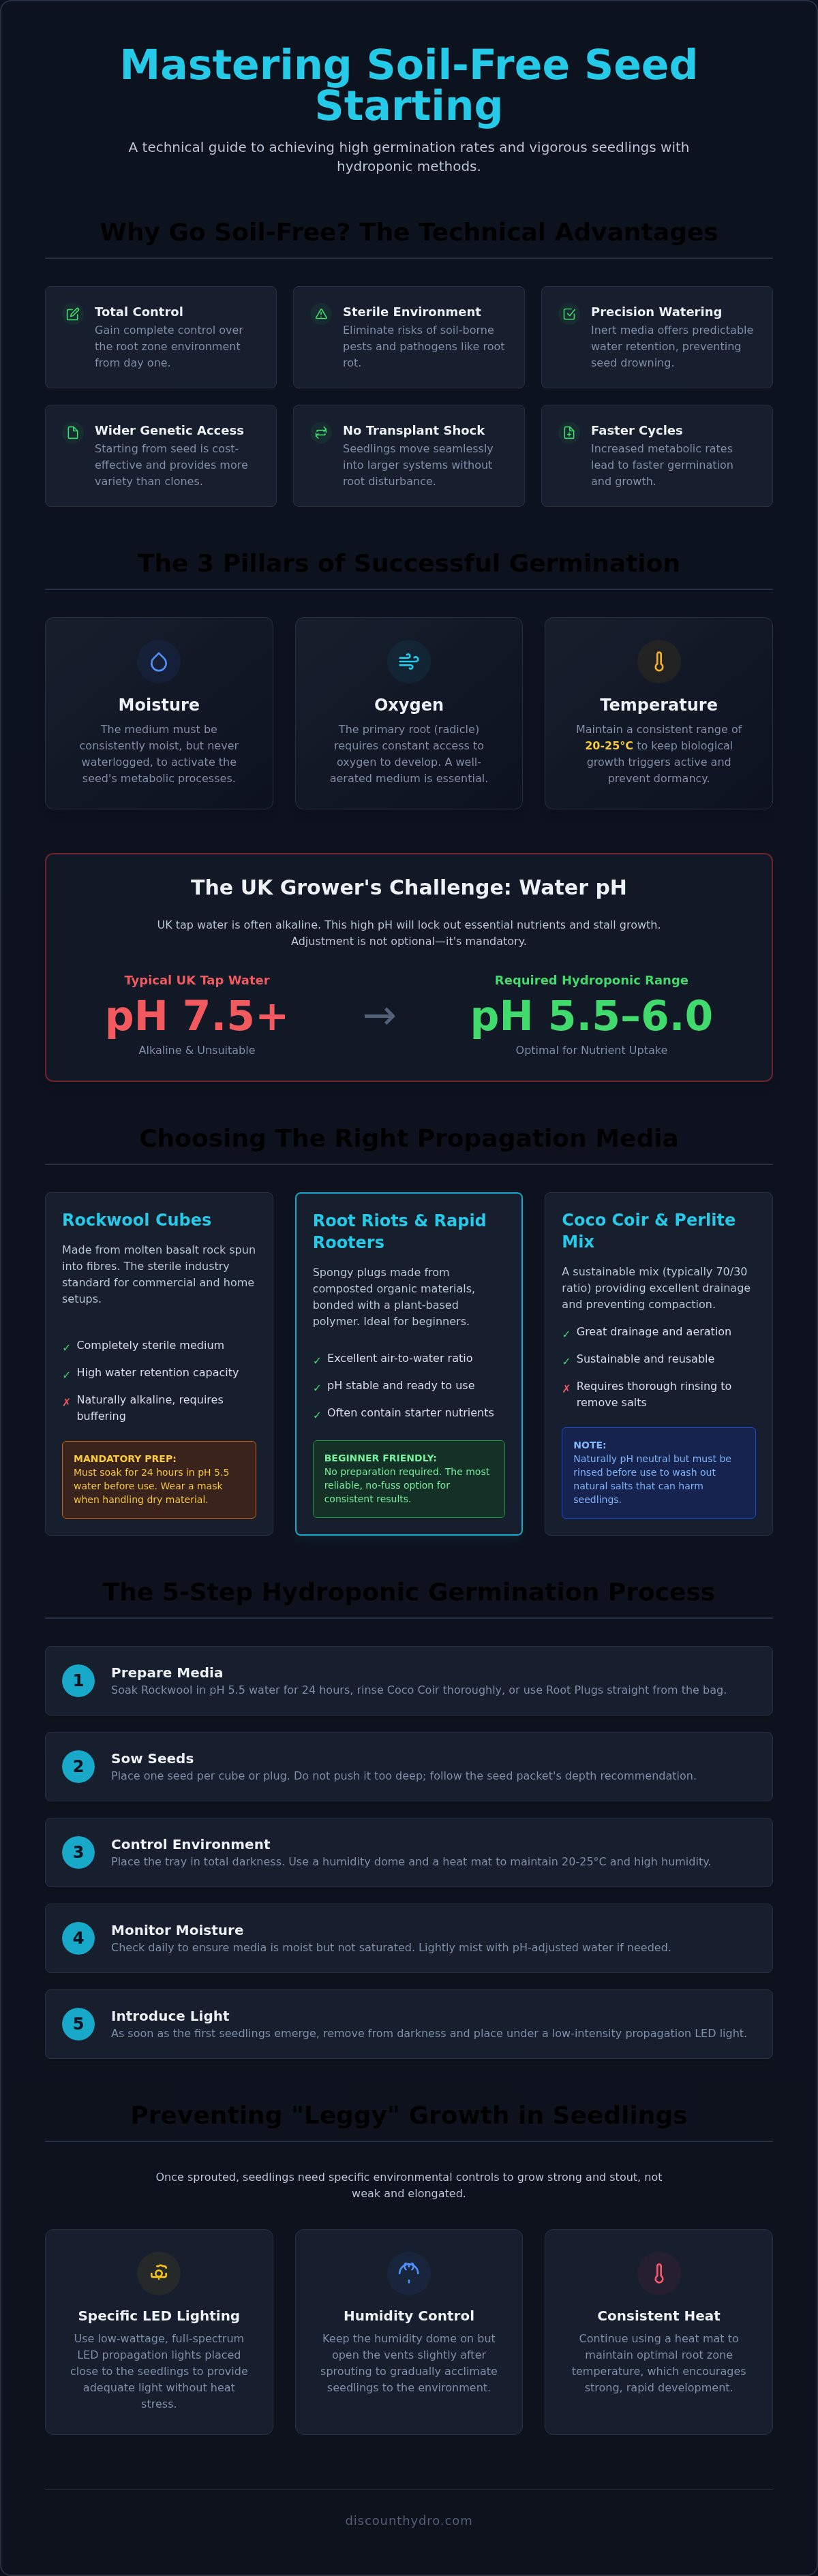
Hydroponic seed starting is the technical process of germinating seeds in inert, soil-free media rather than traditional compost. This method serves as the essential first step in hydroponics, a cultivation style that uses water-based nutrient solutions to drive plant development. By removing soil, you gain total control over the root zone from the very first day. Understanding The Fundamentals of Hydroponic Seed Starting requires a focus on three non-negotiable pillars: moisture, oxygen, and temperature. When these variables are managed correctly, metabolic rates increase. This results in faster germination and more vigorous early-stage growth compared to traditional methods.
Why Skip the Soil?
Soil often acts as a carrier for pests and pathogens. Using sterile, inert media creates a controlled environment that prevents root rot. It's a cleaner way to work. Standard soil mixes can be unpredictable in their water retention, but inert media allows for precision. You can calculate exactly how much moisture is held in the substrate, which prevents the drowning of seeds that often occurs in heavy garden composts. Seedlings started in propagation plugs can be moved directly into larger systems without the "transplant shock" caused by disturbing root structures. This transition is seamless. Starting from seed is also more cost-effective than purchasing established clones. It gives you access to a wider variety of genetics while ensuring your grow environment stays free from outside contamination.
The Biological Needs of a Germinating Seed
The radicle is the primary embryonic root that emerges from the seed, and it must have constant access to oxygen to function. Seeds don't require external nutrients for the first several days of life because they rely on stored energy. In fact, applying fertilisers too early can damage the delicate radicle and stunt growth. Most seeds prefer total darkness and high humidity during the initial breakout phase. Professional growers use heat mats to maintain specific temperature ranges, especially during colder UK months. Consistent heat prevents the seed from entering dormancy. UK growers should be aware that local tap water is often alkaline, frequently testing at pH 7.5 or higher. For successful hydroponic seed starting, you must adjust your water pH to between 5.5 and 6.0. Maintaining a consistent temperature, typically between 20°C and 25°C, ensures the biological triggers for growth remain active and efficient.
Choosing the Right Propagation Media
Successful hydroponic seed starting depends on selecting the correct inert media for your specific hydroponic system. Media choice isn't just about preference; it's about managing water retention and oxygen access. In the UK, growers typically choose between mineral wool, organic-based plugs, or loose coco mixes. Each material has distinct technical specs regarding pH stability and drainage. You must match the media to your final irrigation method to prevent transplant shock or root zone failure. For a deeper look at system management, refer to this Step-by-Step Guide to Germinating Seeds Hydroponically which details how media interacts with nutrient solutions.
Rockwool Cubes: The Industry Standard
Rockwool is made from molten basalt rock spun into fine fibres. It's the most common choice for commercial and home setups because it's completely sterile and holds a high volume of water. However, it's naturally alkaline. You can't use it straight from the box. It requires a 24-hour soak in water adjusted to pH 5.5 to buffer the material. Without this step, the high pH will lock out essential elements. Always handle dry Rockwool with care. Wear a mask to avoid inhaling the fine mineral dust, and never squeeze the cubes when wet, as this collapses the internal structure and reduces oxygen capacity.
Root Riots and Rapid Rooters
These plugs are manufactured from composted organic materials bonded with a plant-based polymer. They offer several advantages for beginners:
- Air-to-Water Ratio: The spongy texture ensures roots always have access to oxygen, even when fully saturated.
- Pre-moistened: Most brands arrive ready to use, containing micronutrients and beneficial fungi to kickstart development.
- Ease of Use: No pH buffering is required. They're ready for seeds immediately.
The technical structure of these plugs supports faster rooting than traditional mineral wool. They're a reliable, no-fluff option for growers who want to avoid the prep work of Rockwool.
Coco Coir and Perlite Mixes
Coco coir is a sustainable alternative to peat. When used for hydroponic seed starting, it's often mixed with perlite in a 70/30 ratio. This combination provides excellent drainage and prevents the media from compacting in small starter pots. Coco is naturally pH neutral but requires thorough rinsing to remove residual salts. It's a forgiving medium that works well for hand-watering or drip systems. If you're looking for value, browse our range of propagation supplies to find bulk media and tray options that suit your budget. Using loose media requires more cleanup than plugs, but it's often the most cost-effective route for high-volume growers.
Step-by-Step Guide to Germinating Seeds Hydroponically
Hydroponic seed starting requires a sterile, repeatable framework to ensure high success rates. Contamination is the primary cause of failure in home setups. Pathogens thrive in warm, moist environments, so every piece of equipment must be scrubbed before you begin. This process focuses on eliminating variables to produce uniform seedlings ready for your main system. For a professional start, browse our high-value propagation supplies and kits. Following a strict protocol ensures you don't waste expensive seeds on failed attempts.
Preparation and Sanitisation
Cleaning trays and humidity domes is the most important step in the cycle. Use a mild sanitising solution to remove any residue or bacteria from previous grows. Once clean, prepare your soaking water. UK growers must adjust their water to a pH of 5.5 to 5.8. This range is critical for nutrient availability once the seed breaks dormancy. Saturate your chosen media as discussed in our guide on Choosing the Right Propagation Media. Ensure the plugs are moist but not dripping wet. Over-saturation starves the seed of oxygen and leads to rot.
Sowing and Initial Darkness
Handling delicate seeds with your fingers can introduce oils and bacteria that hinder growth. Use a scalpel or precision tweezers to place the seed into the media. For most indoor crops, a sowing depth of 5mm to 10mm is sufficient. After sowing, place the tray in a humidity dome. You need to maintain a relative humidity (RH) of 80% or higher to keep the seed coat soft. Keep the tray in a dark area away from direct drafts or cold windowsills. A stable, warm environment triggers the metabolic process of germination efficiently.
The First Signs of Life: What to Do Next
When the first green shoots emerge, you must introduce a light source immediately. Failure to do so results in "leggy" seedlings that stretch and eventually collapse. Start with low-intensity lighting placed 15cm to 30cm above the dome. Begin "hardening off" the plants by gradually opening the dome vents. This reduces humidity and encourages the plant to strengthen its stem. Once the first set of true leaves appears, start a weak hydroponic nutrient regime. Use approximately 25% of the recommended strength to avoid burning the young root system.
Environmental Control: Lighting, Heat, and Humidity
Environmental stability is the difference between a high success rate and total crop failure. While mature plants are resilient, seedlings are highly sensitive to fluctuations. During hydroponic seed starting, you must maintain a precise balance of light intensity, root temperature, and atmospheric moisture. Over-lighting or under-heating at this stage leads to stunted growth or damping off. Precision is the goal. You are creating a micro-climate that forces the seed to break dormancy and establish a root system as quickly as possible.
Lighting Requirements for Seedlings
Seedlings require significantly lower light intensity than plants in the vegetative or flowering stages. Using high-powered lights too close will bleach delicate tissue. However, insufficient light causes the stem to stretch towards the source. This creates "leggy" seedlings that lack structural integrity and eventually collapse. Modern LED grow lights are ideal because they offer adjustable intensity and run much cooler than traditional HPS lamps.
Run a light cycle of 18/6 or 24/0 for the first 14 days. A "blue" spectrum, typically around 6500K, is preferred for this phase. It promotes tight internodal spacing and thick, strong stems. Use the "hand test" to check height: place your hand at seedling level. If you feel any heat on your skin, the light is too close. Keep the source high enough to provide coverage but low enough to prevent stretching.
Using Heat Mats for Consistent Germination
Root zone temperature is more critical than air temperature during the first week of life. If the media is too cold, metabolic processes slow down and germination stalls. Tropical crops like tomatoes or chillies require 24°C to 26°C, while temperate crops like lettuce thrive at 20°C to 22°C. In the UK, ambient air in grow rooms often drops below these levels, especially at night.
Heat mats provide consistent bottom heat that bypasses cold air. Always use a thermostat with your heat mat to prevent overheating the media. High temperatures can cook the delicate radicle before it establishes. Aim to keep your root temperatures between 20°C and 24°C for the majority of common varieties. This consistency ensures a uniform "pop" across your entire tray.
Low humidity is a silent killer. If the air is too dry, the seedling loses moisture faster than the young roots can replace it. Maintain 80% relative humidity using a dome until the first true leaves are established. Shop our range of LED grow lights to find the perfect spectrum and intensity for your propagation setup.
Essential Propagation Supplies for UK Growers
Successful hydroponic seed starting requires more than just seeds and water. You need a dedicated hardware setup that maintains environmental stability. Investing in professional-grade tools prevents the high failure rates associated with budget equipment. At Discount Hydro, we stock a range of propagation hardware designed for commercial results at home. For local growers, we offer a convenient click-and-collect service from our County Durham warehouse in Chester-le-Street, alongside nationwide delivery options for the rest of the UK.
Propagators and Humidity Domes
A standard unheated propagator is suitable for basic germination, but high-top vented models offer better control. Vents allow you to manage humidity levels precisely as seedlings begin to harden off. Sturdy, rigid trays are essential. Flimsy trays often buckle under the weight of wet media, which can disturb the delicate root zone. If you're managing large batches, consider multi-site systems that allow for high-density propagation without sacrificing airflow between plants. Using a deep-tray system ensures that roots have enough vertical space to develop before you move them to your main grow room.
Rooting Hormones and Nutrient Starters
While seeds contain initial energy, rooting hormones like Clonex Rooting Gel encourage a faster root strike once the radicle emerges. This reduces the time the plant spends in its most vulnerable state. Once roots are visible, transition to "First Feed" nutrients. These are specifically formulated for young root systems and lack the harsh salts found in standard vegetative fertilisers. High-purity, UK-sourced nutrients ensure your water chemistry remains stable, which is vital when working with the small water volumes typical in propagation trays. Using professional supplements at this stage builds the foundation for heavy-yielding plants later in the cycle.
Precision Tools: Scalpels and Pipettes
Precision is mandatory. Tearing media with your fingers creates irregular surfaces that trap stagnant water and promote rot. Using a sterile scalpel ensures clean cuts and precise placement of seeds or cuttings. For pH adjustment, don't guess. Use plastic pipettes to measure out pH Down or nutrients in small increments. Even a single millilitre can significantly shift the pH in a small propagation reservoir. Using the right tools ensures your setup is efficient and repeatable. You can shop all propagation supplies at Discount Hydro to find everything needed for a professional-grade start.
Upgrade Your Propagation Results Today
Success in hydroponic seed starting comes down to technical precision and the right hardware. You've learned that selecting the correct inert media and maintaining strict environmental controls are the only ways to ensure reliable germination. By focusing on sterile practices and adjusting pH for UK water conditions, you eliminate the variables that lead to crop failure. High-quality tools aren't just an expense; they're an investment in the health and speed of your entire grow cycle.
Discount Hydro provides everything you need to build a professional-grade setup. We offer competitive prices on LED lighting and nutrients, backed by expert advice for indoor growers. Benefit from our fast UK-wide delivery or use our click-and-collect service in County Durham to get started immediately. Don't leave your early-stage growth to chance. Browse our range of professional propagation supplies for UK growers and take control of your root zone from day one. Consistent, high-yield results start with a perfect germination phase.
Frequently Asked Questions
How long does it take for seeds to sprout in a hydroponic system?
Usually 3 to 10 days depending on variety and temperature. Rapid germination happens when root zone temperatures stay between 20°C and 24°C. Temperate crops like lettuce might sprout in 48 hours, while tropical varieties like chillies take longer. Maintaining high humidity with a dome ensures the seed coat stays soft. This allows the radicle to break through faster than it would in dry or inconsistent soil conditions.
Do I need to use nutrients when starting seeds hydroponically?
No nutrients are required for the first few days of life. Seeds contain enough stored energy to develop their first set of roots and embryonic leaves. Introducing fertilisers too early can cause chemical burns on the delicate radicle. Once you see the first true leaves, start a very weak nutrient regime at 25% strength. Use high-purity UK nutrients specifically designed for seedlings to ensure the young plants aren't overwhelmed by mineral salts.
Can I start any type of seed in rockwool cubes?
Most common indoor crops thrive in rockwool, but you must buffer the cubes first. Rockwool is naturally alkaline, so it requires a 24-hour soak in pH 5.5 water before sowing. Small seeds like herbs and large seeds like tomatoes are equally compatible. However, root crops that require deep soil for taproot development are less suited to standard cubes. Always ensure the seed is placed at the correct depth for its specific variety.
Why are my seedlings falling over (damping off)?
Damping off is caused by fungal pathogens that thrive in overly wet, stagnant conditions. It's often the result of using unsterilised equipment or over-watering the media. To prevent this, ensure your trays and domes are scrubbed with a sanitising solution before starting. Improve airflow by gradually opening the dome vents once the seeds have sprouted. Keeping the root zone moist but not dripping wet is the best defence against rot.
What is the best light cycle for hydroponic seedlings?
Use a light cycle of 18 hours on and 6 hours off for the first two weeks. Some growers prefer a 24/0 cycle to maximise early growth, but an 18/6 cycle is often more cost-effective and prevents heat stress. Use a blue spectrum LED light to promote thick stems and tight internodal spacing. This prevents the leggy stretching often seen in windowsills. Modern LED grow lights allow you to adjust intensity as the plant develops.
How much water should I keep in my seed starting tray?
Keep only enough water to maintain capillary action without submerging the media. There should never be standing water in the bottom of the tray once the media is saturated. Over-watering starves the roots of oxygen and leads to damping off. Check the weight of the tray daily. If it feels light, add a small amount of pH-adjusted water. Using a spray bottle is a precise way to maintain moisture without drowning the delicate seeds.
When are my seedlings ready to be moved into the main system?
Seedlings are ready for transplant when you see roots emerging from the bottom of the starter plug. This usually coincides with the appearance of the second or third set of true leaves. Ensure the root system is white and fuzzy, which indicates healthy development. Moving them too early increases the risk of transplant shock. Moving them too late can lead to root binding, which stunts the plant's future growth potential in the main system.
Can I reuse rockwool cubes or starter plugs?
Reusing starter media is not recommended for hydroponic seed starting. Rockwool and compost-based plugs are designed for single use because they trap organic matter and pathogens that are difficult to fully sterilise. The risk of introducing root rot to a new batch of seeds far outweighs the small cost savings. Always start with fresh, sterile media to ensure the highest possible germination rates and a clean environment for your new indoor garden crop.