

Light Control Timers: The Complete Guide to Grow Room Automation
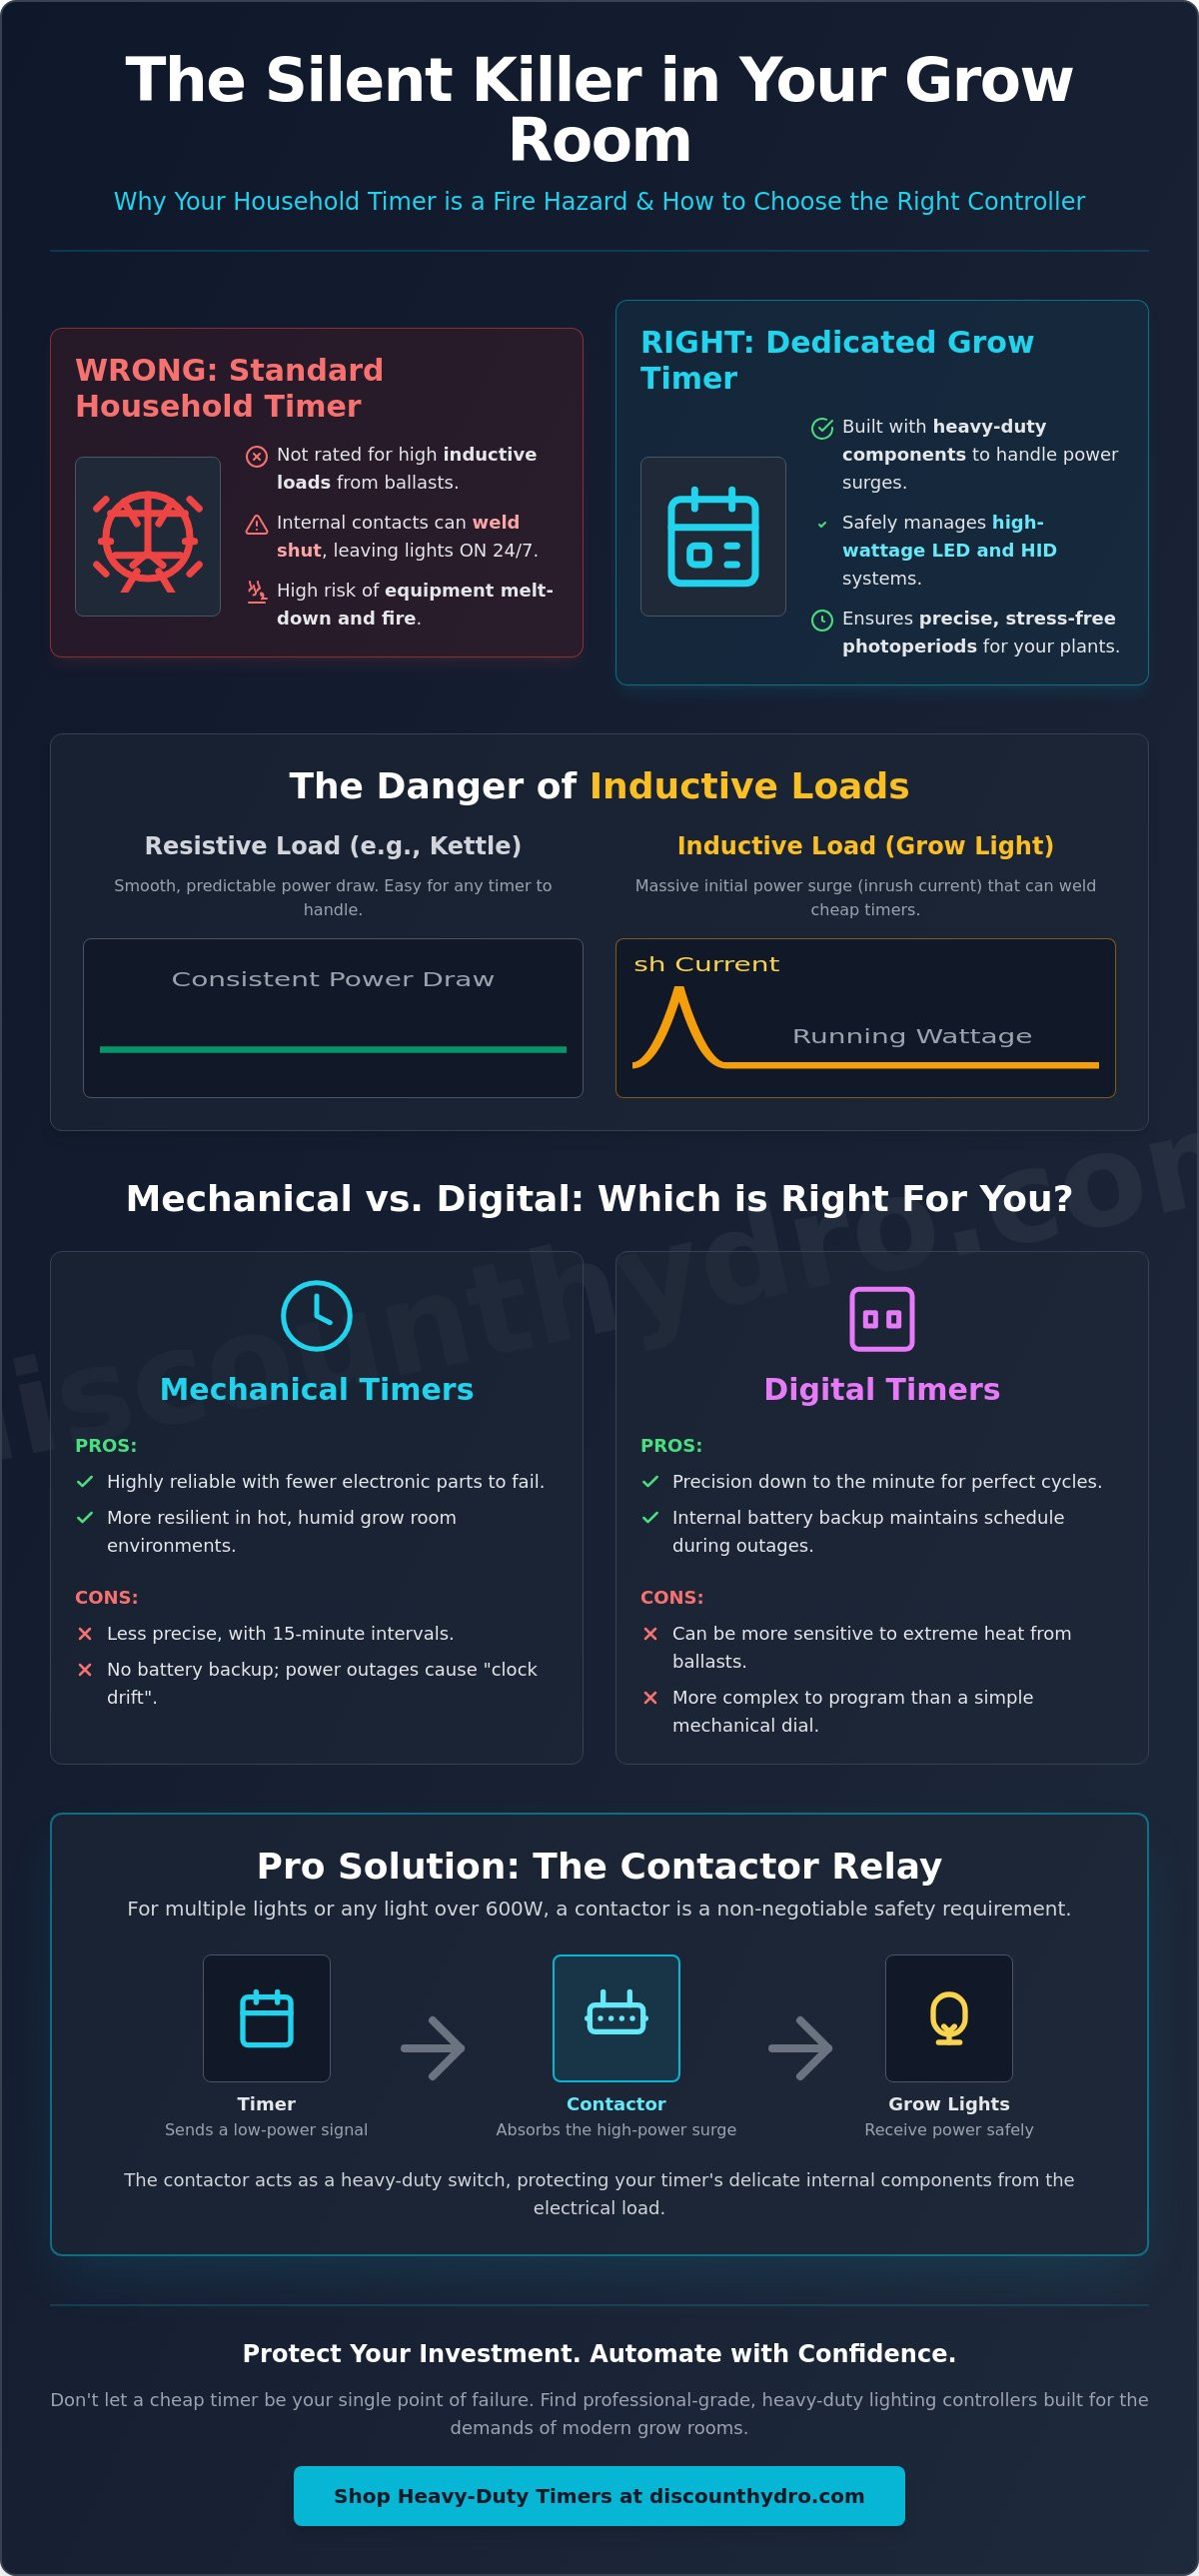
A standard household timer is the fastest way to melt your equipment and risk a fire in your grow room. These cheap components can't handle the high inductive loads of professional ballasts. They often weld shut, leaving your lights on and ruining your crop's photoperiod. You've invested in high-efficiency LED lights rated at 3.0 µmol/J or more, so don't let a budget plug-in be your single point of failure. Selecting dedicated light control timers is the only way to ensure your environment stays safe and your plants remain stress-free.
A standard household timer is the fastest way to melt your equipment and risk a fire in your grow room. These cheap components can't handle the high inductive loads of professional ballasts. They often weld shut, leaving your lights on and ruining your crop's photoperiod. You've invested in high-efficiency LED lights from LED Grow Lights Depot rated at 3.0 µmol/J or more, so don't let a budget plug-in be your single point of failure. Selecting dedicated light control timers is the only way to ensure your environment stays safe and your plants remain stress-free.
It's stressful to worry about plants herming due to timer failure or light leaks while you're away. You need a setup that's both reliable and automated. This guide will help you master the art of photoperiod management and select heavy-duty controllers that protect your expensive equipment. We'll break down the differences between mechanical and digital reliability, examine NEMA safety standards, and preview the latest automation tech. You'll learn how to choose the right gear to keep your grow room running smoothly and safely every day.
Key Takeaways
- Learn to identify the specific risks of inductive loads and why cheap components often fuse in the "ON" position.
- Master the calculation of total wattage draw to choose light control timers that won't fail under the pressure of professional ballasts.
- Discover the step-by-step method for synchronising your timers with real-world schedules to maintain a perfect, stress-free photoperiod.
- Find out how to troubleshoot "sticky relays" and clock drift to keep your automation accurate and your equipment safe.
- Explore the benefits of integrated contactor units for managing high-amperage, multi-light systems without electrical hazards.
What are Light Control Timers and Why Do Growers Need Them?
Light control timers are specialized electrical switches designed to manage the operational schedule of grow room equipment. Unlike standard home automation, these units act as the primary gatekeeper for high-wattage LED systems and HID ballasts. A time switch in a horticultural setting must handle inductive loads that would fuse the internal contacts of a basic domestic timer. Without this automation, achieving a consistent harvest is impossible because plants rely on specific light durations to regulate their internal hormones and growth stages.
Indoor environments lack the sun's natural movement, so you must simulate these cycles with absolute consistency. A 15-minute drift in a light cycle might seem minor, but it can trigger significant plant stress. Inconsistent "nights" often lead to hermaphroditism, where a plant develops male characteristics and ruins the quality of the entire crop. Precision isn't a luxury; it's a requirement for any serious indoor setup. Reliable timers ensure that your lights turn on and off at the exact same second every day, protecting your yield and your equipment from electrical surges.
Mechanical vs Digital Timers: The Pros and Cons
Mechanical timers, often called segment timers, use a rotating dial with physical pins. Each pin typically represents a 15-minute interval. These are highly reliable because they have fewer electronic components to fail in humid environments. However, they lack a battery backup. If you have a power cut for 3 hours, your light cycle will be 3 hours behind schedule until you manually reset it.
Digital timers offer precision down to the minute. Most professional models include an internal battery backup to keep the clock running during outages. While they offer complex scheduling, they can be more sensitive to the extreme heat generated by large ballasts. For most single-light setups, a heavy-duty mechanical timer is the most resilient choice against the heat of a grow room. If you need to run multiple schedules or want to-the-minute accuracy, digital light control timers are the better investment.
The Importance of Photoperiod Management
Your plants track time to determine their life stage. During the vegetative stage, a common 18/6 cycle (18 hours of light, 6 hours of darkness) encourages rapid leafy growth and strong stems. This mimics the long days of mid-summer. When you're ready for production, you must switch to a strict 12/12 cycle. This 12-hour period of uninterrupted darkness is the biological trigger for flowering and fruit development. Even a tiny light leak or a timer that stays "on" when it shouldn't can confuse the plant. This often causes it to revert to vegetative growth or produce seeds. Using high-quality light control timers eliminates human error, ensuring your plants stay on track for a high-yield finish without the risk of accidental light stress.
Choosing the Right Timer for High-Intensity Lighting
A standard plug-in timer might claim to handle 13 Amps, but that rating usually applies to resistive loads like heaters or kettles. Grow lights use ballasts and drivers that create an inductive load. When these devices switch on, they create a massive surge of electricity. This inrush current can be several times higher than the running wattage. If your light control timers aren't built for this, the electrical arc will weld the internal metal contacts together. This is why cheap timers fuse in the ON position, leaving your lights running for 24 hours straight and potentially ruining your crop's flowering cycle.
Modern LED grow lights, even those hitting professional efficiency levels of 3.0 µmol/J, still require careful timer selection. While they use less power than old HPS systems, their drivers still produce significant startup surges. Using energy-saving lighting controls is essential for efficiency, but only if the hardware can survive the daily stress of these high-power draws. You need a timer specifically rated for high-intensity discharge (HID) or high-wattage LED loads to ensure longevity and safety.
Why You Might Need a Contactor
A contactor is a heavy-duty relay that takes the electrical burden away from the timer's delicate clockwork. Instead of the timer switching the light directly, it simply tells the contactor to click over. The contactor then handles the massive surge from the mains. If you're running more than one 600W light, or a single high-power LED over 600W, a contactor isn't optional; it's a safety requirement. Moving to a multi-way relay box allows you to automate several lights from one master clock safely. You can find professional-grade heavy-duty lighting controllers that integrate these contactors for a plug and play setup.
Top Features to Look For
Look for units with an internal battery backup. If you suffer a power cut at 2 AM, a digital timer without a battery will reset to 00:00, throwing your entire photoperiod out of sync. Mechanical models should have sturdy, tactile segments that won't snap off easily. High-quality internal relays are the most important feature. Check for NEMA-compliant housings that resist the high humidity and heat found in active grow tents. Finally, ensure there's an easy-access manual override switch. This allows you to turn the lights on for quick maintenance during the dark hours without messing up your programmed light control timers.
How to Set Up and Programme Your Light Timer
Setting up light control timers correctly is the difference between a bumper harvest and a failed crop. Before plugging anything in, calculate your total wattage draw. If you're running a 600W HPS or a high-efficiency LED, ensure the timer or contactor is rated for that specific surge. A safe rule is to never exceed 75% of the timer's rated capacity to account for heat and long-term wear. Overloading a timer leads to internal heat buildup and eventual component failure.
Synchronise the clock with real-world time immediately. For the vegetative stage, most growers use an 18/6 cycle (18 hours of light and 6 hours of darkness). When you're ready to trigger flowering, shift to a strict 12/12 cycle. Accuracy matters. Even a 20-minute deviation caused by a poorly set clock can stress plants and reduce yields. Once programmed, use the manual override switch to test the connection, then return it to "Auto" mode to ensure the trigger engages at the scheduled time.
Final placement is a safety priority. Mount your timer on a wall or a dedicated board outside the grow tent. Keeping it away from high-humidity areas prevents corrosion of the internal metal contacts. Manage your cables using ties or clips to avoid "spaghetti" wiring. Bundled cables trap heat and create fire hazards, especially when carrying the high amperage required for professional lighting systems.
Setting Up a Mechanical Segment Timer
Mechanical timers use physical pins or segments, usually representing 15-minute intervals. On most models, pushing the segments down turns the light ON, while pulling them up turns it OFF. Always double-check the side switch; it must be set to the "Clock" or "Timer" icon. If it's set to "I" or "Always On," your programme will be ignored. Rotate the central dial clockwise only. Turning it anticlockwise can strip the plastic gears and ruin the timing mechanism.
Programming a Digital Grow Room Timer
Digital light control timers allow for to-the-minute precision and complex scheduling. Use the "Week" button to select a Monday through Sunday group setting to ensure the cycle repeats every day without gaps. Most units feature a "Random" or "Vacation" mode designed for home security. Never use this for plants. Plants require a predictable photoperiod to regulate growth hormones. If the screen is blank after months of storage, plug the unit into a socket for 2 hours to charge the internal battery before you start programming.
Common Mistakes and Troubleshooting
The most frequent failure in a grow room is the "Sticky Relay" problem. This occurs when the internal contacts of your light control timers weld together due to the electrical arc created during startup. If you walk into your grow room during the scheduled dark period and find the lights still running, your timer has fused in the ON position. This usually happens when using a domestic-grade timer with a high-wattage ballast. Once a relay sticks, the unit is permanently damaged and must be replaced immediately to avoid further disruption to your plant's hormones.
Clock drift is another issue that affects mechanical models. These timers rely on the frequency of your mains electricity to keep time. In environments with heavy electrical interference or extreme heat, the gears can slip, causing the clock to lose 5 to 10 minutes every week. You should check your timer against your phone's clock every 14 days to ensure your photoperiod remains accurate. If the drift is significant, it's a sign that the internal motor is struggling and a failure is imminent.
Daisy-chaining multiple light control timers or plugging them into cheap, unbranded extension leads is a major fire risk. Most domestic extension leads are rated for resistive loads, not the high-amperage startup spikes of grow lights. Plugging a 600W light into a timer, which is then plugged into a 4-way lead, creates a bottleneck of heat. This can melt the plastic housing of the socket long before a fuse ever blows. Always plug your primary lighting timer directly into a high-quality wall socket or a dedicated contactor relay box.
Digital light control timers often feature bright backlit screens or glowing "Power" LEDs. While helpful for programming, these small light sources can cause issues during the 12/12 flowering cycle. Even a tiny amount of light can prevent plants from entering deep sleep, leading to stunted growth or hermaphroditism. Cover any glowing LEDs or digital displays with a small piece of black electrical tape to ensure total darkness within the tent.
Safety Checks for Grow Room Electronics
Inspect your plugs and sockets every 30 days. Look for any signs of browning, discolouration, or soot around the pins, as this indicates arcing or overheating. Keep all timers and electrical connections at least 1 metre away from humidifiers and nutrient reservoirs to prevent moisture ingress. A professional-grade heavy-duty timer typically provides a reliable service life of 12 to 24 months when operating under constant 24/7 horticultural loads. If your gear is older than two years, replace it before it fails. Upgrade to a professional heavy-duty lighting controller to prevent these common electrical failures.
What to Do if Your Timer Fails
If your timer fails and interrupts the photoperiod, you must act quickly to reset the plant's internal clock. If the lights stayed ON too long, give the plants an extra-long dark period of 12 to 18 hours to allow their hormones to stabilise before resuming the normal cycle. If the lights stayed OFF, simply turn them back on and resume the schedule as soon as possible. To identify the fault, plug a simple desk lamp into the timer; if the lamp doesn't turn on, the timer is dead. If the lamp works but your grow light doesn't, the issue lies with your ballast or bulb.
Heavy-Duty Solutions: Professional Timers at Discount Hydro
Professional growers don't use standard household electronics because they aren't designed for the intense demands of a 24/7 indoor environment. At Discount Hydro, our inventory focuses on horticultural-grade components from industry leaders like Omega and Lumii. These light control timers feature reinforced internal relays and flame-retardant housings that meet strict safety standards. Whether you're running a single tent or a multi-light room, using equipment built for high-amperage draws is the only way to ensure your facility remains safe and your photoperiod stays accurate.
Matching your led grow light to the correct controller is critical for performance. High-efficiency 2026 models reaching 3.0 µmol/J and above often have high-capacity drivers that generate significant inrush current. A basic timer will fail under this stress. Our range of heavy-duty solutions is curated to handle these modern loads, providing a reliable link between your mains power and your expensive lighting investment. We prioritize stock that offers the best price-to-performance ratio, ensuring you get commercial-grade reliability without the premium markup.
Contactor Lead Sets vs Standard Timers
Contactor lead sets provide a professional-grade safety buffer that standard plug-in timers can't match. These units use a heavy-duty relay to switch the power, meaning the timer itself never carries the full electrical load. This setup is ideal for 600W HPS systems or the newer 720W LED fixtures. Investing in a contactor set is a pragmatic move to protect your wider hydroponics equipment from electrical surges. It's a small upfront cost that prevents the total loss of a crop due to a fused timer or a localized fire.
Building a Reliable Grow Room Automation System
Automation doesn't stop at lighting. A truly efficient system combines light control timers with fan speed controllers and pump timers. Automating the delivery of hydroponic nutrients via timed irrigation pumps ensures your plants receive consistent feeding without human error. This level of precision leads to faster growth rates and heavier yields. Use this final checklist to ensure your indoor garden is fail-safe:
- Verify that all timers are rated for the specific wattage of your ballasts or pumps.
- Check that your lighting contactor is mounted vertically to allow for maximum heat dissipation.
- Ensure your nutrient pump timer has a resolution of at least 1 minute for precise feeding cycles.
- Test your fan speed controllers to ensure they maintain negative pressure when the lights turn off.
- Replace any mechanical timers that show more than 10 minutes of clock drift per month.
Automate Your Grow Room for Maximum Safety and Yield
Reliable automation is the foundation of a successful indoor garden. You now understand why domestic electronics fail under the pressure of high-intensity ballasts and why heavy-duty light control timers are essential for fire safety. By matching your equipment to the correct inductive load rating and maintaining a strict photoperiod, you protect both your investment and your plants' health. Consistency in the 12/12 and 18/6 cycles ensures your crop stays on track without the stress of hormonal fluctuations or accidental light interruptions.
Don't risk a fused relay or a ruined harvest with sub-par components found in standard hardware shops. We stock specialist horticultural-grade equipment specifically designed to handle the massive startup surges of modern 720W LED and 600W HPS systems. Our team provides expert technical support to help you choose the right configuration for your specific setup. Benefit from our UK-wide fast delivery and secure your grow room with warehouse prices today. We ensure every component meets the pragmatic needs of serious growers.
Shop our range of heavy-duty light timers and contactors and take the stress out of your daily grow room management. Your plants will thrive under a perfectly timed, automated environment.
Frequently Asked Questions
Can I use a standard household timer for my 600W grow light?
No, you shouldn't use a domestic timer for a 600W light. These units are rated for resistive loads like lamps or kettles. Grow lights create an inductive load with a massive startup surge. This surge often exceeds the capacity of standard 13A domestic components, leading to internal failure or fire risks in your grow room.
Why did my light timer melt or fuse shut?
Your timer fused because the electrical arc created during startup welded the internal metal contacts together. This usually happens when a timer is under-rated for the inductive load of a ballast. Once fused, the timer remains in the ON position permanently. This is a common safety failure in low-quality light control timers that lack heavy-duty relays.
What is the best light cycle for indoor plants in the vegetative stage?
The 18/6 cycle is the industry standard for the vegetative stage. This provides 18 hours of light and 6 hours of total darkness. This schedule mimics the long days of mid-summer, encouraging plants to develop strong stems and dense foliage. Maintaining this cycle with 100% consistency is vital to prevent growth stalls or hormonal stress.
Should I choose a mechanical or digital timer for my grow room?
Choose a mechanical segment timer if you want maximum reliability in hot, humid environments. They are simpler and less likely to fail due to internal circuit heat. Digital timers are better if you need to-the-minute precision or have frequent power cuts, as they include a battery backup. For most simple 12/12 flowering cycles, a heavy-duty mechanical unit is the most pragmatic choice.
Do LED grow lights need a special type of timer?
LED grow lights require heavy-duty light control timers despite their overall energy efficiency. High-performance LEDs, reaching 3.0 µmol/J, use drivers that produce significant inrush currents when they first click on. If your timer isn't rated for high-wattage LED drivers, the internal components will wear out or fuse just as quickly as they would with old HPS ballasts.
How do I know if my timer is overloaded?
You can identify an overloaded timer by checking the temperature of the plug pins and the plastic casing. If the unit feels hot to the touch or shows any brown discolouration, it is failing. Smelling burning plastic or hearing a buzzing sound are critical warning signs. These symptoms indicate that the electrical draw is exceeding the safe operating limits of the device.
What happens to my plants if the timer fails during the dark cycle?
Plants experience severe hormonal stress if the timer fails and leaves the lights on during the dark cycle. Flowering plants may revert to the vegetative stage or develop male flowers, which ruins the quality of your entire harvest. If the lights stay off, growth will stall until you manually reset the photoperiod and stabilize the light schedule.
Is it safe to plug a timer into an extension lead?
It is not safe to plug a high-power timer into a standard domestic extension lead. Most 4-way leads are rated for a total of 13 Amps, but they struggle with the heat generated by the continuous draw of grow lights. Plugging your timer directly into a wall socket or using a professional contactor relay is the only way to avoid melting your sockets or causing a fire.