
How to Clean a Hydroponic System Between Grows: The Ultimate Checklist
Last month, a grower in County Durham lost a £1,400 harvest to Pythium simply because they missed one hidden reservoir corner during their reset. It's a brutal way to learn that your equipment is only as good as your last deep clean. You likely already understand that a quick rinse is never enough to protect your investment from stubborn salt deposits or pathogens that survive in the shadows of your irrigation lines.
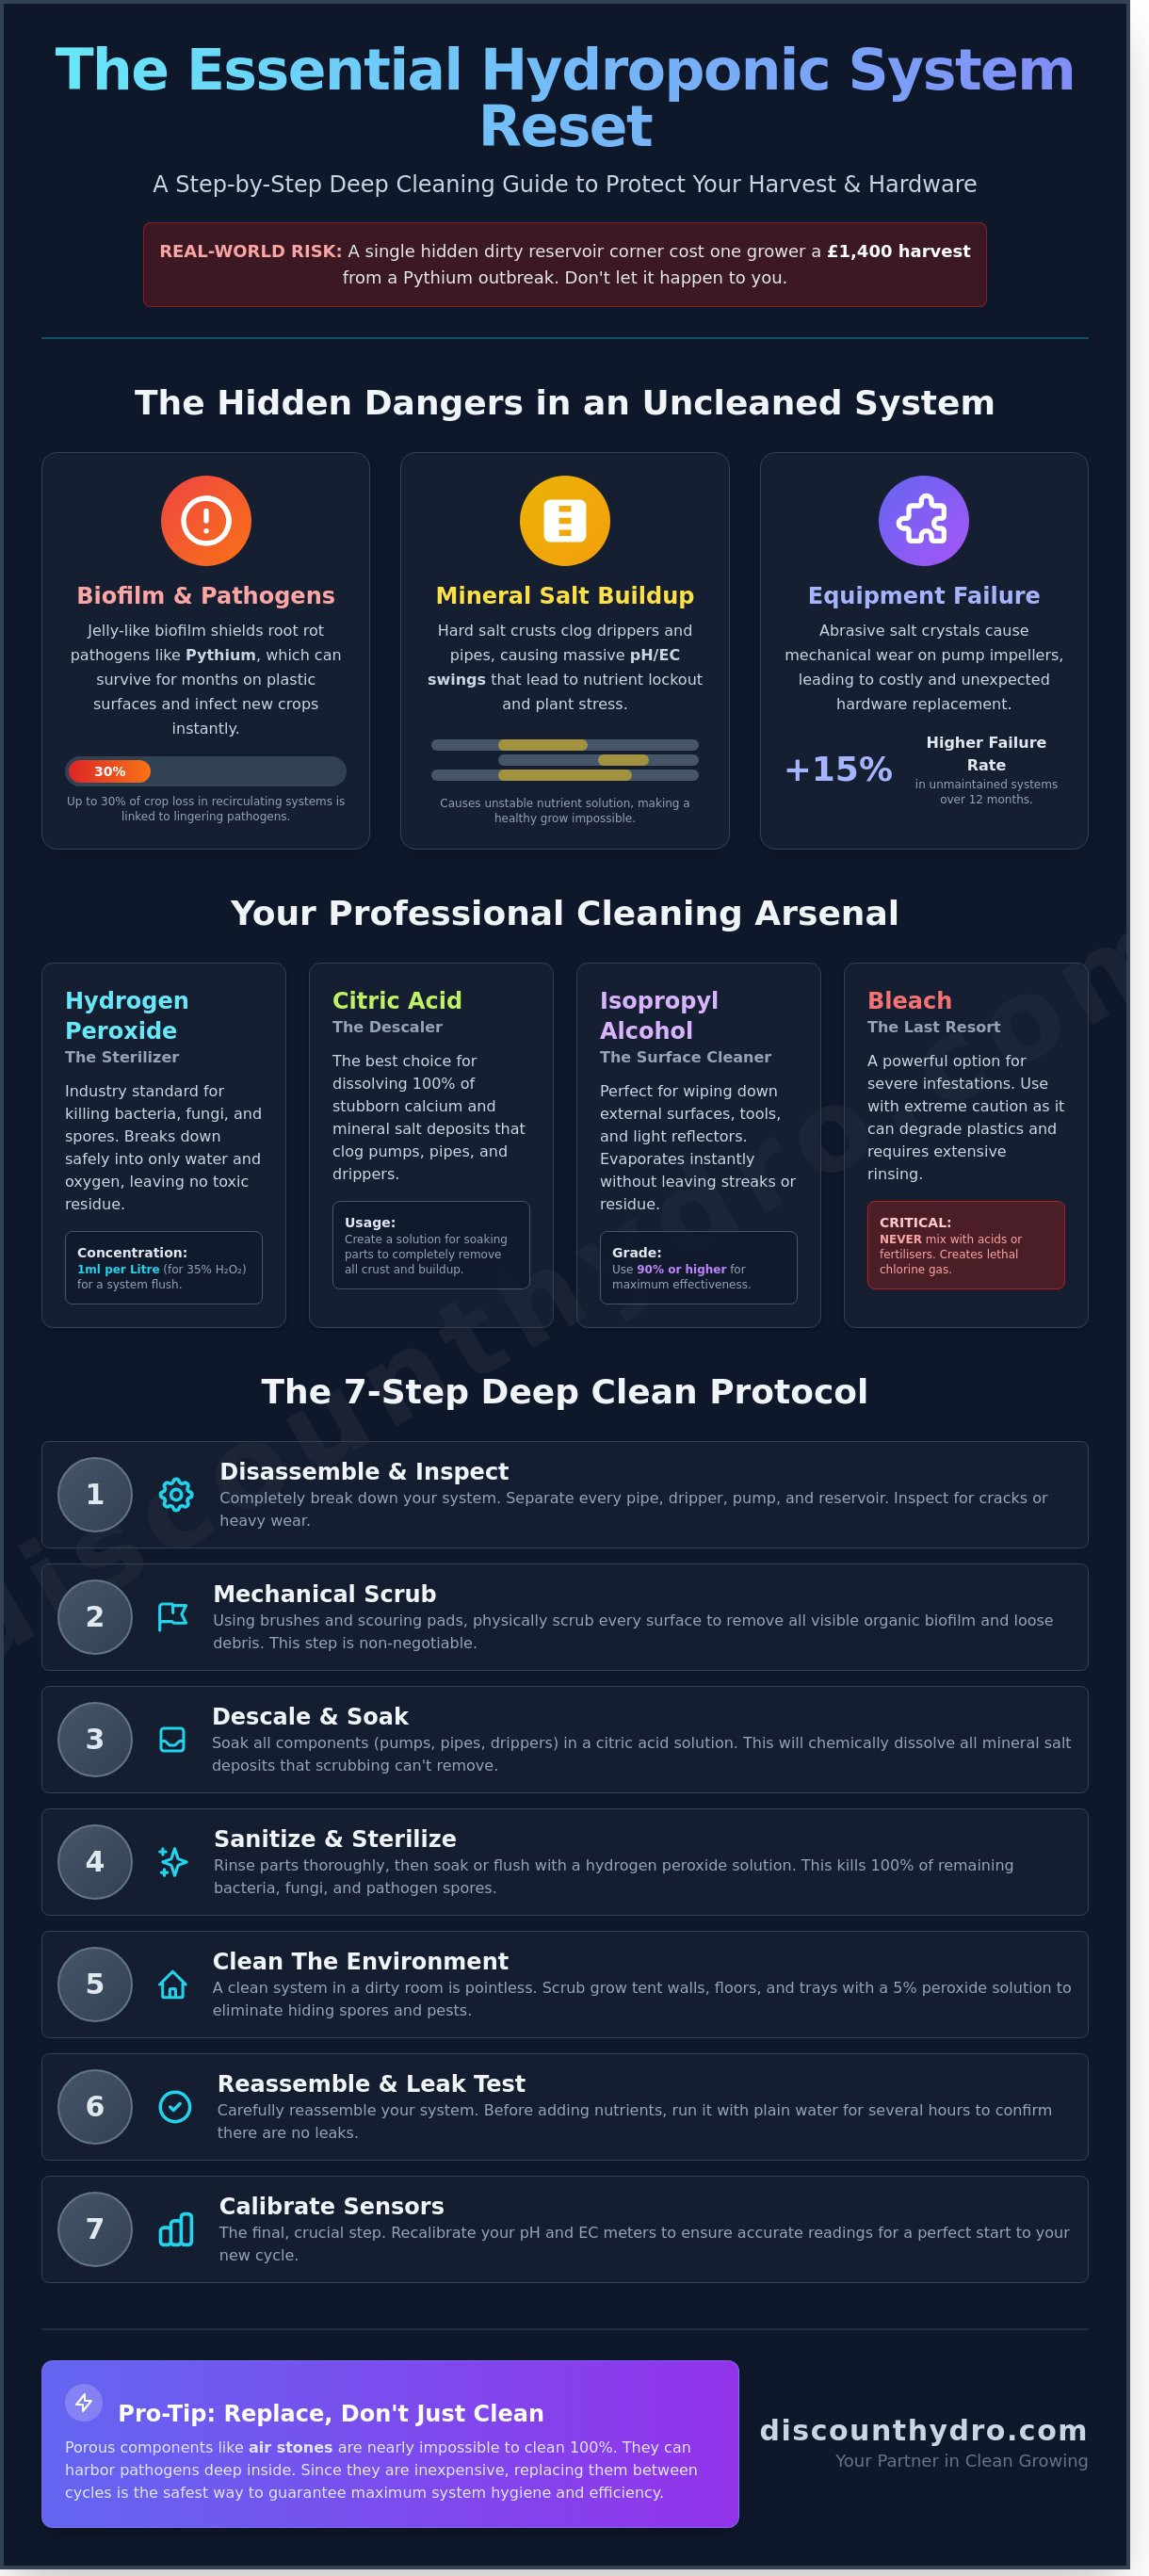
Cleaning a hydroponic system between grows is the only way to guarantee a sterile environment and keep your £80 pumps running at full capacity for several years. We've put together the ultimate checklist to help you sanitise every pipe, dripper, and tank without damaging your expensive hardware. You'll learn exactly which professional-grade chemicals are safe for your specific kit and how to eliminate 100% of lingering bacteria before your next cycle starts. We're breaking down the entire process into manageable steps so you can focus on hitting your next yield target instead of fighting avoidable diseases.
Key Takeaways
- Identify the hidden risks of organic biofilm and learn how to stop pathogens like Pythium from compromising your next crop.
- Master the use of professional-grade agents like hydrogen peroxide and citric acid to effectively dissolve stubborn mineral salt deposits.
- Follow a rigorous step-by-step guide for cleaning a hydroponic system between grows, including full disassembly and mechanical scrubbing techniques.
- Discover why certain components like air stones are often better replaced than cleaned to maintain maximum system efficiency and hygiene.
- Learn how to perform a final system reset, including essential leak testing and the correct way to recalibrate your pH and EC sensors.
The Risks of Neglecting Your Hydroponic System Between Cycles
Cleaning a hydroponic system between grows is a mandatory maintenance task that directly impacts your bottom line. This process involves the total removal of organic biofilm, stubborn mineral salts, and latent pathogens that survive the harvest period. If you ignore this step, you're leaving your next crop vulnerable to issues that are 100% preventable. A single neglected reservoir can harbour enough bacteria to compromise a 50-plant setup in less than 72 hours. Resetting the hardware ensures your new seedlings start in a neutral, pathogen-free environment where they don't have to compete with the leftovers of the previous cycle.
Biofilm and Pathogen Risks
Stagnant nutrient solution creates a thick, jelly-like slime known as biofilm. This organic layer acts as a protective shield for pathogens, making them resistant to basic water flushes. Pythium, the primary cause of root rot, thrives in these conditions and can survive on plastic surfaces for several months without a host. If you don't scrub these surfaces, the infection will transfer to your new root systems immediately. Pests like fungus gnats also find refuge in organic debris left in the trays. Their larvae can survive 14-day dry spells between cycles, ready to emerge as soon as you refill the tanks. Professional growers report that up to 30% of total crop loss in recirculating systems is linked to these lingering pathogens.
Mineral Salt Accumulation
Nutrient solutions are highly concentrated, and as water evaporates, they leave behind a hard salt crust. This build-up is most aggressive around drippers, spray heads, and the interior of 13mm or 19mm piping. These old deposits cause massive pH fluctuations as they slowly dissolve back into your fresh solution, making it impossible to maintain a stable environment. They also skew the EC (Electrical Conductivity) of your reservoir, leading to nutrient lockout or toxicities. For those who need a refresher on how these variables affect growth, our beginner guide to hydroponics explains the fundamentals of water chemistry. Beyond plant health, salt crystals are abrasive. They increase mechanical wear on pump impellers, leading to a 15% higher failure rate in unmaintained systems over a 12-month period. Replacing a £150 pump is a high price to pay for skipping a basic cleaning routine.
- Biofilm: Protects bacteria from standard sanitisers.
- Pythium: Causes root rot and lingers in uncleaned plastic.
- Salt Crust: Blocks drippers and causes pH instability.
- Mechanical Failure: Increases the cost of equipment replacement.
Essential Cleaning Agents and Tools for a Sterile Grow Room
Success in any grow room starts with a sterile foundation. When you're cleaning a hydroponic system between grows, you can't rely on soap and water alone. You need high-grade chemicals that strip away mineral salts and kill pathogens without damaging your equipment. Using the wrong agents can leave residues that stunt young plants or fail to kill off dormant spores that ruin your next harvest.
Hydrogen Peroxide (H2O2) is the industry standard for oxygenating and sterilising. It’s an oxidiser that kills bacteria and fungi on contact. It breaks down into oxygen and water, so it won't leave behind toxic residues. Food-grade Citric Acid is the best choice for descaling your hardware. It dissolves 100% of the stubborn white calcium and nutrient salt deposits that clog pumps and drippers. For external surfaces, Isopropyl Alcohol (90% or higher) is the standard for wiping down tools and light reflectors because it evaporates instantly without leaving streaks. Bleach remains a powerful last resort. Use it only for severe infestations like root rot, as it can degrade plastic components and requires extensive rinsing to be safe.
Chemical Safety and Concentrations
Handling concentrated chemicals requires precision. If you use 35% food-grade H2O2, dilute it to 1ml per litre of water for a standard system flush. If you're using the weaker 3% H2O2 found in most pharmacies, you'll need roughly 11ml per litre to achieve the same effect. Don't ever mix bleach with acids or fertilisers; this creates lethal chlorine gas. Always wear nitrile gloves and wrap-around eye protection. A single splash of 35% peroxide can cause immediate chemical burns on the skin.
Sanitising the Wider Environment
Cleaning a hydroponic system between grows must extend to the entire room. Spores and pests hide in the folds of your grow tent. Scrub the walls and floors with a 5% peroxide solution to ensure a sterile environment. This process is a vital part of spider mite prevention during your room reset. Don't forget your lighting. Use a microfibre cloth to wipe dust from LED heat sinks and reflectors. Even a 0.5mm layer of grime can reduce your light intensity by 10% or more, which directly impacts your final yield. You can find all the necessary hydroponic maintenance tools at the best prices in our shop to keep your gear running at peak efficiency.
Step-by-Step: Deep Cleaning Your Hydroponic Setup
Cleaning a hydroponic system between grows is the most effective way to prevent crop failure. Pathogens like Pythium can survive in dry residue for months. You need a systematic approach to ensure your next cycle starts in a sterile environment. This process requires roughly 48 hours to complete properly. Don't rush the stages. A single missed corner can lead to a 20% reduction in plant health within the first three weeks of growth.
Phase 1: The Tear Down and Scrub
Start by disconnecting every component. Remove all pumps, manifolds, and delivery lines from the reservoir. You must strip the system down to its individual parts. Use a soft nylon brush to clean the surfaces. Avoid wire brushes or abrasive pads. Hard bristles create 0.5mm micro-scratches in plastic. These tiny grooves act as havens for bacteria that standard flushes won't reach.
- Remove Root Matter: Use a plastic scraper to clear every millimetre of dead root material from the trays and buckets.
- Target the Water Line: Biofilm accumulates most heavily at the "tide mark" in your reservoir. Scrub this area until the surface feels smooth to the touch.
- Pump Maintenance: Open the pump housing and clear the impeller. Organic sludge here reduces flow rates by up to 15%.
Phase 2: The Recirculating Flush
Physical scrubbing isn't enough for the internal plumbing. You need a chemical solution to reach the inside of 13mm and 19mm pipes. Fill your reservoir with clean tap water and add a high-strength oxidiser. Use 12% food-grade hydrogen peroxide (H2O2) at a ratio of 20ml per litre of water. This concentration is strong enough to dissolve mineral salts and kill algae spores without damaging the PVC components.
Run the system for 24 hours. Ensure the H2O2 solution cycles through every dripper and return line. Monitor the water colour during this period. If the water turns brown or cloudy, it means the solution is successfully breaking down salt build-up from previous nutrient cycles. These salts often cause pH fluctuations if left inside the lines. After the 24-hour cycle, drain the system completely.
Once the chemical flush is finished, perform a final rinse. Use pH-neutral water at 7.0 to flush out any remaining H2O2 or loosened debris. Run this rinse for 30 minutes. This ensures no chemical traces remain to interfere with your new nutrient solution.
The final step is total drying. Leave the entire setup disassembled in a room with 40% humidity for at least 48 hours. Air is a natural steriliser. Most aquatic pathogens cannot survive in a completely dry environment for more than 24 hours. Ensure every pipe and fitting is bone dry before you begin cleaning a hydroponic system between grows for the next cycle. This dry time is your final insurance policy against root rot.
Advanced Sanitisation: Pumps, Lines, and Reusable Media
When cleaning a hydroponic system between grows, you've got to look past the reservoir. Pathogens and mineral salts hide in the mechanical components. Biofilm, a microscopic layer of bacteria only 0.1mm thick, can reduce your pump's efficiency by 15% and serve as a breeding ground for root rot. To clear your irrigation lines, use a high-pressure flush with a 10% bleach solution. For stubborn blockages in 13mm or 19mm piping, a flexible pipe brush is the only way to manually strip away internal scale. If your lines are stained or brittle, don't waste time scrubbing; replace them for a few pounds to ensure a sterile start.
Air stones are another common failure point. Because they're made from porous materials like blue sandstone, bacteria lodge deep inside where liquid disinfectants can't reach. A standard 50mm air stone costs roughly £2.00. Replacing it's a smarter investment than risking a £400.00 crop on a contaminated stone. If you use high-end ceramic diffusers, you can boil them for 20 minutes, but for standard equipment, binning them is the safest and most cost-effective route.
Restoring Pump Performance
Take the pump apart by removing the impeller housing. Pull out the magnetic rotor and wipe the shaft clean of slime. If you see white crusting, soak the parts in a 10% citric acid solution for 30 minutes to dissolve limescale. Before committing to a new grow, time how long the pump takes to fill a 10-litre bucket. If it's significantly slower than its 300L/hr factory rating, the internal motor is likely failing and needs replacing.
To Reuse or Replace Growing Media?
A 50L bag of clay pebbles costs about £18.00. If you're only using 10 litres, your time is worth more than the savings; just buy new. For larger setups, cleaning a hydroponic system between grows includes sterilising pebbles with a 48-hour soak in 12% H2O2 followed by a thorough rinse. Never reuse coco coir or soil in a sterile hydro setup. These organic materials trap pathogens that survive even the strongest flushes, making them a one-use item.
The Final Reset: Testing and Calibrating for Your Next Crop
Reassembling your setup is the final stage of cleaning a hydroponic system between grows. You've scrubbed the tanks and flushed the lines, but the reset isn't complete until you verify the integrity of every seal. Tighten every bulkhead, John Guest fitting, and hose clamp. A single loose connection can lead to a 20-litre flood once the pumps reach full pressure. This phase ensures your environment is stable before you risk expensive new genetics.
Instrument Calibration
Digital sensors are the most common point of failure in a new grow. During the "gap time" while the system is empty, pH probe glass bulbs often dry out or develop a salt crust. This leads to sensor drift, where your meter might read 6.0 when the actual value is 5.5. Clean the glass bulbs using a dedicated probe cleaning solution and a soft brush. Follow this by soaking the probe in KCL storage solution for at least 4 hours to rehydrate the reference junction.
- Verify EC Accuracy: Use a standard 1.41 mS/cm or 2.76 mS/cm calibration fluid. If the reading is off by more than 0.1, recalibrate the device immediately.
- Battery Maintenance: Replace the batteries in your handheld pens. Low voltage often causes erratic readings that can lead to nutrient lockout within the first 7 days of growth.
- Storage: Always keep probes in storage solution between uses to prevent the internal reference gel from leaching out.
System Priming and Leak Check
Fill your reservoir with plain tap water and run the pumps at 100% capacity for a full 2-hour test cycle. This duration is vital because heat from the pumps can slightly expand PVC pipes, potentially revealing slow drips that aren't visible during a 5-minute flick-test. Check every T-junction and elbow. If you find a leak, drain the system and reseal the joint before adding any expensive additives.
Once the plumbing is secure, position your LED grow lights at the correct starting height. For most 600W LED arrays, a distance of 60cm to 75cm from the top of the pots prevents light stress on young seedlings. Check your PAR levels if you own a quantum meter; aim for 200-300 µmol/m²/s for the first week.
Finalise the reset by mixing a fresh batch of quality hydroponic nutrients at 25% strength. Use a base nutrient with a proven N-P-K ratio to encourage root development without burning delicate tissue. Check the pH one last time after the nutrients have circulated for 30 minutes.
Success starts with the right gear and the best maintenance supplies. Visit Discount Hydro for the UK’s best prices on cleaning solutions, calibration fluids, and premium nutrients to kickstart your next cycle.
Prepare Your System for Maximum Yields
Success in the grow room starts with a sterile environment. Neglecting the buildup of mineral salts and biofilm can slash your next harvest by 20% or more. By following a strict 5-step sanitisation routine, you eliminate 95% of the pathogens that threaten root health. Proper cleaning a hydroponic system between grows isn't just about appearances; it's about protecting your profits and ensuring your equipment lasts for years. Resetting your pumps and recalibrating your meters to 100% accuracy ensures your plants get exactly what they need from the very first hour.
This principle of diligent maintenance to protect a valuable water-based system extends beyond the grow room. For instance, outdoor equipment like hot tubs also requires proper protection to maintain hygiene and prevent damage. If you're looking to safeguard that kind of investment, you can check out Northern Hot Tub Covers for custom-fit solutions.
Don't let a dirty system ruin your next crop. We stock everything you need to maintain a professional-standard setup. Our County Durham experts provide specialist advice to help you choose the right tools for the job. You'll find massive savings on leading nutrient brands and essential cleaning agents right here. We offer fast UK-wide delivery on all orders to keep your downtime to a minimum.
Browse our full range of cleaning supplies and hydroponic kits at the UK’s best prices
Take control of your environment today and get ready for your most successful grow yet.
Frequently Asked Questions
Can I use washing up liquid to clean my hydroponic reservoir?
You shouldn't use washing up liquid because it creates foam that can clog your pumps and leaves a film on your reservoir walls. This residue can affect plant health by altering 100% of the water's surface tension. Stick to dedicated horticultural cleaners like Silver Bullet or RoomClean to ensure your gear stays sterile without the risk of suds or chemical residues.
How long should I soak my clay pebbles in hydrogen peroxide?
Soak your clay pebbles in a 3% hydrogen peroxide solution for 24 hours to kill 99.9% of pathogens and algae. This duration ensures the solution penetrates the deep, porous surface of the expanded clay media. After the 24 hour soak, rinse them thoroughly with pH-balanced water until the runoff is clear and free of debris.
Is it safe to use bleach in a plastic hydroponic system?
It's safe to use a 10% bleach solution in plastic hydroponic systems if you rinse it out thoroughly within 30 minutes. Use 100ml of bleach for every 1 litre of water to scrub down tanks and trays. Don't leave high concentrations in contact with the plastic for longer than an hour, as it can cause the material to become brittle over time.
Do I need to clean my carbon filter and extraction fans between grows?
You must clean your extraction fans every 3 months and replace carbon filter pre-filters every 6 months to maintain airflow. Dust build-up on fan blades reduces efficiency by 20%, which forces your motor to work harder and increases power consumption. Wipe fan blades with a damp cloth and wash the white pre-filter sleeve in a 30 degree wash to keep your ventilation system running at 100% capacity.
How often should I replace my hydroponic irrigation lines?
Replace your hydroponic irrigation lines every 12 months to prevent blockages from biofilm and mineral deposits. Cleaning a hydroponic system between grows is more effective when you swap out 5mm or 13mm piping instead of trying to scrub the internal walls. Since 10 metres of piping costs less than £10, it's a cheap way to prevent a total crop failure caused by a blocked dripper.
What is the fastest way to dissolve nutrient salt build-up?
Use a 5% citric acid solution or a dedicated descaler like FlashClean to dissolve nutrient salts in under 2 hours. These acidic solutions break down the calcium and mineral bonds that form crusty white deposits on your pumps and pipework. Circulate the solution through your system for 60 minutes to clear internal blockages and restore your flow rates to 100%.
Can I clean my air stones or should I just buy new ones?
You should buy new air stones every 6 months because they're nearly impossible to sterilise completely. Bacteria hide in the tiny pores of the stone, and a new 50mm air stone costs as little as £1.50. If you're in a pinch, you can boil them in water for 10 minutes, but replacing them is the only way to guarantee a sterile start for your next cycle.
Does a UV steriliser replace the need for cleaning between grows?
A UV steriliser doesn't replace the need for cleaning a hydroponic system between grows. While it kills 98% of free-floating bacteria in the water during the cycle, it won't remove the physical salt crust or biofilm stuck to your trays. Use UV as a preventative measure during the grow, but perform a full manual scrub-down with a sterilising agent after every harvest.